Lesson for the younger group on "ladybug" appliqué. Summary of the application “ladybug”
DIY paper applique for preschoolers junior group. Master Class with step by step photos.
Application "Ladybug"
Lobacheva Anna, 2 years oldSupervisor: Chernikova Dina Nikolaevna, teacher at MBDOU kindergarten No. 1 village Staroye Melkovo, Tver region, Konakovsky district.
Description of material: this material designed for preschool children, teachers and parents.
Purpose: making gifts, participating in a competition, decorating the interior of a room.
Target: making applique using paper and plasticine.
Tasks:
- develop Creative skills in children;
- develop fine motor skills, artistic taste;
- cultivate accuracy while performing work.
This babe puts it on
The dress is red with polka dots.
And he can fly deftly
This is... (Ladybug)
Scientific name ladybug received thanks to its unusually bright color - Latin word"coccineus" corresponds to the concept of "scarlet". And the common nicknames given to the ladybug in many countries around the world speak of people’s respect and sympathy for this insect. For example, in Germany and Switzerland it is known as the "Virgin Mary's bug", in Slovenia and the Czech Republic the ladybug is called "Sun", and many Latin Americans know it as the "St. Anthony's bug".
The origin of the Russian name for ladybug is not exactly known. Some researchers are inclined to believe that this is due to the ability of the insect, in case of danger, to secrete “milk” - a special poisonous liquid (hemolymph) that repels predators. And “God’s” means meek, harmless. Others believe that these insects received the nickname “ladybugs” because they destroy aphids and help preserve crops.
To complete the work we will need:
ladybug toy; colored paper; white cardboard; plasticine; ruler; scissors; PVA glue; simple; cloth; black felt-tip pen; signets.

Work order:
1.Cut out a circle with a diameter of 8cm from red colored paper.


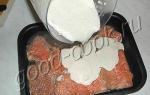
2. Coat the reverse side of the circle with PVA glue.

3.Glue the circle onto white cardboard (length 21cm, width 15cm) in the middle.

4.Using a black felt-tip pen, draw the head of the ladybug.


5.Then draw antennae and legs (6 pieces)

6.Using a ruler, draw a dividing line on the back, thereby separating the wings of the beetle. To make it easier for kids to navigate, you can draw dots in the places where plasticine balls should be stuck.

7. Let's make balls for the spots from black plasticine. Pinch off small pieces of plasticine and roll them into balls. Attach the balls to the back of the ladybug using the pressing method.

8.You can use signets: mushrooms and bugs.


9.What a beautiful ladybug we got.


Look quickly, Vovka!
This is a ladybug!
Little red circle,
Lots of black dots.
Opens its wings
It flies into the sky. (Yu. Dulepina)
Irina Firsova
Abstract of the NOOD on artistic creativity (application) for children of the junior group “Ladybug”
Abstract of NOOD
Educational area « Artistic creativity »
(applique)
Junior group
Subject: « Ladybug»
Preliminary work:
Observations on ladybug while walking.
Learning nursery rhymes " Ladybug".
Tasks:
Educational:
Expand Views children about ladybug;
Continue to learn how to put together a whole from parts, stick on ready-made blanks, based on a sample;
Consolidating knowledge about the shape of an object - a circle;
Consolidating ideas about red and black colors;
Fastening the count to two;
Reinforcing concepts "one is many", "big small".
Developmental:
Develop the ability to use glue and brush;
Develop fine motor skills, attention, orientation on a sheet of paper.
Educational:
Foster love and respect for living nature;
Cultivate accuracy and independence in work.
Integration: OO "Socialization", OO "Cognition", OO « Artistic creativity» .
Material: illustration with image ladybug, green landscape leaf in the shape of a plant leaf, ready-made forms for gluing (red circle cut in half; black circle) black plasticine, glue, brushes, napkins, oilcloths.
NOOD move.
Educator. Guys, spring has come outside. The sun began to warm up. You can find amazing bugs on plants. They are red in color and have black spots on them. Guys, have you guessed who it is? (Children answer).
Educator. That's right, that's ladybug. Look at her (shows an illustration of ladybug) .
Educator. Guys, tell me what ours has ladybug? (head and wings)
Educator. What color are the wings? ladybug? (red with black dots.)
Guys, look how many wings he has ladybug? (Two).
How many spots are there on the back? ladybug? (A lot of).
Well done! What shape is the back? ladybug? (Round).
What color is your head ladybug? (black).
Right! What shape is the head? ladybug(Round).
Guys, tell me which is larger, the body or the head? (torso).
That's right, the body is large, the head is smaller, and what size are the spots? (Little ones).
Educator. Well done, that's right, very small.
Physical training is being held « Ladybug» .
Ladybug,
black head, (children raise their hands to their heads.)
Fly to the sky (flapping their arms like wings).
Bring us some bread
Black and white (waving their hands towards themselves.)
Just not burnt. (They shake a finger.)
Educator. Well done! Have you rested? Let's continue. Look again carefully at our ladybug two red wings. And when they are put together, it turns out to be a circle.
U children ready-made ones lie on the tables templates: two halves of a red circle "wings" that need to be pasted on album sheet. The teacher pays attention children for that, What "wings" you need to fold it so that you get a circle. Reminds me of the gluing rules. The children get to work. Along the way independent work The teacher helps the children and praises them children
Educator. Well done boys! Now we need to glue it "head".
Children take a ready-made template: black circle. The teacher pays attention children for that, where is located "head" ladybug. The children get to work. During independent work, the teacher helps the children and praises them. children for correct execution and accuracy in work.
Educator. Look what wonderful bugs we have made, but for some reason they are sad. Why do you think? (They don't have black spots).
Educator. Right. There are not enough black spots on the wings. Now we will decorate the wings of our bugs with black spots, and we will make them from plasticine.
Children take black plasticine, pinch off a small piece of it, roll it out into a ball, and glue it onto the wings. The teacher pays attention children for that that the spots are small, round, and are located on the wings. During independent work, the teacher helps the children and praises them. children for correct execution and accuracy in work.
Educator. Well done boys! Look how beautiful they are you got ladybugs like real ones.
Publications on the topic:
Questionnaire for parents. Educational field "Artistic creativity" Questionnaire for parents. Dear parents! Please read the questions below carefully and mark the answer you choose or.
Application "Ladybug" Tasks: Repeat characteristics ladybug; arouse interest in nature; we consolidate working methods.
 From black paper and using a hole punch we make blanks of black dots for the ladybug. Cut out an oval from black paper.
"Nature surrounds us." Summary of the final NOOD in the educational areas “Cognition” and “Artistic Creativity” Objectives: Educational: to consolidate children’s knowledge about natural world. Developmental: develop children's thinking, imagination, and creative abilities.
Objectives: - to consolidate the skills and abilities of working with scissors: cut a circle from a square using the familiar method of “folding it in half twice” and a semicircle.
Summary of the drawing lesson “Ladybug” (middle group) Lesson notes on visual arts(Drawing) middle group "Ladybug". Developed and conducted by: Irina Viktorovna Rudinskaya.
Theme: "Ladybug"
second junior group
(“Goodbye, summer! Hello, kindergarten!”
Tasks: teach children how to properly stick (apply glue reverse side details, take a little glue on the brush, work on oilcloth, pressing the image to the paper with a napkin and the whole palm); develop concentration, attention, and the ability to act in accordance with the instructions of an adult; cultivate hard work and accuracy.
Integration educational areas: Artistic creativity, Cognition, Communication, Reading fiction, Labor.
Equipment: illustrations , a demonstration sample for the teacher, for children - blanks of parts (dots for a ladybug), an image of a ladybug, glue, brush, oilcloth, napkin.
Progress of activities.
I. Organizational moment.
II. Main part.
1. Guessing the riddle
This babe puts it on
The dress is red with polka dots.
And he can fly deftly
This is... (Ladybug).
2. Examination of illustrations.
3. Examination of illustrations-blanks for crafts.
What is the ladybug missing? (Black dots).
4. Preparing your fingers for work.
Finger gymnastics
Ladybug's daddy is coming. with all fingers right hand"walk" on the table
Mom follows behind dad. “walk” across the table with all fingers of your left hand
The kids follow their mother, " walk with both hands
Following them, the little ones wander.
They wear red suits. shake your own hands
Suits with black dots. tap your index fingers on the table
Dad takes the kids to kindergarten
After the game he will take everyone home. clap your hands
Productive activity.
a) examining the details of the craft;
b) placement of parts on the base sheet;
c) repetition of the rules for working with glue;
d) gluing parts;
d) cleaning the workplace.
5. Review of works, discussion.
6. Reading a poem.
I can fly deftly
Variegated ladybug.
The wings are red with dots,
As if in black circles.
In a bright holiday shirt
I'm saving the harvest.
I am a useful bug
Don't hurt me!
IN middle group Kindergarten children begin to get acquainted with the world around them. Adults can help them with this through creative tasks.
One of the popular methods is the “Ladybug” applique. During the lesson, the baby will learn about this unusual insect and gain new knowledge about color and geometric shapes.
There are several application options. Finished work used to decorate cards.
Creative activities in kindergarten or school are not just a way to keep kids busy.
In the course of their work, they acquire the skills necessary for development:
- learn to work with scissors;
- consolidate knowledge about color and shape;
- learn to choose the right color scheme;
- train attentiveness and perseverance;
- master safety precautions;
- develop fine motor skills of fingers;
- educate careful attitude to nature;
- form neatness.
The cow applique is made during school labor lessons and classes in the second junior group preschool. The craft is offered to be done at DPI club classes for younger schoolchildren. If a child likes to work with colored paper, then you can invite him to make one of the versions of this application at home.

At school or kindergarten, they most often make a classic paper applique, but at home, invite your child to make a three-dimensional version consisting of a larger number of elements.
Work for children 3-6 years old
With his own hands, a preschooler can make a craft from colored paper with different appearance. It is most interesting to work with volumetric appliqué. It helps develop imagination, looks more visual and authentic.
Volumetric applique is made using the following materials:
- colored paper in red, black and white;
- green cardboard - one sheet;
- glue stick or classic PVA;
- simple pencil and eraser;
- scissors, correctly selected in size;
- black felt-tip pen or marker;
- black wool thread.

For the wings of a three-dimensional craft, take only double-sided red paper, and make the remaining parts of the ladybug from single-sided paper.
For children younger age You need to make templates in advance (large and small circles, semicircle) or cut out parts of the ladybug yourself. Children over 4 years old can trace cardboard blanks themselves. Preschoolers aged 5-6 years are able to draw circles without templates, but they will be uneven. Students can use compasses instead of templates.
A three-dimensional ladybug craft is made as follows:
- The work begins with preparing the parts. From black paper you need to cut out: big circle, semicircle, 6 small circles.
- From the white one, cut out two small circles that will become the basis for the eyes.
- On the white circles you need to draw pupils with a black felt-tip pen (you can replace them with circles from a black sheet).
- Glue the eye blanks onto the semicircle representing the ladybug's head. The pupils can be directed towards each other.
- Make two large circles from a red piece of paper. Fold each piece in half to make the craft voluminous.
- Glue three dots to the first wing, spacing them evenly. In a similar way, decorate the second wing of the ladybug with spots.
- To assemble the craft, a cardboard base is used. Draw from cardboard and then cut out a large leaf. You can draw veins on it with a felt-tip pen to make the applique more reliable.

Paper applique can be made on different backgrounds or bases. It is acceptable to use white cardboard on which a large flower or twig with several leaves of paper will be glued. Ready-made templates with large elements can simplify the task; then it will be easier to make an application. You can combine several forms of creativity in one work, and first draw the base for the applique with paints or colored pencils.
- We begin the assembly with the body, which must be placed on a sheet of cardboard.
- Then cut 6 pieces of wool thread to make the legs. Glue them on the body, 3 pieces on each side of the future ladybug.
- Glue the head.
- Attach the wings to the body at an angle to each other.
Bend the upper part of the wings slightly so that it seems that the insect is preparing to fly. After the craft is ready, discuss it with your child. You can ask him to tell where the ladybug will fly.
What can be added to the lesson?
The paper craft making activity can be divided into two stages if you are going to make a complex background part of the craft. In this case:
- On the first day, ask your child to cut out a few petals and the center of the flower and glue them onto white cardboard. Or you can make an applique in the form of a branch with several leaves. It is permissible to make a drawing on cardboard. A teacher or parent needs to pay attention to ensure that the dimensions of the drawn picture correspond to the future ladybug.
- On the second day, the application itself is performed. It may also be simplified or modified. You don’t have to make the legs from woolen thread; just draw them with a felt-tip pen. A voluminous craft can be simplified to a traditional one. To do this, you need to cut out just one circle from red paper and divide it in half.

To make the lesson more complete, choose poetry and musical accompaniment for it. Young children can read anything piece of art, where one of the participants is a ladybug.
Average preschool age You will be interested in nursery rhymes and beliefs associated with this insect. For younger students interesting facts from the animal world.
As musical accompaniment you can use different classical works. Tchaikovsky's "Seasons" works well.
It is best to conduct the lesson on making the “Ladybug” appliqué in late spring, when the child can observe insects in the outside world.
During a walk, you can invite your baby to look for ladybugs on the grass or flowers. Additionally, place prepared visual aids– real photos, pictures from books printed on A4 sheet. Try to find photos of insects different colors to introduce the child to the diversity of the surrounding world.
Municipal budget preschool educational institution kindergarten No. 1 “Teremok”
structural subdivision family kindergarten
Notes on application in the junior group
"Ladybug"
Completed by: teacher
Vandysheva Elena Vladimirovna
Tonkino 2017
Target: develop skills in creating applique from ready-made blanks, develop accuracy in working with glue, and gain new knowledge about insects.
Tasks: develop the ability to compose an object from several parts; develop the ability to distinguish shapes by size and use large and small shapes; develop tactile perception and fine motor skills of the fingers. Develop imagination and the ability to make assumptions. Develop independence, accuracy and consistency in performing your work.
Materials:
1. Ready-made ladybug craft (sample).
2. Glue, brushes, oilcloth for each child.
3. Pre-cut ladybug parts.
Progress of the lesson.
Educator: do you like to visit?
Children: Yes!
Educator: let's play the game "Visiting Thumb"
Finger game"Visiting the big toe"
Visiting the thumb (Thumbs up.)
They came straight to the house (Join the fingertips of both hands at an angle “roof.”)
Index and middle
Nameless and last.
The little finger itself is the little one (Alternately connect the called fingers with the big one, lightly massaging them, on both hands at the same time.)
He knocked on the threshold. (Clench your fists, point your little fingers up, move them.)
Together fingers are friends,
They cannot live without each other.
Strong, friendly - (Rhythmically clench and unclench the fingers on both hands.)
Everyone needs them! (Children clap their hands.)


Guys, please listen to the rhyme that we will learn with you:
Ladybug can be caught
One two Three. Did not make it!
My ladybug has flown away!
Look, a ladybug flew to our lesson.
Guys, I have prepared parts for a ladybug for you. Now look, I’ll show you how to assemble the application, if you have any questions, ask. So, we can begin our work. In the meantime, while you are doing crafts, I will read you poems about the ladybug:
Look quickly, Vovka!
This is a ladybug!
Little red circle,
Lots of black dots.
Opens its wings
It flies into the sky.
Flying is easy.
All you need is skill! -
shared with cows
ladybug.
Who gave ladybugs such a name!
The little ones now know no peace,
Crumbs crawl on the leaves without rest -
Everyone is looking for the missing horns!
Simple Shapes turns into a beautiful creation.
we need three circles: a red one and two black ones, a large one and a small one, eyes, black dots that you can draw or use ready-made ones, scissors, glue and imagination.
Black circles are glued on top of each other, and red circles are cut in half.


The body and wings are ready.
Now our grandmother isboxshould be decorated with black dots, which we counted in childhood to find out the age of the bug. Our children themselves determined the number of dots. They made them from plasticine.


That's all! Our funny little bugs "Grandmothers -boxes" ready!
Let them live in our clearing and make everyone happy!