DIY modular paintings. Step by step guide. Modular paintings in the interior
Model paintings are a fashionable decoration for any interior. At their core, these are reproductions of paintings famous artists, good photos, even children's drawings, which are divided into several segments and hung on the wall.
Most often, they are used as a basis for a modular painting. conceptual works contemporary artists. However, if you divide the reproduction into several rectangular parts, you will get an interesting artistic accent, emphasizing the “as if” antique interior in dark colors. Modern Art whatever it doesn’t unite into a single whole.

A modular painting can consist of several rectangles with fragments of one canvas with one plot. Sometimes photographers create a modular picture from several frames of the same type, imitating sequential “movement”.
In addition to rectangular segments, you can divide the base into squares, wavy fragments, trapezoids and even triangles. The only thing that needs to be taken into account is that work is best perceived when divided into rectangles. Such work optically emphasizes the verticality of the space, and the artistic accent depends only on the taste of the owner of the house.

Prices for modular paintings
You can order a modular painting on the Internet, buy it in special stores, or make it yourself, since it is not at all difficult. A finished modular painting will cost approximately 5,000 rubles. This is the average price for an average-sized job.
If you decide to make the interior decoration yourself and according to your taste, then everything will cost much less.

Firstly, you can use pieces for a modular painting cardboard box from under the TV, refrigerator or other household appliances. Choose a base - reproduction famous painting, photograph, your own drawing and carefully paste it onto the base. Then you cut it into segments, strengthen each segment (with a second layer of cardboard, corners, etc.) and fix each segment separately on the wall.
To make your work look more professional, it makes sense to purchase it in a store. ready-made base for a modular picture. In this case, the basis for the segments will be frame with stretched canvas . In this case, you can do different things: create the work yourself (draw something using colors that are in harmony with the interior, or, on the contrary, sharply contrasting with it), or you can attach segments to the base separately (in the case of a photograph).
If the interior allows, you can buy a print of an ancient engraving. Many people use beautiful pictures from the network, ordering them printed in large format.
Modular art provides unlimited scope for creativity for anyone, even the most inexperienced artist and designer.
They have gained great popularity as an option for interior decoration. They can consist of two parts - a diptych, three - a triptych, and more - a polyptych.
Of course, today they can be purchased in many stores, but wouldn’t it be more pleasant to make a modular picture with your own hands? That is why we have provided you with a master class on creating such a decorative element. And for this you will need:
- Fabric with beautiful pattern(choose the pattern so that it harmoniously matches the style of the room you will decorate). The pattern can be the same ornament, or maybe a plot. If you're using a story as a basis, you'll need to take measurements from the canvas so that the divided pieces fit together on the canvas. different parts modular picture.
- Base 1 – wooden slats and pieces of plywood.
- Base 2 – fiberboard or polystyrene foam (even polystyrene foam from ceiling tiles will do).
- PVA glue.
- Scissors, hooks, furniture stapler, tape measure.
- Pencil or chalk (for making marks on fabric).
Making a modular painting with your own hands is quite easy, so we will look at this process step by step:
1. Ready base
It can be purchased at the store in required quantity for your modular painting. They are sold with fabric already stretched over the base. And then, having studied in detail how to draw a modular picture yourself, you can use a ready-made base. If you want to make a modular picture with your own hands, using the fabric or print you like, then you will have to carefully remove the fabric from the stretcher.
2. We make the base ourselves
Or you can make the base for a modular picture with your own hands. The first option is to create subframes using wooden slats. Here you will need to take stretcher slats of the same length in pairs, file the ends and connect them together using glue or a furniture stapler. In each corner, on the wrong side, you can fasten pieces of plywood in the form of triangles, this way you will strengthen the frame for your painting. For greater density, you can stretch the fabric onto the stretcher as an additional base, also securing it with a furniture stapler.

The second option is that you can take a solid base - a piece of fiberboard or foam plastic, but then do not forget to process the edges. This is the simplest version of the base if you decide to make a modular picture with your own hands and spend a minimum amount of time on it. Of course, making modular paintings with your own hands will in any case cost a certain amount of effort and time, but we especially recommend this option for female craftsmen, because there is less work with tools.


Distribute the fabric evenly, stretch it to avoid crumpling and folds. The corners will require special attention and care. Fasten the long opposite sides first, then the short ones.

4. Let's decorate the interior!
As a result, you get a great decorative element for your room. Now you can get creative with placing the paintings relative to each other. Making modular paintings with your own hands can also bring you income if you reach a certain level of skill.

If you are interested in how to draw a modular picture, then everything is simple. Anyone who didn't miss drawing lessons at school will be able to do it themselves. Your end result doesn't have to be a work of art. top class– you can find pictures of patterns or colors and redraw them, dividing them into modules of your picture.
Choosing modular paintings will allow you to create a special interior style. A series of several elements merges into one composition - it looks alive and dynamic. By choosing to make modular paintings with your own hands, you can express your individuality. The master class will help you quickly master the basics, and you will become the owner of an original decorative element.
What are modular paintings
A modular painting is several canvases that are combined into one composition.
There are many options for the arrangement of elements:
- symmetrical arrangement in the horizontal plane;
- displacement and asymmetry horizontally and vertically;
- mixed vertical-horizontal;
The most popular are variations with symmetrical and asymmetrical offsets - they literally change the space of the room. It’s amazing how using this design technique you can achieve a visual increase in space. This is very important for arranging the interior of a small room.
Depending on how many parts it consists of big picture, are distinguished by:
- diptych – 2 canvases;
- triptych – 3 canvases;
- polyptych - more than three canvases.
There are no strict rules for interior design using modular paintings. In addition, with the current capabilities of printing, you do not need to be an artist to make such a composition with your own hands. Isn't this a challenge for a truly creative person?
How to do it yourself
The material that can be taken as an image can be selected depending on the availability of finances and wishes.
Options for canvas with images:
- fabric with a bright, clear print, such as flowers;
- photo or picture printed on a printer;
- favorite version of wallpaper with photo.
The choice of frame depends on the chosen base. A master class on making such paintings will help you create an interior masterpiece.
Master class made of fabric
Materials:
- fabric with a plot or ornament, a printed image or wallpaper with a photo design;
- base: wooden slats 50x20 and plywood, fiberboard or polystyrene foam;
- PVA glue;
- scissors;
- pencil, chalk or soap;
- centimeter;
- stapler for furniture.
Step 1. Preparing the base
Depending on your budget, you can buy a ready-made canvas base or make one yourself. The first option is suitable for those who are inspired to paint a picture. For the first experiment, it is better to make a triptych - three elements, for which we prepare three bases. From slats and pieces of plywood you can quickly build a base for a modular picture. To do this, we connect wooden slats into a frame, cutting off the ends at an angle of 45 degrees. They can be stapled or glued.
For strength, we attach plywood triangles (with 10 cm legs) to the corners of the frame from the wrong side. As a lining, you can stretch a neutral-colored fabric over the frame, securing it with a stapler.
It is much easier to use pieces of fiberboard as a base; you just need to process the base along the edges. If you choose the option of wallpaper or a printed image, then you can choose a very simple and light base - polystyrene foam.
Step 2. Attach the canvas to the base
Before cutting out segments, plan well and mark the cut locations using the “measure twice and cut once” principle. The size of the fabric should take into account the folds on reverse side. We fix the fabric on the stretcher with a furniture stapler, attaching the staples from the wrong side of the work. It is important to stretch the fabric evenly without forming folds. We fasten the long side first, and then the short one.
Printed versions can even be glued to thin foam ceiling tiles using PVA glue.
Many people, instead of wallpaper with a photo, order a print of the picture they like from numerous printing services. You don't need to be a master to do this, however, when printing you need to think about making several separate elements with overlapping designs. This way you maintain the integrity of the overall picture.
Step 3. Place the paintings
At this stage, you need to figure out a place where you will hang your composition, as well as a way to position the canvases relative to each other. For mounting, you can choose ordinary small-format furniture hangers. If the paintings are mounted on stretchers, then they can be fixed with screws that are screwed into dowels and protrude slightly from the wall.
Extremely interesting are the arrangement options where one of the panels are offset in an interesting way. An element that is deliberately shifted in “flight” as if by a blow of wind looks unique.
The master class will give you an understanding of the main points of creating a modular painting. You can safely experiment with the materials of the canvas itself and the base, choosing what you have available. For the first tests, even pieces of drywall or foam plastic, on which pictures from a printer or rectangles from wallpaper are pasted, will do. When you practice simple materials, you can make more complex compositions for interior decoration.
Modular pictures- a generally recognized trend in interior design, which consists of several canvases united by a common idea or image. Today we'll talk about doing it at home.
Modular paintings in the interior
The originality of such products as modular paintings lies in the following:
- they give the room a unique and complete look;
- emphasize the taste of the owner of the house;
- attract the attention of visitors;
- have high quality color rendering;
- are a powerful source of energy;
- create the illusion of movement in the room;
- hide small surface defects, etc.

Types and schemes of modular paintings

Today there is a wide variety of modular paintings, differing in size and shape. So they can have horizontal, vertical, asymmetrical displacement, and also be segmented and divided into several separate images (diptych, triptych, penaptych, etc.).

A special place is occupied by modular paintings on glass, made using special paints and printers.

You don't have to be talented artist and a designer to get a unique product. It is enough to choose any picture you like and print it using special equipment on fabric, paper or other sheet material. After this, all that remains is to cut the image into the appropriate elements and fix them.

The process of creating a painting from modules
Method No. 1

To make a modular picture for the kitchen, you need to prepare several wooden frame structures of various sizes and attach the finished printed image to them using a furniture stapler. At the same time, keep in mind that the frame itself should remain on the wrong side.
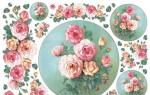
in the absence of the possibility of printing and painting yourself, you can use patterned bright fabric as a canvas;
If desired, the frame can be replaced with a piece of chipboard or rectangular plywood.
Method No. 2 (Modular painting “Flowers”)

1. Prepare oil or other paints that do not fade and are used for painting batik and paintings on canvas.
2. Take several canvases and frame structures of a certain size. However, keep in mind that the latter should be slightly smaller than the fabric, otherwise you will not be able to capture the resulting image.
3. Secure the canvas to each frame using a furniture stapler.
If used acrylic paints, then it is better to work with them on cotton fabric or silk (batik technique). The advantage of this method is that you first draw the design on a piece of paper and then place it under the fabric.
DIY modular painting video: