Beautiful drawings of women's faces. Drawing a person's face. Line of mouth and lips
The human face is quite complex in its structure, moreover, it is considered the most expressive part human body.
Experts determine character, emotionality, and sensitivity based on the face. Drawing a face with a pencil or paints is a matter of choice for each individual artist. There will be one technology. To learn how to draw a woman's face you need a little patience and skill.
Face contour
First, let's draw the outline of the face.
To do this, draw an oval that will taper downwards. Don't draw a circle, because most people still have an oval head shape. In appearance, the oval you drew should resemble an egg.
![]()
Next, we will draw dividing lines that will help us correctly outline the proportions of the face. Draw a vertical line strictly in the middle of the oval. Next, also draw a horizontal line in the center. The lines must intersect exactly in the middle of the oval.
Nose
The first thing we will start drawing out will be the nose.
![]()
Divide the bottom of the oval into equal parts by drawing a horizontal line. The point at which this line intersects the vertical line will be the starting point for drawing the nose. Draw the base of the nose and then the nostrils on both sides. Exist various forms nose, but it will be convenient to draw all of them using the proposed method.
Mouth
In order to correctly position the mouth on the face, divide the remaining part of the oval under the nose in half.
![]()
The point where the line you just drew intersects the vertical line will serve as the base for the lower lip. First draw the center line of the lips, which is the line where the upper lip meets the lower lip. Next draw upper lip, and lastly draw on the lower lip.
Eyes
The main thing when drawing eyes is to remember that they should be on the same line.
![]()
The first horizontal line that we drew at the very beginning will help us in this matter. Draw two small circles that will intersect the horizontal line. These circles will form the eye socket. Place eyebrows on the upper contour of the circles, and draw cheekbones on the lower part.
Brows
Eyebrows can vary in width, but let's learn how to draw eyebrows of the correct shape.
![]()
The eyebrow should lie on the top outline of the circle we drew earlier. Draw an eyebrow of the required width. The length of the eyebrow should also not go beyond the circle.
Eye shape
Most often, almond-shaped eyes are found, so we’ll draw just like that.
![]()
To do this, draw two tonsils. Remember that the distance between the eyes is equal to the width of the other eye.
Pupil
Here we will draw not only the pupil, but also the iris. To do this, draw a circle that will be located a little closer to the center of the eye relative to its middle.
![]()
This will be the iris of the eye. Next, draw another circle, smaller in size, inside the iris. Paint it black, leaving some white. This will be a glare from the light. The same highlight must be reflected on the iris. From the center of the eye to the white of the eye, leave several white lines, which will be more pronounced near the pupil, and less noticeable on the contour of the iris. In this case you will get a good artistic effect.
Eyelids
Draw the tonsil smaller than you drew before.
![]()
Position it so that the pupil touches its borders. The tonsils should touch the large tonsils at a point located near the bridge of the nose.
Borders of the nose and eyes
This can be done using shadows.
![]()
To do this, add a slight darkening under the eyes, walk along the contour of the nose, and also shape the wings of the nose. If you want to portray a tired look, then the shadow should be drawn under the lower eyelid at a sharper angle, tending to the bridge of the nose.
Ears
In order to draw ears correctly, you must remember several nuances.
![]()
First, the bottom of the ears should be in line with the tip of the nose. Secondly, the upper borders of the ears should correspond to the eyebrows. And thirdly, the ears should not be protruding if they are not like that in reality.
Hair
There is only one rule for depicting hair.
![]()
Make sure that you draw them in the direction from the parting to the ends of the hair, and not vice versa. The parting can be placed on absolutely any side, or you can do without it altogether.
Only those who have studied in special courses or in art school because this is not an easy task. To fully transfer proportions to paper, you need to know many of the nuances of each element.
However, if you are a beginner who already has some drawing skills, you can try your hand at drawing a face. First, you should practice drawing various features on a rough draft: lips, eyebrows, nose. Then you can take Blank sheet paper and move on to the first stage of this lesson.
Necessary materials:
- paper;
- eraser;
- pencil;
- marker;
- colored pencils in red, brown, blue, orange.
Drawing steps:
1. Let's draw an oval. This will be the head. Let's draw two in the center auxiliary lines.

2. Now let's adjust the shape of the face. Simple curved lines Let's label the hair.

3. Draw the eyebrows and the upper eyelid of the eye, which should be on a horizontal line.

4. We finish drawing the eyes, namely the lower eyelid, eyeball and pupil, as well as eyelashes. Add a line in the center where the nose is located.

5. Draw the nose and mouth. The lips will be wide and large.

6. Let's draw the general shape of the hairstyle around the head.

7. Let’s draw the neck and shoulders below.

8. Let's detail the girl's hair - draw strands.

9. Outline the outline of the face, eyes, eyebrows, nose and lips with a black marker. We will also go over each line of the neck, shoulders, and hair.

10. Let's start coloring step by step drawing faces. First of all, let's add color to the girl's hair. They will be red. Take an orange pencil and completely shade it along the contour of the hairstyle. In some places you can add volume using a brown pencil. You can also give the girl a different hair color.

11. Now let's move on to the gentle and sensitive skin girls. To give a natural look, we first use a pink pencil, then to create penumbra - red, and for shadow areas - brown.

12. Let’s make the girl’s lips bright red.

13. Decorate the gorgeous eyebrows on your face with a brown pencil.

14. Then let's move on to the eyes. Color the lower and upper eyelids with a black marker. Let's make the iris blue. We will also decorate the pupil with a marker.

The result is a beautiful portrait of a girl, and you learned how to draw a woman’s face. To draw a man's face, use the same steps, just change their features. After all, a man's is rougher.


If you find an error, please highlight a piece of text and click Ctrl+Enter.
To know how to draw a girl with a pencil, you don’t have to study art and be an artist. Any beginner can try his hand at it. It is enough to be persistent and gradually master some skills. It is important to keep in mind the aspects below.
What materials are needed
Before starting the lesson, novice creators should stock up on materials such as:
You should not skimp on basic drawing materials, even if we're talking about about a novice amateur. Poor quality materials can discourage interest in drawing and complicate the first steps in art. For beginners, the best choice would be mid-priced products.
Female body proportions
Proportions female body differ from men's in some respects. Besides, in different times for the standard of beauty in fine arts were accepted different proportions.
Nowadays, the following parameters of the female body are relevant for drawing:
- To measure height, you need to calculate the height of the woman’s head and multiply this parameter by 7-8.5 times. It is useful to know that a person’s height is divided exactly in half at the point of the symphysis pubis.
- To calculate shoulder width, you will need an average of 1.5 head heights.
- The width of the pelvic bone is directly proportional to the width of her shoulder, and the height of a woman's pelvis is slightly lower than the height of her head.
- The waist is on average equal to 1 head height.
- To calculate the height between the base of the chest and the hip joint, you should divide the height of the head in half.
Axes and proportions of the face
Not everyone knows the tricks on how to draw a girl with a pencil. It is easy to explain this process step by step for beginners.
It is enough just to know about the following proportions of facial features and about the universal axes on which you can rely on in the process of constructing a face:

Face drawing scheme
Scheme:

How to draw a girl in profile
When wondering how to draw a girl with a pencil step by step for beginners, you need to look for the answer in the same measurements and center lines, as when drawing from the front. You should start drawing by drawing auxiliary lines in the form of a square. Its height should be 1/8 greater than its width. All the main axes need to be transferred to it, as if a face was inscribed in it from the front. 
Then, you should inscribe an inclined ovoid oval into a rectangle between the axis on which the tip of the nose is located and the top of the entire square. This oval helps to build correct form skull, back of the head and forehead.
The part of the side of the skull that connects to the neck should be angled downward.
- From the top extreme point oval, you should start drawing the line of the forehead, eyebrows, nose, mouth and chin. In this case, it is necessary to focus on the drawn auxiliary lines. The most prominent point of the forehead, closer to the eyebrows, is in contact with the edge of the square.
- The eyes are located on their own axis. On the face in profile, the eyes take the shape of an arrowhead. The iris changes from round to a thin, elongated oval with a pointed top and bottom.
- The tip of the nose will protrude slightly beyond the square. The depression of the bridge of the nose falls on the same axis on which the eyes are located.
- Lips on a profile face will appear prominent, especially the lower lip. The line where the lips meet goes slightly downward from the lips. Even if a person smiles, the line goes straight at first and then smoothly curves upward.
- When viewed in profile, the ears become C-shape. An arc of thin cartilage runs along the edge of the ear. Also, be aware of your earlobe. When drawing a woman's face, the ears are often covered with hair.
How to draw a girl in full height
When drawing a girl with a pencil step by step, it is extremely important for beginners to maintain the body proportions discussed earlier. Only compliance with proportions will help avoid depicting an awkward, unrealistic body. 
To portray a girl in full height, it is recommended to consider the following aspects:
- Image central axis. This axis coincides with the girl’s spine. At the initial level of drawing, it is recommended to draw a figure standing straight and level, from the front. Therefore, the central axis will also be straight.
- Torso. It is recommended to depict it schematically as an inverted triangle. You should not make it too large or wide, as female figure, on average, has more graceful shoulders and chest.
- Breast. To determine the correct location of the chest, another smaller one is inserted into the torso triangle, pointing upward. At its corners you need to draw two identical circles, which are the chest.
- Hips. To depict the hips, it is convenient to draw a circle, a small part of which extends to the lower corner of the triangle representing the torso.
Using the obtained guidelines, you need to connect them with smooth, rounded lines. The figure should acquire the contours of a female body. Next, you need to draw the arms and legs. The length of the arms is just below the groin area.
Important points when drawing hair
Scroll:
- When drawing hair, it is important to pay attention to how the light falls on them. As a rule, the roots of the hair are in the shadow, and at some distance from them a highlight is noticeable on the hair. It should be left unpainted, or only a few strokes should be added around the edges. Next, it is important to pay attention to how the hair lies in the strands. In the drawing, you should combine small strands into larger ones and depict a highlight on them as the light falls. Also, it is necessary to highlight the darker, shadow areas so that the drawing does not look flat.
- The hair lies luxuriantly on the head, covering part of the forehead, cheeks, and ears. Depending on the structure of the hair (curly, straight), it can be more voluminous or, on the contrary, smooth. It is important to notice the direction in which the hair grows to reflect them as realistically as possible.
- There is a lot of hair on a person's head, but you shouldn't depict all of them.. You just need to show their overall texture. Pencils of varying hardness are used for shading hair. For shadow areas, take the softest pencil and shade with pressure. Hard pencils are needed to define hairs in lighter parts and highlights. It is important that the strokes are confident and long. To do this, it is recommended to rest your hand with a pencil on your elbow, and not on your wrist, and draw from the elbow.
Step by step drawing of hair
Now we know how to draw a girl with a pencil.
Step by step for beginners it is realistic to master such a complex detail as hair:

How to draw a girl with long flowing hair
However, some distinctive features should be taken into account:

How to draw a girl with short hair
Short hair during the drawing process have several distinctive features:

How to draw a girl from the back
Many people don’t know how to draw a girl with a pencil step by step. For beginners, it will not be difficult to master drawing a girl from the back.
This is a simpler option where you won’t need to depict her face, breasts and other complex details.
 However, drawing a girl from the back has its own nuances:
- The width of the shoulders and back should be indicated. General form will resemble a triangle, however, it should not be too large and wide. Otherwise, the girl will look too strong and masculine.
- The spine runs vertically in the center of the back, which must be reflected in the form of several strokes.
- At the level where the arms are attached to the body, the shoulder blades are visible on the back. They should not be highlighted too clearly. But if the picture shows a slender girl, it is advisable to indicate the shoulder blades with light strokes.
- Often the back and neck are covered with loose hair. Drawing a girl from the back is a good opportunity to depict beautiful curls scattered over her shoulders.
Anime style
Anime style involves a stylized image of the girl's figure and face. Generally, anime characters have exaggeratedly large and round eyes in a small face, and a small mouth and nose (which may be indicated by a dash or a dot). The arms and legs are thin and slender. The girl herself is most often petite and graceful, with thin waist. The legs are exaggeratedly long. 
First you need to make a sketch, depict the head, facial features and hairstyle. Anime hairstyles suggest some carelessness and volume. Next, you should detail the sketch, adding details and paying attention to the location of shadow and light in the drawing.
In a dress
Pencil drawing girls in dress should start with step by step sketch The girl's figure seems to be without a dress. For beginners, this will help to correctly build her figure in clothes. It is advisable to take into account that clothing helps to hide those details that turn out poorly. Therefore, it is important to choose a dress style that will cover the most complex elements drawing.
In addition, the style of the dress should suit the drawn girl and fit her well.
When drawing a dress, it is important to take into account the material from which it is supposed to be made. Soft and delicate material will flow or hug the figure, dense material will not deform along the lines of the girl’s body. In addition, the direction and distribution of light should be considered to reflect soft lighting on the fabric. This will make the drawing more voluminous and naturalistic.
How to apply chiaroscuro using strokes
Hatching – important element drawing a girl with a pencil, and for beginners, first of all, it requires step-by-step training. You need to learn how to apply strokes, changing the saturation from dark to light as softly as possible. The softer and smoother the transition, the better the shading is mastered. 
To draw a girl, you should take into account the rules of construction and proportions of her body and face. In drawing, training and observation are important, which will help you depict what you want with the greatest accuracy.
Video: how to draw a girl with a pencil
How to draw a portrait of a girl with a pencil, watch the video:
How to draw a person's face correctly, watch the video:
One of the most complex species art it is. The physique needs to be studied in detail in parts. We have already looked at some elements. Before you begin, be sure to read these few tips from professional artists:
- First you need to think about the approximate location of all the elements
- For sketches, take a sharpened pencil of medium hardness (I used HB and 2B, write in the comments which pencils you used), which will allow you to sketch thin lines.
- Do not erase the sketch lines until the desired result is clearly visible.
- Maintain proportions
- Please note that the face has a pointed shape at the bottom and a more rounded shape at the top.
- Practice! The more you practice, the better you will learn to convey the necessary emotions and nuances of human facial expressions.
Now let's move on to the lesson.
How to draw a person's face step by step:
Step one. This face is oval shaped. First, let's make an oval and divide it with lines. A vertical line crosses it exactly in the middle, and horizontal lines are located as follows. The first divides the face just below half, and the second another half from the remaining lower part of the face. We cannot give exact sizes, since everyone's face is different. But the task of these lines is to outline (this is the vertical line), as well as the location of the lips (the horizontal bottom line). Don't forget that you'll have to erase them later, so don't press the stylus too hard on the paper. If you press hard on the paper, it will become deformed, and the drawing will look like a girl getting ready for a wedding. plastic surgery. (Will )  Step two. Make approximate strokes in the place where. And also add lines for , and halfway between the nose and chin. Make the line that marks the lower lip wider.
  Step three. Let's move on to drawing. They are located just above the nose. The outer edges of the nose indicate where the inner corners of the eyes will go. Make a sketch as shown in the picture. Consider another important factor here. Human anatomy is designed in such a way that the distance between the eyes is equal to the size of another eye. This is indicated by a red arrow in the figure. Now let's add the eyebrows. Tip: Even if one eyebrow is raised and the eyebrows are the same height, start drawing from inside(points closer to the nose). To get an idea of how high the eyebrows are, add another dummy eye above the left eye - this should give you more or less the correct height for the eyebrows.
  Step 4. Add a mouth. In the previous lesson we already covered some points. For example, we tried to depict . But there's another one important point, a lot of questions aspiring artists have about how big a mouth should be? Mentally draw two lines from the inner edges of your eyes down. This will be the approximate size of the mouth; when smiling it may be a little wider.
  Step 5. Now we erase the auxiliary lines that we made in the first two steps. Let's see what we got. In principle, the sketch is ready. Now all that remains is to decorate and add shadows.
  Step six. Give your face shape more specificity. Pay attention to the cheekbones and the shape of the chin. This woman has a strong chin, but try not to let it get too strong, otherwise she will turn into a man. Sketch in the black pupils and add eyelids. requires concentration. This is the mirror of the soul.
  Look closely at the animation. You will see in what order it is best to do this.
 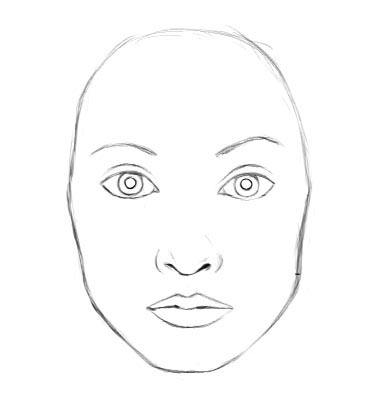 The last step. With a simple pencil add shadows to give the drawing volume and make it more realistic. That's all. We will look in more detail about other parts of the human body in the following lessons. Also leave your works and write comments about how only we have such lessons, see for yourself.
Every aspiring artist will sooner or later want to learn how to draw portraits. Of course, to create a full-fledged portrait, you will need unlimited patience and long training. For beginners, it is important to master the technique of drawing the main components and work out the correct proportions. The human face can be depicted in free form, and then work on parts and components.
For such a complex job as drawing a human face, stock up on quality materials. You will need a piece of paper, an eraser and some pencils. Pencils should be chosen in different hardnesses, which can be distinguished by markings. A hard pencil is marked “H” or “T”, a soft pencil is marked “B” or “M”. Using hard pencil, you get a thin light line. When drawing with a soft pencil, the lines will be darker and thicker. Let's start drawing. Take a good look at yourself in the mirror or look at any images of a human face. Look at the proportions. The narrowest part of the face is the chin, the wider part is the cheekbones and temporal area. Any human face


Drawing a person is a difficult task that can be done by those who are not afraid of hard work. Before starting the process, carefully study the techniques of applying shadows, drawing eyes, lips and other facial elements. Maintain proportions, but don't be afraid to experiment and never stop improving your skills.