How to draw a bunny with a pencil. How to draw a hare with a pencil? Gray and white hare. With carrots on a stump
What child doesn’t dare to draw their favorite fairy tale or cartoon characters? And the furry inhabitant of the forest, who changes the color of his coat in winter, is one of the most... popular characters. That is why it will be interesting for both children and adults to learn how to draw a hare step by step easily and quickly.
Good old friend
Little children love to be read aloud to. Over time, they begin to ask to draw them their “own” bunny or fox. However, not all parents have the ability for visual creativity. Therefore, it makes sense to master the most basic techniques for drawing representatives of the animal world participating in various scenes. And in this case, you simply cannot do without the omnipresent kind, cowardly, resourceful hare as a character in the drawing! Moreover, over time you will be able to show and explain to your little one how to draw a hare step by step with a pencil or felt-tip pens. For some children, this can be the starting point of a new exciting hobby.
2 funny bunnies
According to psychologists, children with early age must hear the correct and full names objects of the surrounding world. But with the images of this very world the situation is different. If you are going to draw animals with your child, then it is better to let them be funny and funny cartoon characters. In this case, the baby will not experience fear of some representatives of the fauna. For beginners, there are several diagrams that describe how to draw step by step fairy hare pencil.
Scheme No. 1
Instructions:
1. Use a pencil to sketch the contours of the bunny. To do this, draw two ovals - the head and the torso, and mark the ears on the head.

2. Now let's give it geometric shapes natural shape of body parts.
3. Draw the ball of the tail and paws. We draw the forelimbs bent at the elbows, and the hind limbs at the knees.


6. Draw the contours. The pencil drawing is ready.

Instructions:

1. Draw a horizontal oval.
2. Draw a semicircle to it so that it turns out to be a mushroom.
3. In the top figure we denote a circle of the muzzle and eyes.
4. Draw the columns of the front and hind legs.
5. We detail the eyes and finish the nose.
6. Add ears.
7. Draw the toes on the paws, inner side ear, eyebrows, mustache and mouth. The hare is ready.
Hare on 9 squares
If your child is seriously interested in the animal world, then he will probably be delighted with the drawing of a “real” hare.

Instructions:
1. Divide the working area of the sheet into 9 squares.
2. We place 3 circles on them - for the head and for the torso. The oval head runs along the lower border of the upper square, one of the body shapes - at the intersection of 4.5 and 7.8, and the second body shape should be at the junction of squares 5.6 and 8.9.

3. On the head we mark the ears and muzzle.


6. Add fur. The animal is ready.

“Well, Hare, wait a minute!”
One of the most prominent obliques is considered to be the character of the cartoon “Well, wait a minute!” How can you not learn to portray something like this yourself?! Moreover, the explanation of how to draw a hare from this animated series is understandable even to a child.

Instructions:
1. Draw an oval for the head, a rectangle with a beveled upper side for the body, lines for the arms and legs.
2. Let's start with the head. Draw the fur on the cheeks and add ears.

3. Let's start with the muzzle. We draw eyes on half the face, detailing the pupils and eyelids with eyelashes.

5. Draw the eyebrows and mustache.
6. Draw clothes. We finish drawing the T-shirt and shorts.

7. We enlarge the protruding parts of the arms and legs and detail the fingers and feet.

8. Color the drawing. The most famous cartoon hare is ready.

A small fluffy ball with long ears - this animal causes only tenderness in everyone. But at the same time he is quite nimble and elusive. How to draw a hare if it is constantly on the move, running somewhere and hiding from people?
Everything is very simple - step-by-step schemes with its image will help you easily cope with the task. Even if you have never held pencils and paints in your hands, if you have never seen a real live bunny, you will really enjoy the exciting process of drawing. After all, it lifts your spirits and helps you take your mind off worries.
Let's start the lesson with such a positive, cheerful hero with a drum. He can become a decoration for any holiday, and his mischievous smile involuntarily makes you smile back. The diagram makes it clear how to draw a hare step by step, but if you have any questions or doubts, we’ll look at it in more detail.
- We draw a circle, divide it into two equal parts, this will be the future face of the animal. The ellipse is his torso.
- Add legs, nose and eyes.
- Our bunny lacks long ears, a small tail, a cute face and an apron of paws.
- We trace all the strokes to get the complete image.
- All that remains is to erase the extra lines and the drawing is ready.
- To make the fluffy look even more beautiful, we suggest painting it with bright colors.

This cute little bunny is loved by both kids and adults. It is a symbol of many gifts, cards, and souvenirs. Hundreds of children's poems have been written about him, and adult songs have been sung. And of course, fairy tales and cartoons could not do without his participation.
In them, the hero sometimes appears as a coward, defenseless and helpless, and sometimes he is cunning, cheerful and mischievous. He deftly leads large animals by the nose, constantly escaping their clutches. You should definitely try to portray someone so smart and funny. cartoon character.
For example, going on a trip on a skateboard with a flower in hand.

If you look at how to draw a hare with a pencil according to the following diagram, you can understand that the process comes down to learning how to beautifully depict circles and ovals. It is from them that a small hare is produced, which, as if frightened of something, hid under a bush, quietly pressing its ears. I just want to take him in my arms under my protection, warm him and gently hug him.
Which bunny will you like the most? Cute smiling face? A mischievous creature standing on its hind legs? Or a furry animal, preparing to jump, to gallop far into the forest?
You can choose anyone, or try yourself as an artist and draw all three interesting pictures.

The following diagram explains how to draw and color with a simple pencil, while receiving real works of art. The animal on it seems to be alive and is about to jump into your arms to be stroked on its soft back.
Looking at this step by step instructions drawing a hare, no one will say that it was done by a simple person, without special creative skills and abilities. And everyone can add such a wonderful image to their collection of paintings.

And this is simple step by step guide to create a drawing on a quick fix. It is quite easy to depict such a bunny and the drawing is done with almost continuous lines. Taking a closer look, you can note that all that it lacks is a wide radiant smile.
Here you should use your imagination and figure out on your own how to draw such a cheerful facial expression on the hare that will delight and amuse everyone around. If the idea achieves its goal, then you can safely give an “A” for the drawing lesson.
Drawing. Hare in the grass with gouache step by step for children from 5 years old. Master class with step-by-step photos
Master class on painting with gouache from 5 years old "Hare in the grass"
Author: Natalya Aleksandrovna Ermakova, Teacher, Municipal Budgetary educational institution additional education children "Children's art school named after A. A. Bolshakov", the city of Velikiye Luki, Pskov region.Description: The master class is intended for children from 5 years old and their parents, educators, and additional education teachers.
Purpose: interior decoration, gift, drawing for exhibitions and competitions.
Target: drawing a hare in the grass using gouache technique.
Tasks:
-teach children to draw a hare hiding in the grass;
-practice in working with gouache, working with a brush with all the bristles and its tip;
-develop an eye, attentiveness, and interest in working with color;
- to cultivate interest in the traditions and customs of their native land.
Hello, dear friends and guests! Today main character our work is a hare! In the old days they believed that almost every animal was associated with various gods and was a conductor of his will. The Slavs believed that every god could turn into an animal. It depends on the traits of the animal itself. Animals have their own character and are the patrons of humans. Each person is endowed with the traits of different animals. We can trace the traits of animals in the folklore of the Slavs. The Slavs created a huge number of fairy tales and epics, where the heroes, along with humans, are various animals. They help a person, but they can harm him. Animals live according to their own laws. These laws are sometimes cruel, but always fair. IN Slavic mythology There are legends about people who turn into various animals: into a wolf, into a lynx and others.
Slavic spinning wheels and towels were decorated with ornaments in which one can easily trace the image of a particular animal. In more late period Images also appeared on the shutters of houses and platbands.

People call the hare differently: vytoropen, kriven, lop-eared, hare, skoromcha, uskan, oblique, billey, zets. Moreover, the hare has its own name for different times of the year: in the spring it is a wildflower, in the summer it is a summer grasshopper or herbalist, in the fall it is a deciduous planter, and with the arrival of winter it is a grasshopper. Both the brown hare and the white hare, a steppe and forest animal, respectively, were held in high esteem by the Slavs on the same level - it symbolized youthful strength, the power of nascent life, fertility and procreation.

The hare, like the wood grouse, was dedicated to Yarila, the spring god of the sun and procreation. The hare is cunning and thereby saves its life, resisting the formidable, but not very intelligent force of other animals. It was often associated with the spring madness that begins in March. Despite its cowardice, the hare always fights to the end, fighting off the enemy with its powerful hind legs.

For its speed and lightness, the hare is compared either to a ray of light running through water, or to blue sparks on the coals of a fire. The Indians considered the hare (saya) to be a lunar animal, because of its white coat, comparing it with the reflections of the moon on the surface of the water. With the advent of Christianity, the image of the hare, as an ancient totemic animal, was declared unclean. Hence the sign - a hare crossed the road, there will be trouble. “A stump and a block for you, a path and a road for us,” they say after a running hare in order to ward off trouble.

Fast hares were often compared to lightning, the faithful companions of the thunder god Perun. Lightning was also called sea bunnies, which bathe in the sea of rain, quickly cutting through the water jets. Hares, like other rodents, squirrels and chipmunks, have strong teeth that chew through the strongest wood like lightning. Hares and squirrels carried with them storms and bad weather that were destructive to people. The man sailing in the storm never mentioned the hare's name, fearing the wrath of the waterman. The first spring hare hunt was dedicated to the supreme thunder god and symbolized the arrival of the new season. Just as Perun pursued cowardly lightning bolts, which hurried to hide from his wrath in dark clouds, so hunters drove hares and squirrels to the glory of the thunderer. The time of the hare is the beginning of spring.

Materials and tools:
-sheet of A3 paper
-simple pencil, eraser
-gouache
-brushes
-water jar
-cloth for arms and hands
-palette

Progress of the master class:
We begin work with a preliminary sketch of the silhouette of a hare. Using auxiliary construction lines we find the middle of the sheet. At the bottom of the picture, under the horizontal auxiliary line, draw a line for the chest and back of the bunny.

Next, we continue the back line upward to depict the hare’s ears, and above the chest line we draw an oval-shaped line for the hare’s head.

We finalize the ears, draw an eye and a nose.

The preliminary drawing is completed, erase it auxiliary lines and start working with gouache.

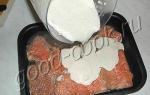
We start with yellow gouache and apply the color at the very top of the work using horizontal strokes. The next color is green, we smoothly connect these two colors with each other.

After green, we work with white, and again create smooth transitions, carefully mixing the colors with each other (apply strokes in a horizontal direction).

We finish the work on the background with blue, and at the very beginning we combine it with white - getting blue.

Let's add a little to blue Green colour.

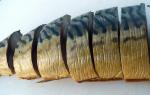
Now using vertical strokes we draw the grass-ant. We draw from top to bottom, starting from the tip of the brush and ending with the entire pile. When drawing grass you need to remember that it is not "persistent" tin soldiers", the grass is alive - it sways, reaches for the sun, twists under the breeze, as if each blade of grass is whispering to each other.

The grass is obtained in different tones due to the wet background and mixing the green color with the previously applied colors.

We paint the bunny with ocher using the “dipping” technique (you can make the ocher color yourself: yellow + brown).

Next, the eye and nose are gray (white + black), and the ear is pink (white + red).

Now we need Brown color, if necessary, it can also be created on the palette: green + red. We work with a semi-dry brush (the “dipping” technique), first the muzzle and ears.

Then the torso (here we teach children to be attentive; we suggest repeating the color spots as accurately as possible).

After brown we put it to work White color, shade the ears and muzzle, the body and draw antennae with eyelashes (semi-dry brush).

Add a little more black color to the ears (with a semi-dry brush).

Draw the antennae in black, highlight the nose and eye.

Add a white highlight to the eye. All we have to do is hide the bunny in the grass - draw vertical strokes of green and yellow.
This lesson fell into the category of easy ones, which means that in theory it can be repeated by Small child. Naturally, parents can also help young children draw a bunny. And if you consider yourself a more advanced artist, then I can recommend the “” lesson - it will require more perseverance from you, although it will be no less interesting.
What you will need
In order to draw a bunny we may need:
- Paper. It is better to take medium-grain special paper: beginning artists will find it much more pleasant to draw on this kind of paper.
- Sharpened pencils. I advise you to take several degrees of hardness, each should be used for different purposes.
- Eraser.
- Stick for rubbing hatching. You can use plain paper rolled into a cone. It will be easy for her to rub the shading, turning it into a monotonous color.
- A little patience.
- Good mood.
Step by step lesson
Drawing characters from films, cartoons and stories is much easier than drawing real people and animals. There is no need to adhere to the rules of anatomy and physics, but each character is unique in its own way. The authors created them using special patterns, which must be repeated quite accurately. But if you want, when you start drawing a bunny, you can always make the eyes a little bigger. This will give it a more cartoonish feel.
By the way, in addition to this lesson, I advise you to pay attention to the lesson “”. It will help improve your skill or just give you a little fun.
Simple drawings are created using contours. It will be enough for you to repeat what, and only what is shown in the lesson, to get an acceptable result, but if you want to achieve something more, then try to present that. what do you draw in the form of simple geometric bodies. Try making a sketch not with contours, but with rectangles, triangles and circles. After some time, with constant use of this technology, you will see that drawing becomes easier.
Tip: create a sketch with as thin strokes as possible. The thicker the sketch strokes are, the more difficult it will be to erase them later.
The first step, or rather the zero step, is always to mark a sheet of paper. This will let you know where exactly the drawing will be located. If you place the drawing on half of the sheet, you can use the other half for another drawing. Here is an example of marking a sheet in the center:
You can draw a bunny on clean slate paper, sitting next to the computer and looking at the hint steps on the monitor.
Or you can print 2 sheets of A4 with step by step instructions, and practice directly on them.
Drawing sequence:


3. Draw the bunny’s eyes and eyebrows.


5. Below we draw an oval slightly larger than the head - this is the torso.

6. Draw a bang or forelock between the ears - the bunny will look cuter with it. We add the front legs to the body.

7. Draw the hind (in the picture - lower) legs. A circle can be used to indicate a hare's belly.

8. Color the resulting bunny.

Here's a cute guy we've come up with:

If your child is afraid to visit the dentist, you can accompany the drawing process with a story that the bunny has such white and strong teeth because he constantly visits the pediatric dentist. And he’s not at all afraid, although it is generally accepted that all bunnies are cowards. And all because there is absolutely nothing to be afraid of there.
Now you know how to draw a bunny and I hope that you were able to repeat the lesson. Now you can pay attention to the lesson “” - it is just as interesting and exciting. Share this lesson with your friends on social media. networks.
Step by step drawing hare in kindergarten
How to teach kids to draw a bunny? You need to start with the same thing as when drawing a chicken: the child must draw small circle in the central upper part of the leaf, closer to the top of the leaf. Next, you need to draw two symmetrical elongated ovals to this small circle. This will be the head of a bunny with long protruding ears. To complete the drawing of the hare's head, all that remains is to draw two points (the eyes of the bunny), a small triangle of the nose, from which two semi-ovals of the hare's mouth extend and three short lines on each side of the muzzle. This will be a hare's mustache.

Now the child needs to complete the hare’s body in the form of a small oval drawn to the head. To this oval you need to draw four more smaller ovals. These will be the hare's feet. That's all! Now we need to paint our toy hare in any color, but preferably red or gray. The hare wears these colors in the summer; these are the camouflage colors of its skin. And in winter the bunny wears a white camouflage robe.

The second method of drawing a hare step by step
Having learned to draw a toy hare, children should take the next step and learn to draw a real hare, not so sketchy. It's a little more complicated, but much more interesting. We start, as always, with two ovals, of which the small oval is the bunny’s head, the large oval is his body. Draw an elongated oval ear to the oval head. Draw a tail or an oval to the oval body hind legs and lines of the front paws. And also don’t forget to smooth out the transition from the head to the body with two lines indicating the hare’s neck.


And at the end of their efforts, children need to outline the head and limbs of the animal with a clear line, mark the mustache and lightly mark with strokes the fur of the hare on the ears, on the tail, on the paws, and also do not forget to erase the unnecessary lines of the sketch.