What does an artist specializing in digital painting need? Computer graphics as art
A documentary about the unprofitability of CG graphics in cinema as a business. The company that drew Life of PI went bankrupt two weeks before they won an OSCAR for it. Over the past 10 years, 21 prominent effects studios in Hollywood have closed. Despite the fact that CG is traditionally an industry where people work day and night without days off (like video production, by the way) and without guarantees - almost everyone is hired individually for the duration of the project and constantly changes jobs, often leaving their families for months and years . Almost the entire American CG industry is dying due to the fact that tax breaks were made in Canada (as well as for gamers, by the way - that’s why Ubisoft does almost everything there). As a result, artists are constantly moving from country to country, where there are benefits and the industry is booming.
Overall, the film is about the fact that it's time to change the business model - CG artists are the same filmmakers as everyone else and should receive a percentage of the film's income or an hourly wage (like camera operators, etc.) because, like any creative activity, it is difficult to calculate in advance. Most studios force contractors to work at a fixed price - they say, we pay you 10 million and let us fulfill all our whims. Well, then it started - the director changed his mind, they decided to reshoot the scene, redo it, throw it out altogether and replace it with another - CG people do this work for free. The studio bears the losses and cannot do anything about it.
In 2013, the film's characters did work in two films nominated for an OSCAR, Life of Pi won. Former employees gathered to demonstrate outside the ceremony. When from the stage the employees of the now closed studio tried to talk about the fact that the company that made this work had a problem, they were drowned out by music from “Jaws.” In addition, Ang Lee, when thanking everyone from the stage for their participation in the film, listed everyone except the CG artists, who in this case did 70% of the film.
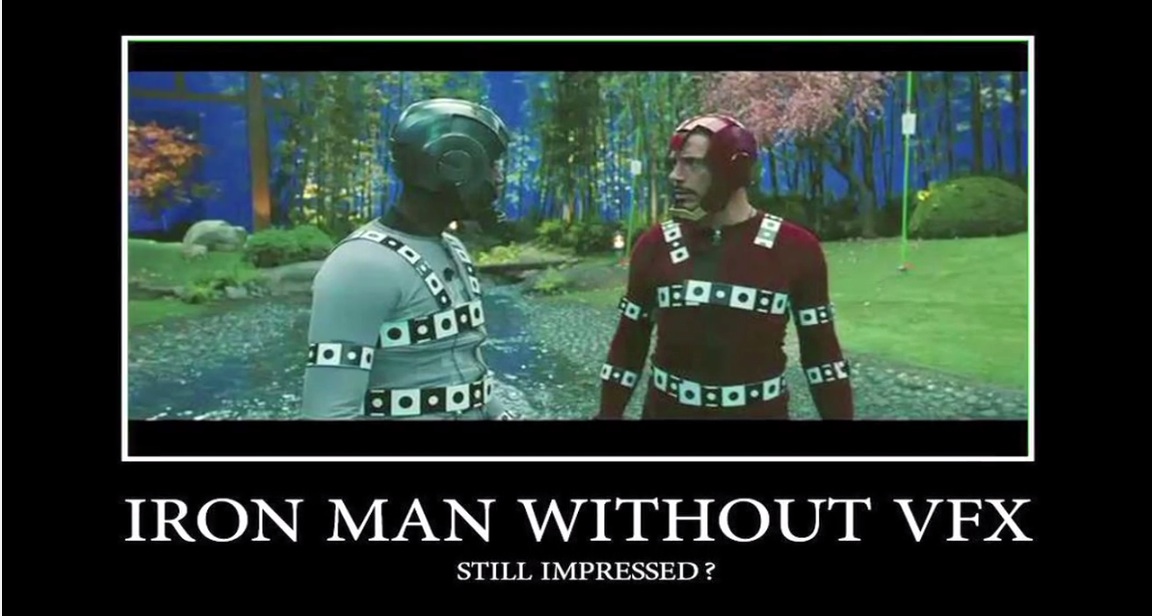
As a result, the entire CG community was simply beside themselves. In protest, artists began to put green screens on their Facebook avatars and publish real stills from films without CG. Now the entire VFX industry is trying to develop a common policy for working with Hollywood. 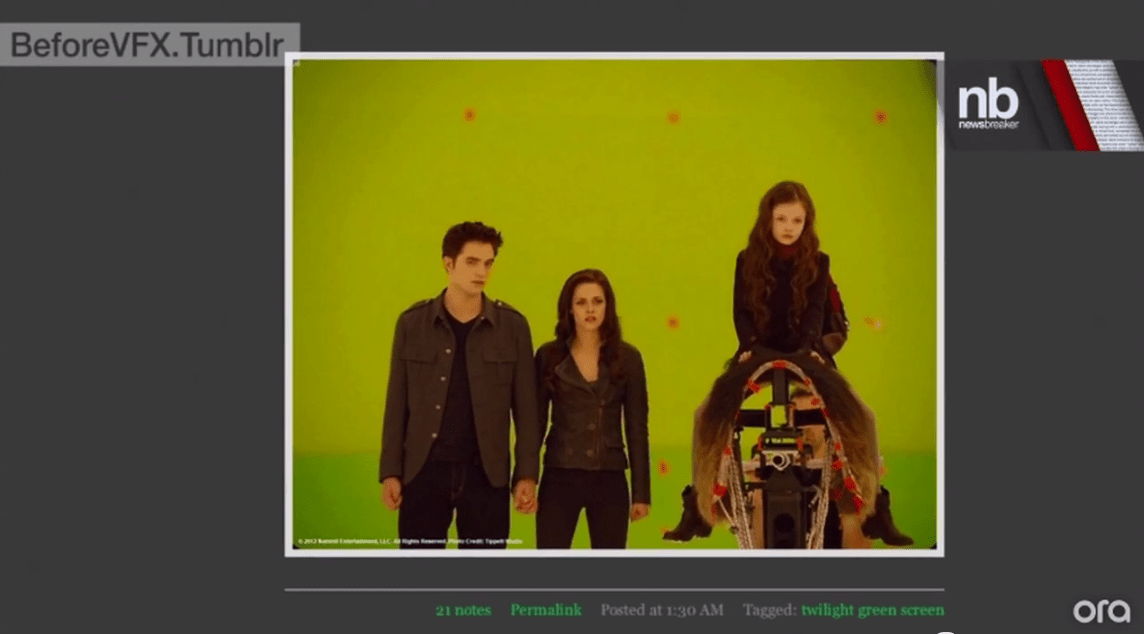
In principle, we at FXA are very, very familiar with all these problems, even though we are not talking about CG. Description of problems with customers and changes in plans - 100%.
On March 3, Hollywood will host a massive demonstration of VFX artists against major studios. At the same time, a lobby is being created to change legislation. In general, big companies are accused of pitting governments against each other, forcing them to fight among themselves by increasingly increasing benefits for films at the expense of taxpayers, while they themselves make money by setting box office records.
Date of publication: 04/15/2012How are special effects for films created? What is digital painting? What do CG and CGI mean? We will answer these questions in this two-part article. And besides, here you will find addresses of websites on the topic and videos about creating special effects for films.
The article turned out to be so long that I had to divide it into two parts to make it easier to read. The first part is devoted to theory and special effects, and the second digital painting and graphics.
In general, most of the resources on the Internet related to the creation of special effects and digital painting are of foreign origin. This is due to the fact that in Russia this area is still developing. That is why Russian blockbusters with beautiful special effects have appeared quite recently. It is worth mentioning Timur Bekmambetov, who gave impetus to modern Russian blockbusters (for which many thanks to him).
Concept
"CG" translates to "computer graphics". However, as a rule, this concept has a slightly different meaning. After all, the concept of “computer graphics” covers almost any field of activity where graphics are created by or with the help of a computer. However, the word “CG” specifically implies the creation of either special effects for video, or digital painting, or the creation of graphics for various interactive presentations and video games.
True, special effects in movies are usually called "CGI" ( computer- generated imagery , literally "computer-generated images"). Although, in principle, there are no special differences between CG and CGI.
And now the most interesting...
Special effects in cinema
Once upon a time, special effects were very primitive, but also innovative. Usually, the essence of special effects was to skillfully erase safety ropes, etc. from the frame to make everything look exciting and more interesting. All this happened in the days of silent films.
Later, when there was a need for various movie monsters, there was a need for corresponding special effects. Of course, if you need to create a humanoid or Bigfoot, then the actor simply applied makeup or put on a costume. However, creating something more complex caused big problems for directors.
To add bizarrely shaped creatures to movies, filmmakers came up with stop-motion animation. Those. a plasticine model of the creature was made, and then photographed many times, while its body pose was slightly changed. And then, if you quickly scrolled through such photographs (30 frames per second), it looked like the creature was moving. Although it looked ridiculous, the directors managed to make it quite interesting.

It was stop-motion animation that changed everything (even modern special effects are made according to the same principle). However, even in our time, some cartoons are made using frame-by-frame animation, because such cartoons look unique and interesting.

And then came the era of information and computerization...
Then the film industry realized that it was possible to render special effects using a computer. Moreover, characters and various creatures can also be drawn directly on the computer and transferred to film during editing. Then the first films with “embedded” characters appeared.

However, with this came problems. Due to the fact that such characters were superimposed on the tape after filming, the actors had to show all their acting abilities in order to interact with such an “invisible partner”.
When Steve Jobs created the Pixar company, he wanted to create a cartoon made and drawn only using a computer. This is how the Toy Story series was born.

Modern cinema is not far from the basics used by the forefathers of special effects. Only the plasticine creatures were replaced by creatures made entirely in graphic editors. However, there are a couple of techniques and tricks that modern directors actively use...
ChromaKey
Pronounced "chroma kay" though correct pronunciation should be "lame ki". The idea is simple: the actor is filmed against the backdrop of a green or blue cloth (rear screen), and after that the canvas is replaced with an image. Those. you can shoot almost an entire film in one pavilion, where main character travels around the planet (by the way, this is how the film Resident Evil 4 was created).

To project the desired image well onto the rear screen, you need to use a monotonous soft color, and therefore either green or blue are usually used.
MotionCapture
This means "motion capture". Special sensors (white balls or cubes, etc.) are attached to a real actor, and then all his movements are analyzed on a computer. Those. an actor fully dressed in a suit of sensors makes some movements, and then this animation data is transferred to a computer character. This way the computer character moves just like a human (smoothly and physically correctly).
And sometimes, motion capture is used locally, for example, to add something computer-generated to a real actor (computer makeup, if you like).


3D graphic editors
Without them, you won’t be able to make a single three-dimensional monster or creature, or build an entire city. To add, say, King Kong, you need to first model him. This is done in three-dimensional graphic editors, and the process is more like creating a sculpture. You need not only to be able to handle such programs, but also to know the basics of anatomy, composition, etc. As a rule, such people are also called artists, since the principle of work is almost the same.
Usually, a primitive model of the character is first made in order to understand how he will behave in the frame, how much space he will occupy, and how the actors should interact with him. And then a high-quality model is made for installation.

The skill of modern special effects creators is amazing. Fully simulated actors are already being created - of course, why pay a real actor when you can make your own, who will neither be capricious nor get sick.
In the following image you can see actor Jeff Bridges from the movie Tron: Legacy. On the left is the real Jeff Bridges, and on the right is his artificial young copy (which was created on a computer). Amazing isn't it...

Filmmakers have many more clever ideas for using computer technology in cinema. Who knows, maybe tomorrow this article will have to be updated - new technologies for producing special effects will appear. Now special effects and artificial computer characters indistinguishable from reality, and what will happen next...
At the end I want to show you a few short videos about the creation of special effects in some films.
Duration: 8 lessons of 2-3 hours
Cost: 3900 rub.
An extensive course in computer drawing, from which you will learn the principles of digital drawing and gain the necessary skills to create 2D graphics and implement ideas for computer games. During the training you will draw your own original character, game space, objects, etc.
For whom:
The course will be useful for aspiring CG artists, graphic designers and traditional artists who are looking to expand their skills and explore new possibilities in drawing. In other words, this course will be useful to artists in any field of digital drawing.
Peculiarities:
Similar courses in drawing studios in Moscow and St. Petersburg cost 20-30 thousand rubles. plus train tickets, accommodation and meals. Not everyone can afford such a pleasure, plus you need to carve out a few days for the trip.
With our course, you will receive the same amount of knowledge, but at a minimal price and in a schedule convenient for you.
Advantages:
- the lowest price;
- video recordings of all lessons;
- step-by-step system training;
- Feedback from the teacher;
- analysis of homework;
- individual approach;
- assistance with portfolio organization.
The video course is designed for 2 months, one lesson per week + homework, a total of 8 step-by-step lessons for 2-3 hours and 7 homework. For each homework you will receive a detailed video analysis from the teacher.
You can study lessons and complete assignments at a time convenient for you.
To take the course you will need a computer, internet, graphics tablet and graphics editor Photoshop.
For a main group of 10 people - 3900 rubles (cost in an additional group - 8000 rubles). Self-study 2900 rub.
Result / will know, be able to
- You will master basic digital drawing skills, the principles of creating 2D computer graphics, and learn how to bring ideas to life in a high-quality manner. Such a wealth of knowledge will give you big advantage in developing the skills of a CG artist. Will also appear in your portfolio quality work, which will certainly help you in future employment.
Program
Includes:
1. PREPARATION. Theory, pre-production, setting up Photoshop, tablet, brushes, creating a palette and much more.
2. CONCEPT. We look for references, draw sketches.
3. CHARACTER. Let's look at the entire character creation process.
4. SUBJECT. We will develop an inventory for your character.
5. BUILDING. Let's look at the principles of construction, shadows, volume and more.
6. LOCATION. We create a playing space - trees, stones, various textures.
7. INTERFACE. We'll draw icons and buttons, work with fonts, touch on usability and much more.
8. CONCLUSION. Let's sum up the results and prepare the work for the portfolio.
Write about irrelevant information.
If you don’t have the opportunity to spend at least several years on careful and painstaking learning to draw, and then thoroughly master the editor’s capabilities, and you still want to draw... Perhaps these tips for beginners will help you at least avoid mind-blowing pictures and save a lot of time in stepping on a rake.
I’ll say right away - you still need to learn the basics! But if you don't have the time or opportunity, then you have two options: don't draw at all or learn as you go. If you chose the latter, then feel free to read on.
Remember that everything that is forbidden to you, of course, can be used, but this should be done only when you understand what to do with it, otherwise the bumps from the rake will grow, but there will be no result.
TIP 1. Standard brushes in the form of grass, stars and other nonsense are bad for you for the next few months of working with your tablet and Photoshop.
This is evil, at least until you realize that you can do just fine without them. In the meantime, we strictly remember that during the first months of your close communication with the tablet, your only brush should be... a standard round hard brush. Okay, it can be square, rectangular, or whatever shape it is. Solid. Not soft.
A soft brush, of course, is also useful, but for starters it’s best to forget about it, or if you decide to paint a little with it, do it in small doses and leave it as a priority for now hard brush. Over the course of a couple of years, I heard so many phrases like “if only someone told me this” that I was definitely convinced that it was correct. this advice. So - trust me! Or kill it.
Many artists eventually make (or borrow from others) their own basic brushes. They usually have jagged edges to aid blending. But for you all this is completely unnecessary now. Forget about all these brushes that are full of them on the Internet. Learn to master the round hard one at least a little, and only then make it more difficult.
If the desire to use other brushes is too great, go to Photoshop and delete all the brushes except the hard round one... okay, also the soft one, and forget everything known methods creating brushes. For a while, of course.
Do you urgently need grass, leaves and butterflies? So what's the deal? Draw!
TIP 2. Your first drawing, or the next one if you have already drawn, should not be your favorite cat, dog, brother, sister, mom, dad, but... a tonal stretch.
And... no, not to practice pen pressure and straight lines, but to learn how to make smooth transitions. Most novice artists suffer from the fact that they simply do not know how to mix colors and smooth out planes. And, of course, the simplest and fastest solution is to use a soft brush, and this, in turn, leads to terrible results, which then lead especially faint-hearted artists to psychological trauma. Okay, that last one is a joke, but the fact remains. Therefore, before you start drawing, whether it is desirable or not, you definitely need to learn one simple but incredibly useful technique.
So from this:
We will get this:

Well, we'll deal with color later.
So, the most optimal and successful way to mix colors and create a smooth transition is to use a hard brush, as it allows you to create many transitions and maintain the “clarity” of the drawing, which gives it life. A soft brush allows you to make seemingly smoother transitions:

But such smoothness is rarely beneficial. It is good for creating the overall volume of the background, but whatever one may say, if you look closely, you can see that there remains a feeling of blur, and when this method is used in a drawing, for example, a portrait of your sister, then everything looks even worse.
It's up to you, of course, to decide which option you like best and, ideally, you should be able to use both, but you need to know when to use soft brush, and when it’s better NOT to. In the meantime, we still don’t know this well - the most the best option listen to smart aunts and uncles whom I shake like ripe tree, and do as they say.
So let's start our stretching.
In order to do such a simple stretch, you need to arm yourself with a hard round brush. Personally, for the basic brush, I prefer to turn off the pressure response of the pen, which would determine the thickness of the line, but the response to transparency is just that. But this is not for everyone. I believe anyone can make friends with Photoshop settings if they are not too lazy. And I will talk about something else.
1. So, take black and paint half of our drawing with it. Well, or approximately the part that in your opinion will be... a shadow.
2. Now we take and lower the Opacity (Opacity) and Flow (Pressure) parameters of the brush (they are located at the top of the menu) to approximately 40-50%. How less value Opacity - the more transparent our color will be and if we draw a line, then the bottom layer of color will also be visible through it. In fact, Opacity can be compared to the density of paint. The higher the value, the higher the hiding power. The Flow value determines the density of the "flow". Roughly speaking, by combining these two parameters you can achieve different effects from the brush without getting into its other settings. But let's get back to our sheep.
So, with the selected black color we paint halfway White color. Moreover, this must be done in one movement, without lifting the pen. If you tear it off, the previous stroke will cover the one already drawn and mixing will occur where we do not need it. Now we take the new resulting color with a pipette and paint it half black. As a result, we will end up with something like this:

3. Next we reduce the diameter of the brush, well, I think it’s clear why? And we take the resulting color on the left (on white) and paint it halfway white, and then do the same with black. And we end up with something like this:

4. I think it’s clear, what do we do next? We start going from left to right or from right to left (whichever is more convenient for you) and, taking a color, paint half of the adjacent one. Then we take the remaining piece of the unpainted color and paint the next piece halfway, etc. Basically, we actually did some kind of stretching.

It is crooked in places, but I did it solely as an example of the technique.
5. Now we reduce the Opacity to 15-30% - this depends on personal priorities, I, for example, usually use within 20% or more if the pressure mode of the brush pen is working, and continue to do the same. Again and again. In general, this lesson is made solely for training. As a result, you yourself will figure out how best to create transitions. What pressure to choose, how to apply colors. And this will just help you understand. You are unlikely to pervert yourself like this, but sometimes this will be necessary.
As a result, we will end up with something like this:
Once you understand this simple task, I advise you in the future to try to translate Opacity and Flow to pen pressure. And learn to work this way. Firstly, this will at least reduce your time for constant distractions to change parameters, and secondly, you will learn to more subtly manipulate pressure during the drawing process, which in itself is already cool!
Now let's discuss color stretching. Here everything is essentially the same. You can just stretch it in two ways. More precisely not so. The method is still the same, but the actions are slightly different and the result... different.
Option 1. Transition from one color to another, bypassing intermediate colors. This method is similar to b/w one-to-one stretching.

However, it is not very good for cases where colors are far apart on the color wheel. And, as you can see, the color at the point of mixing “falls” into gray, which is sometimes not very good for the drawing and can lead to “dirt” in the future, but it can be convenient for the background, where the colors should be less saturated than the foreground plan.
Option 2. Transition from one color to another through intermediate colors in the color wheel. Here the essence is the same, but we add colors that are between our two main ones. I won't explain what it is color circle and what does the intermediate color mean? Read color theory and you will find a lot useful information. Over time, you will learn to add several intermediate colors at once during the mixing process. In fact, this is how drawing happens - by adding and mixing different colors. Discovered America, right? But now we'll try to do it in a simple way so that you understand how it all works.
So first we divide our drawing in half into Yellow and Purple. Then open the palette and take a color somewhere in the middle between these colors, and with Opacity 50% paint half yellow and half purple. Voila and we get two intermediate colors.


Now comes the fun part! Open the palette and use the eyedropper to go over the entire stretch. First on the first, and then on the second. Is it really interesting? We follow the same range, BUT in the second case the colors are more saturated and bright. And that's great, right? By adding an intermediate color, we made our stretching more vibrant and it wasn't difficult at all.
Remember this and your drawings will immediately become more vibrant. This, of course, is difficult to implement right away, but over time you will get the hang of it and everything will work out. The main thing to remember is this when you draw.
One aspiring artist asked me to make a stretching video because the simple steps weren't enough for him. It was his first time holding a pen in his hands and he had never worked with Photoshop. I recorded a short video that shows how I did these stretches. It's very simple, but this type of pen training is actually very useful, especially when working with color. It would be great if you set the Opacity and Flow to pen pressure when executing. By the way, in this case you won’t have to lower these parameters too low. This can be seen in the video. I use 50% Opacity almost all the time.
C.G. or CG Painting is nothing more than digital drawing or abbreviation for Computer Graphic. This direction includes all pictures drawn on a computer or, as it is also called, Digital.
What CG artists draw in depends on what exactly they are drawing. Roughly divided, there is raster, vector and 3D. The vector can still be animated later.
Raster is, first of all, Adobe Photoshop
, in which you can draw in raster, partly in vector, create flash animations, work in the technique of photo art and collages.
Is there some more Corel Painter with a huge amount different brushes, imitating real painting. Some paint in less popular PhotoImpact, GIMP, SAI, Artweaver, Open Canvas, Art Rage, MyPaint, Krita. And of course in Paint, in which, by the way, it is convenient to draw pixel graphics, they say.

Vector is drawn mainly in Corel Draw And Adobe Illustrator . Both have their advantages and disadvantages, but both are the largest and most famous vector editors.

3D players also have a choice. 3D Max, Maya, ZBrush, Cinema4D– editors for 3D modeling. To fully create this type of computer graphics, you need a VERY powerful computer.

How is digital painting better than traditional painting?
- Very high speed and big choice materials. Choice desired color- a matter of seconds (unlike traditional painting, where you need to mix or buy additional paints to get the desired color - it requires experience and time), choosing the right brush/tool is also an almost instantaneous operation. You can do work with imitation oils, pastels, watercolors, or all at once, which is difficult in real world.
- The ability to cancel your actions, as well as the ability to save at any point in your work and return to it later, and an even larger list of features and advantages - all this makes the artist’s work several times faster with the same quality.
- Computer work is immediately ready for use in digital technologies of cinema, games, layout - work done on the material with paints must first be transferred to digital form and there are also a lot of problems here, plus an additional stage of work.
- Unlike traditional painting, digital painting has cool and convenient tools and capabilities: for example, working with layers or applying textures from photographs to the areas of the painting you need; generation of noise of a given type; various brush effects; HDR pictures; various filters and corrections, and much more.
The problem of education still remains outside the brackets - few schools and courses, a lot of personal time and money. But I think few areas can boast of instant and easy development. In general, now I know what CG is with some additional details and I’m not afraid of this term. It seems to me that, despite the “warm and luminous” aura of traditional painting, the possibilities of CG are still just developing and in the future this direction will only get better.