Is it possible to dry Antonovka? How to dry apples correctly: delicious apple chips at home. Dried apples in the oven on a baking sheet
During the harvest period, it is time to prepare for future use. Many people prefer canned vegetables and fruits and pickles. Compotes and jam are very tasty. Preparation of vegetable, fruit and berry products by freezing is quite popular. There are a huge number of recipes for preparing these preparations. But we should not forget that vegetable and fruit preparations can be prepared by drying. This type of food storage has a number of advantages. First of all, maximum preservation of vitamins, as well as the absence of any kind of preservatives. Dried fruits have a long shelf life that does not require special conditions.
Preparation of dried apples
Dried fruit compote is a popular drink that is prepared in winter. The main component in it is apples. At first glance, it may seem that drying them is quite difficult and cannot be done on your own. Even without special equipment, it is not difficult to prepare apples. There are several different cooking methods, and the simplest of them is sun drying.
The natural method of harvesting is the simplest and most affordable
Dried fruits are very useful. At home, apples can be dried in the open air. This harvesting method helps preserve nutrients. The quality of the workpiece will depend on the correctness of its execution. How to dry apples in the sun?

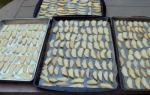
The main condition for this method is the air temperature. Naturally, this event is planned for a period with intense solar radiation. In cloudy or cold weather it is impossible to dry apples. No special preparation of fruits is required. Ripe, dense fruits are suitable for drying. The fruits are washed and dried. Next, remove the core and cut into thin slices. Before laying out the apple stock, the containers are covered with a clean cloth. The slices are laid out on a baking sheet or in one layer. They are placed in the sun. The drying process involves shaking containers of fruit daily. At the same time, the apple slices are turned over. The dry fruit preparation period will last three or four days.
Mixed cooking method
It should dry well. Even a little moisture can spoil dried fruits during storage. Therefore, if the sun is not bright enough, sliced apples can be dried and dried in the oven. At what temperature should you dry apples?

Drying begins at forty degrees Celsius. Next, the temperature is increased to seventy degrees Celsius. The last stage takes place at sixty degrees Celsius. The entire process will take about six hours. The finished dried fruits are cooled and placed in paper bags, linen bags or glass jars. They store very well and will be an excellent vitamin boost during the winter.
Application of technology for preparing dried fruits
The natural way is good. But if the summer is rainy, you won’t see good dried fruits. In this case, miracle technology comes to the rescue. Many people use electric ovens or ovens for this purpose. But, of course, special equipment will be more convenient for preparing dried preparations. An electric apple dryer is an excellent solution to this issue. There will be no need to depend on weather conditions and time of year.

Principle of operation
Apples are quite juicy fruits. To prepare dried fruits from them, you will need to evaporate the moisture contained in the fruits. This can be achieved in high temperature mode and constant air flow. For these purposes, various versions of electric dryers have been designed, which provide the process of moisture evaporation. Typically this is a thermostat with a built-in fan.
Various dryer options
How to dry apples in an electric dryer will depend on the type of equipment chosen. The simple design consists of a plastic sheet having a thickness of 3-5 mm. The interior is equipped with a heating element. The tray intended for placing fruit slices has a size of 20x60 cm. How to dry apples in an electric dryer of this type? This option is very easy to use and does not require special skills. Place apples cut into slices in one layer on a tray. Plug in the equipment. The entire drying process consists of periodically turning the apple slices over.

A more complex type of electrical equipment has greater productivity. The main part is the electric motor, usually located at the bottom. A varying number of plastic pallets with sides are installed above it. The entire structure is equipped with a lid on top with a hole for air exhaust. Electric dryers of this type are small-sized and easy to use. They are equipped with a different number of pallets and can have various additional equipment.
How to dry apples in this type of electric dryer? The engine generates a hot air stream that flows to the installed trays. Before turning on the dryer, you should prepare the apples. They are thoroughly washed and dried. Apples are cut into thin slices and placed in trays. It is better to cut it in the form of half rings, and immediately before drying. Fruits prepared in advance quickly oxidize and darken. The fruit preparation is placed on pallets in one layer. All preparatory work has been completed. You can turn on the equipment.

How long to dry apples in an electric dryer? Temperature conditions may vary. Low temperature - 35 degrees Celsius, medium - 50-55 degrees Celsius, high - 60 degrees Celsius. Apples are dried for ten hours. After the drying process is completed, the equipment is turned off. But you should not remove the trays immediately after finishing work. They remain in the same place for thirty minutes. During this time, the dried fruits cool down. Now the pallets are removed. Dried fruits are poured onto prepared trays. It is best if the finished product is left in the open air for some time. After this, they are packaged in prepared paper bags or linen bags intended for storage.
Determining the readiness of dried fruits
How to dry apples in an electric dryer until fully cooked? Dried fruits are considered fully prepared if the slices have changed their natural color and do not stick to your hands. Drying times may vary for different apple varieties. It depends on the juiciness of the fruit. Drying early and medium varieties will take a little less time than winter varieties. Very juicy fruits will have to be dried in several stages. If at the end of the drying process the cuttings are slightly damp, they should be dried further.
An apple is a most valuable product in its properties and taste, which contains a whole range of vitamins - A, B (1, 2, 3, 5, 6, 9), C, E, H, K, PP and many microelements - iron and zinc , potassium and calcium, phosphorus, copper and magnesium.
All benefits are easily perceived by the human body when consuming fresh apples in the summer and dried fruits produced from them in the winter. But not every housewife knows how to dry apples in the oven correctly so that they retain their unique qualities one hundred percent.
Before proceeding directly to the process of drying apples, regardless of the method - in the fresh air, in a gas oven, microwave, electric oven, etc., it is necessary to sort the most suitable fruits and process them correctly.
Apples are selected based on the following characteristics:
- Fruits of category 1 are collected from branches and do not have any defects. They are ideal for preparing beautiful, even and uniformly sized dried fruits.
- Fruits of the 2nd category - collected from branches or from the ground, with minor damage to the skin: marks from branches or dents from the impact of a fall. They are also suitable for drying for the winter.
- Fruits of category 3 are carrion, having small holes from worms and other damage. It is not very correct to make dried fruits from such fruits, but if there is no choice, then it is quite acceptable. The main thing is to carefully trim off all defects, leaving only the untouched part of the fruit.
Preparing fruits for drying includes the following steps:
- Apples need to be washed thoroughly.
- Next, carefully cut out all the defects.
- Peel the fruits.
- Cut them into circles or slices.
At first glance, the preparation process looks quite simple, but there are some subtleties here:
- It is not necessary to peel the apple peel, as it contains the largest amount of vitamins. If apples are prepared for compote, then unpeeled dried fruits, and even the core, will do just fine. But when preparing a product for charlotte, jelly or jam, the skin should be peeled, as its hardness will ruin the entire taste.
- You can cut apples into circles 0.5 centimeters thick or into slices up to 0.7 centimeters. Parts that are too thick will not have time to dry out in time, and parts that are too thin will turn into rubber.
- When slicing fruits, it is advisable to try to make the pieces as identical as possible so that they are dried at the same time, and subsequently there will be no problems with under-drying some and over-drying others.
- To prevent the slices from darkening from contact with air (iron oxidizes), they must be kept in a solution of citric acid (2 g per liter) for several minutes.
- Drying apples takes from 5 to 10 hours, depending on their variety (hard and sour ones take longer to dry).
How to dry apples in an electric oven
After the slices are prepared, the drying process begins, which always takes quite a long time. You can dry apples in an electric oven.
This is done as follows:
- Place the prepared slices on a wire rack covered with permanent paper (the drying process will be much faster on the wire rack than on a baking sheet).
- Preheat the electric oven to 40-50 degrees and dry the slices at this temperature for some time.
- Raise the temperature to 80-90 degrees and dry the apples for several hours.
- Closer to the readiness of dried fruits, reduce the temperature again to 50 degrees so that the pieces do not burn.
- Alternate both modes and temperatures - low, medium, low.
- Check the readiness of dried fruits by eye: all pieces should be flexible and elastic.
In a convection oven
The practice of dedicated housewives shows that it is much more effective to dry apples in a convection oven. For your information, convection is the uniform distribution of hot air in the interior of the oven using a built-in fan.
Step-by-step instruction:
- Place the washed and sliced apples in a single layer on a wire rack and place in a convection oven preheated to 50 degrees.
- Wait 1.5 hours and turn the pieces over.
- Raise the oven temperature to 75 degrees.
- Wait from one to two hours depending on the rate of evaporation of water from specific varieties.
- Reduce the temperature again to 50 degrees and keep the future dried fruits for about 2 more hours.
- Check for doneness - turn off the heat and let the apples cool.
Alternatively, you can use another drying method (in a non-convection cabinet):
- Dry the apple slices for 60 minutes in an electric oven heated to 60 degrees.
- Raise the temperature to 75 degrees, stir the slices, and leave the door ajar (an alternative to a fan).
- When the dried fruits are close to ready, increase the temperature to 95-100 degrees and keep them for another 20 or 30 minutes (the door should still be left ajar).
With this technique, cold air entering the cabinet from the outside will act as a fan and distribute hot air evenly throughout the entire internal space, which will ensure quick and high-quality drying of the apple slices.
Apple chips with sugar
Using any oven you can not only dry fruits for the winter, but also prepare amazingly tasty and, most importantly, healthy apple treats. For example, chips with sugar, which both adults and children will definitely love.
Ingredients:
- apples – quantity as desired (4 servings require 5 or 6 pieces).
- powdered sugar – 1 sachet.
- cinnamon - to taste (optional).
Cooking method:
- Cut clean apples (preferably medium-sized) into the thinnest translucent circles (no need to peel, but remove the core if desired).
- Place future chips on a baking sheet previously covered with parchment.
- Set the minimum temperature in the oven and place the sheet with the workpiece in it.
- Cook the chips for 90–120 minutes, depending on your oven.
- Constantly monitor the degree of drying of the product and turn it over so that it does not burn.
- Cool the chips and sprinkle them with powdered sugar and cinnamon.
- Store the finished treat in a fabric bag. Polyethylene is contraindicated, as the chips will become damp.
Dried apples in a gas oven on a baking sheet
You can prepare excellent dried fruits from apples in the oven of a gas stove, and not just in an electric cabinet.
This is done simply:
- Cut the finished apples into slices of approximately equal size with a thickness of no more than 1 centimeter.
- Soak the slices in a solution of citric acid or salt (to get rid of darkening) and dry with napkins. The pieces can also be blanched in boiling water for a couple of minutes.
- Place future dried fruits in a thin layer on a baking sheet lined with parchment paper.
- Heat the oven to 70 degrees and place the sheet with the workpiece in it.
- Dry the apples for 2 or 3 hours.
- Reduce temperature by 20 degrees (to 50).
- Keep the apples until ready\. when dried fruits bend easily and do not crack.
- Approximately every 1.5–2 hours, the slices need to be turned over.
This is done in the following way:
- Select healthy and beautiful medium-sized fruits without damage.
- Take a sharp knife and cut the apple into slices.
- Using the tip of a knife, cut out the core.
You can dry apple rings using any of the methods described above.
How to properly store dried apples
Dried apples should be stored in a dark place and in a cool place. It is highly not recommended to place them in polyethylene, as in this case they will quickly become moldy. Ideal packaging would be made from fabric bags suspended in a periodically ventilated dark room. Optimal conditions are storage in the pantry in clean ribbed wooden boxes, cardboard boxes or paper bags.
Apples have so many beneficial properties that you can’t remember them all at once. They increase hemoglobin, strengthen the heart, remove toxins from the body, cleanse tooth enamel, improve immunity, and are also a hypoallergenic product, and so on.
To maintain health, apples need to be eaten not only in the summer, but also in the winter, and therefore it is so important to learn how to preserve them for yourself and loved ones in the form of dried fruits.
Dried apples are rightfully considered a universal preparation. Compotes and fruit drinks are made using this product, and apples are also consumed as an independent dish. Among other things, the preparation retains its beneficial properties no worse than fresh fruits. Many experienced housewives prefer to dry apples themselves, without overpaying for store-bought products. However, like any other matter, the procedure requires certain knowledge. Let's consider the basic aspects in order, highlighting the main drying methods.
Features of drying apples
- If you are drying whole fruits, sort them by size. It is also important to ensure that the surface is undamaged.
- Autumn apples are considered the best option for drying. It is advisable to choose fruits with equal degrees of sweetness and sourness; you can use completely sour varieties.
- If we talk about drying apples into slices, cut the fruits so that the thickness of each slice is no more than 0.8 cm. It is important to adhere to the same indicator for all sliced apples.
- You can cut apples into slices or slices, it all depends on personal wishes. However, the first option is preferable, since in this case drying occurs quickly and evenly.
- During heat treatment, all sliced fruits should be laid out in one row. Otherwise, the apples will dry unevenly, some of the slices will burn and stick together.
Apples are darkening: what to do
- Apples have an unpleasant tendency to darken due to the large amount of iron they contain. For this reason, oxidized fruits do not look aesthetically pleasing and lose a number of beneficial properties.
- Prepare a solution consisting of filtered cold water and fine table salt. Dilute the amount according to 1 liter. liquid accounts for 12 grams. bulk composition. Always stir the mixture until the granules dissolve. Soak the apples in the solution and leave for about half an hour. After this, dry and proceed to heat treatment.
- Another option that will relieve fruits from blackening is the use of citric acid. Dilute 3 gr. composition in 1 l. drinking water, stir until the crystals are completely dissolved. Dip apple slices into the cold solution and wait 25 minutes. After this, remove and dry to remove excess moisture from the glass.
- One of the popular methods for eliminating darkening is the blanching procedure. The technique is that the oxidized fruits are immersed in boiling water for 3 seconds, then removed with a slotted spoon and dried. It is important to remember that during the blanching process the apples become less sugary.
- Another common method is contrast processing. Place the circles or slices in a colander and hold over hot steam for 5 minutes. After this, immerse in cold filtered water for 1 minute and remove. Dry on a pre-spread towel.

- For drying apples in the oven, winter varieties are considered the best option, and the apples should be sweet, sour or sweet and sour. Give preference to Slavyanka, Aport, Titovka, Anis, Borovik, Antonovka.
- Some housewives dry autumn or summer apples, as well as carrion, in the oven. However, the resulting product is of lower quality. In this case, the apples are dried directly with the peel.
- After choosing the variety of apples, start preparing them. Sort through the fruits, eliminating all that are bruised, rotten or bitten by pests. Place the apples in a colander and rinse under cold running water.
- Remove the core in a convenient way (you can cut the fruit into 2 parts), remove the peel. Cut the apples into slices or circles about 8 mm wide. Place the cuttings in a solution of citric acid or salt to prevent oxidation.
- Remove the slices, blanching if desired, if you need to get the final product faster. However, in this case, the apples will lose their beneficial qualities. Once preparation is complete, begin drying.
- Take several baking sheets and line the cavity with baking paper. Place the sliced apples in one row, keeping a distance of about 1 cm from each other. Turn on the oven to preheat, wait until the temperature reaches 85 degrees.
- Place the baking sheets in the oven, and after 20 minutes, reduce the power to 70 degrees. The process has started, wait 5 hours, then remove the baking sheets and turn the slices over. Reduce temperature by 20 degrees.
- In order for the apples to dry well and not mold to form on them, the exposure time should be another 4 hours at 50 degrees. During this period, turn the slices over every hour to ensure even drying.
- When the chopped apples turn light brown, remove them from the oven. Take one slice, it should not be wet or brittle. Cool the apples, transfer them to a cloth bag or wrap them in parchment paper.

- Processing apples with this method is characterized by the speed of the procedure, which is considered an undeniable advantage. The final product turns out no worse than in the oven. At the same time, apples retain their beneficial properties; they can be eaten as an independent snack or prepared as a compote based on dried fruits.
- The main condition is the correctly selected power, thanks to which the product does not dry out. The duration of heat treatment is of no small importance; it should not exceed permissible limits. Drying is carried out in two stages; we will consider each of them in more detail.
- First, wash and sort the apples. Remove the stems, core, and peel. Choose a flat dish, you can use a round microwave plate. Cut the fruits into slices about 0.5 cm wide, soak them in a solution of citric acid and dry.
- Place the apples on a dish in one row, place the container in the microwave, set the power to about 270W and the processing time for 35 seconds. After the expiration date, remove the dish; the apples will already be half cooked. Turn the slices over to the other side, increase the power to 300W, turn on the timer for 3.5 minutes.
- After the specified time has elapsed, remove the finished product and evaluate the structure. If the apples seem damp to you, leave them for another half a minute. Next, cool the dried fruits and store them for long-term storage in a fabric bag.
Drying apples in an electric dryer
- This method is rightfully considered the most convenient. The process does not require careful outside control; drying takes place automatically.
- To begin the procedure, sort through the apples, remove rotten and spoiled ones. Wash the fruits, cut out the core, stalks and remove the peel (you don’t have to remove it).
- Large apples should be dried only in crushed form. To do this, chop them into circles or slices and place them in a cold solution of citric acid for 10 minutes.
- The best option for drying apples using this method is considered to be the Titovka, Antonovka, Pepin or Aport varieties. You should not send winter-ripened fruits for processing. You can use wild apples or whole scorched apples.
- Assemble the electric dryer, remove the apple section from it, and plug the device into the mains. Place the apples in a single layer on a tray, insert it into the dryer, and close the lid. Turn on the device and go do household chores.
- As a rule, the duration of heat treatment is 5.5-6.5 hours. In the first 3 hours, apples should be dried at a temperature of 80 degrees, then the indicator is reduced to 50 degrees.
- To determine if the product is ready, take a slice and press on it. If no juice is released, drying has come to an end. Cool the apples and place them in a bag or wrap them in parchment paper.

- The good thing about this technique is that, thanks to natural drying, energy costs are significantly saved. However, apples can only be processed in this way in sunny weather with low humidity, otherwise they will become moldy.
- To dry fruits in this way, it is better to choose summer or autumn apples; wild ones are suitable. If the processing naturally did not go according to plan (it started to rain or the sun disappeared), you can dry the apples in the oven or using an electric dryer.
- Slice the apples to about 5 mm thick, no more. Otherwise, the slices will not dry completely. Soak the composition in a solution of salt or citric acid, remove and dry. Prepare a wire rack or plastic tray, place it in one row, cover with gauze cloth.
- Place the trays in the sun and remove the apples from the street at nightfall. Keep them indoors until the morning, since the humidity is much higher at night than during the day. It takes about 5 days to dry apples in this way. At the same time, they need to be put outside during daylight hours, and taken home during dark times.
- After the specified time has passed, you can dry the fruits in the oven or leave them in a place with good air circulation until final cooking. If desired, you can string the circles on a rope, dividing the apples among themselves in a convenient way.
- After cooking, transfer the finished apples to a polished bag or gauze folded in 6 layers. Store in a well-ventilated place, do not expose to moisture. Open the bag periodically to check the safety of the fruit.
Drying apples on an electric stove
- The technique is considered not the most convenient to implement. It is suitable for people who do not have a dryer/oven or are unable to obtain the finished product naturally.
- To begin, sort out the apples, peel and core them, and chop them into slices (about 5 mm wide). Place the food on the grill rack and place the section on a baking sheet.
- Place a baking sheet (or other metal utensil) on the burners and set the power to minimum. Dry for about 15 hours, periodically turning off the device.
- Turn the apples over once every 3 hours. If desired, you can combine natural drying with the use of an electric stove. When the fruits are dry, pack them into bags.
The most convenient way to dry apples is heat treatment in the oven. If you have an electric dryer, the procedure will take place without outside control. Many people prefer to leave the fruit in the sun until final cooking, it all depends on personal preference.
Video: drying apples in the oven
Hello, dear readers of our blog. Today we invite summer residents, gardeners, fans of winter preparations, as well as anyone interested in the topic of how to properly dry apples at home for the winter to a conversation. At the same time, making dried fruits from apples remains our most popular method of preserving the maximum beneficial properties of these wonderful fruits.
Apple drying methods
This year's summer can rightfully be called apple; the generous harvest in most gardens allows you to make jams, purees, marmalade, and other canned goods.
Various methods are effective for drying apples, whether using equipment or not.

You can choose any one that best suits your circumstances:
- on air;
- in a closed, dry room;
- in the oven;
- in the oven;
- in the microwave;
- in an electric dryer.
Now let's talk about the features and subtleties of these methods in more detail.
How to properly dry apples at home: preparing the fruit
Regardless of how you dry your apples, the steps to prepare for the process are the same:

- The fruits are pre-washed and wiped or dried to remove excess moisture.
- Homemade, unprocessed apples do not need to be peeled; they are rich in vitamins. If there is a suspicion that the crop has been repeatedly treated with chemicals, it is prudent to remove the outer peel.
- Remove all damaged, bruised areas and remove the core.
- Cut the apples into slices no thicker than 1 cm.
- If you want to maintain a light color, place the partially prepared material for several minutes in a weak salt solution: 100 g per bucket of water.
Drying apples naturally
This method of preparing fruit is the most ancient and widespread.

Despite the fact that many people have household appliances, it is used en masse due to some advantages:
- with a good harvest, drying without the use of equipment allows you to simultaneously process a large number of pieces almost at once;
- electricity and other resources are saved.
However, there are also some nuances:
- You can start drying preparations outside only during hot, sunny days;
- you have to constantly monitor the weather to prevent moisture from entering;
- must be protected from flies and other insects;
- It will take more than one day for complete drying.
Dry in the sun
For drying in open sunny space, choose a well-lit place. Roof slopes on the south side, large baking sheets mounted on stands, and mesh flooring are perfect for this. The process itself goes like this:
- Lay out the slices in one layer;
- Several layers of gauze or other thin fabric will serve as partial protection against flies and dust.
- At night, cover the drying area with film or put it indoors to protect it from night dew or sudden precipitation.
- The next day, place the pieces on the other side.
How long it will take to completely dry depends on the intensity of solar heating and the juiciness of the apples.
Hanging on a thread
Another way to prepare high-quality dried apples is to string fruit slices on a strong thread, like mushrooms. Try also using thin skewers: it will look like a kebab.
Such a “necklace” or stringed sticks are hung on hooks or long nails in any sunny space.
When the apples are well dried on the twine, they will have to be dried a little more in hotter conditions, since at low temperatures they still have poor ventilation among themselves.
In the air, but in the shade
You can also prepare thin apple chips in the shade under a canopy. Attics, gazebos and similar structures that are well ventilated are ideal for this. The advantage of using a roof is that you don’t have to constantly look at the clouds and protect from rain.
If there is such a useful structure on the site as a bathhouse, you can also use it for preparing dried fruits. To do this, you will have to heat it a little, and the smells of ripe fruits will fill the wooden paneling for a long time, and will remind you of summer.
Such different dryers
To the delight of housewives and owners, manufacturers of household appliances offer us electrical appliances of all kinds in terms of power, capacity and design for drying fruits and vegetables.
The choice of temperature, time and laying rules required for apples are indicated in each instruction for a specific device. The compressor, which heats and pumps air, is located above or below plastic trays with slots or mesh. Balls of chopped apples are placed on these containers.
It is convenient to prepare dried fruits in an electric dryer; the product is completely protected from dust and insects. Cooking time under the influence of hot air becomes a maximum of 8 hours. The disadvantage of this method is that the number of simultaneous bookmarks is limited by the volume of the device. You need to cut exactly as much fruit as will fit at a time; you don’t need to prepare a lot in advance.
Drying in a dehydrator
A dehydrator is also a kind of dryer, but somewhat different. This household appliance is designed to remove excess moisture from any product, leaving maximum beneficial properties and increasing shelf life.
Unlike just a dryer, a dehydrator distributes hot air evenly throughout the entire interior space. Using this device you can also prepare various cookies, marshmallows and other sweets.
How to dry in a house or apartment
What to do if you haven’t purchased any special equipment, there is no yard space, but you got a lot of apples from the village? Dont be upset. Without a dryer, other kitchen assistants will do the job just fine. I’ll tell you now how to do this in the best way.
In an electric or gas oven
In the oven, the drying process goes like this:
- Preheat the oven to 80°.
- On a baking sheet covered with parchment paper, arrange the prepared fruit slices evenly into one ball.
- Place the dish with apples in the oven for half an hour, then reduce the temperature to 70°.
- After half the moisture has come out (this happens after about 5 hours, but depends on the juiciness of the apples), turn the slices over to the other side and reduce the temperature to 50°.
- Leave to dry for another 4 hours.
Normally dried apples do not release juice, do not break when bent, and do not have a soft center. If this stage has already arrived, turn off the oven, let the dried fruits cool slightly at room temperature and pack for storage.
In the microwave
Microwave ovens have their drawback - a small yield of product at a time, but this one yield is obtained much faster. The drying steps look like this:
- Thin slices of apples are laid out in a thin layer on a plate and placed in the oven.
- Required mode: power – 250 W, time – 30 – 40 seconds.
- Take out the plate, turn the slices over to the other side and place them inside again.
- The second stage will take 3 minutes, with a power of 300 W.
Ready. You can easily dry a large number of apples in the microwave, but you will have to stay close and manage the processes all the time.
In the Russian oven
If you have a private house with a Russian stove, then you can entrust the drying of the crop to this assistant. Remove the sparkling coals from the heated oven and cool it to a temperature of 80-85o. It is not necessary to check the degree of heat with a special thermometer; just throw a handful of flour into the ashes - if it instantly turns brown, it means it is still very hot.
The oven space allows you to stack baking trays or sieves in tiers. The lower container is placed on bricks, thick logs, or iron bars so that the apples do not get dirty with ash. Oven drying usually takes 5-6 hours. There is no need to close the damper - the air should circulate well.
Vitamin and tasty preparations have been made - now they need to be properly stored. Do not use cellophane - food in it will quickly fog up and become moldy. Such a bag can be used for a short time in order to transport drying goods from the dacha, for example.

Hello dear readers. We are all waiting for the arrival of autumn in order to fully enjoy its gifts, which are so useful at this time of year. Everyone knows that autumn is the time for fragrant apples, which beckon with the variety of their varieties. Having not had time to try all the types of these autumn fruits, we are trying to prepare them for the winter in every possible way. One of these methods is drying apples, thanks to which we can enjoy healthy vitamin drinks based on such dried fruits even in the cold season. This cloudy time of year does not allow us to carry out natural drying of fruits, but this does not matter. After all, there are several interesting ways to dry apple slices, which can be easily done at home.
Of course, you can buy a ready-made product in the supermarket, but no one can guarantee its naturalness. And the too ideal appearance of such drying is alarming.
Such a sign may indicate chemical processing of this product, which most likely removed the apples from their usual vitamin composition.
By preparing dried apples yourself, you will know for sure that this product is natural, although it is not so attractive in appearance.
So, let's figure out how to properly prepare such dried apples, and what secrets will help your drying look no worse than store-bought.
How to dry apples at home - subtleties and secrets
Remember how grandmother always prepared dried fruits from various fruits even in the warm season, and already in winter we could enjoy the aromatic compote that she prepared.
And we, as children, were always trying to steal a few dried apple slices from a huge bunch, which consisted entirely of dried fruits.
The drying turned out to be very sweet, because during the drying process, excess moisture evaporates from the fruit, due to which only vitamins and sucrose remain in them.
And now it is quite possible to use dried apples as snacks between main meals.
Such a light snack will especially please our lovely ladies who are trying to keep themselves in shape even in winter, when you won’t find vitamins as such during the day.
Apples, in comparison with other types of drying, have the least calories, and their structure is quite soft, which cannot be said about home-dried apricots.
The drying process has a number of advantages, thanks to which you will immediately run to the market for fresh apples for drying:
✔ This type of preparation will not take up much of your time, especially if you are a busy housewife.
You will only need to cut the apples, and the rest is not up to you. After all, if you prepare compote for the winter, it can take a lot of time. And so, you will simply prepare the basis for the future compote, which can be prepared at any time, without particularly straining.
✔ At home, you have complete control over the process, which will result in a natural product.
Ideally, of course, it would be nice to produce this type of preparation from apples that you pick in your own garden.
But fruits bought at the market are also suitable. The main thing is not to buy apples in supermarkets, since you definitely won’t find anything natural there.
✔ Such dried fruits do not require special “greenhouse” conditions for their storage, so they are definitely not in danger of quick spoilage.
And thanks to the reduced size of each slice, you can easily store this dryer in a fabric bag right in the kitchen. Just imagine the aroma that will spread throughout the kitchen.
Therefore, you should not think that the dried version of apples is somehow worse than fresh ones, because they cannot be subjected to any heat treatment. Rather, apple jam will be less healthy, since during its preparation most of the vitamins will simply evaporate.
Interestingly, the same amount of vitamins in dried apple fruits can be preserved for 10 years. Therefore, think about how such “dry vitamins” can save you during the cold season.
Weigh all the pros and the lack of cons, and hurry to the market for the required number of apples.
But keep in mind that during the drying process, fruits can shrink by as much as 7 times. Therefore, if you are planning to dry apples for the entire winter season, then one kilogram will clearly not be enough. After all, from such a quantity of fresh fruits you will get only 150 g of the finished product.
Before deciding to take such a crucial step, you need to familiarize yourself with some conditions for the correct implementation of the drying process in order to fully preserve its vitamin composition.
Apple processing and drying technology
- The process of drying fruits can be carried out either using special devices that every kitchen is now equipped with, or in the tired autumn sun. Since autumn may turn out to be far from sunny, it is better to immediately consider the option of preparing drying in apartment conditions. You can use either a simple oven or a microwave.
- To obtain a quality product, you need to make sure that the apples were removed from the tree correctly. Therefore, it is better to do this yourself, but the collection must be carried out in dry weather, because moisture can lead to future damage to the fruit. In addition, shaking off the apple tree is prohibited, because damage to the structure of the fruit can also spoil the quality of the finished drying.
- Choose only ripe apples without any external damage. Slightly rotten fruits can ruin the entire drying batch.
- Drying involves using only ripe apples, so it is recommended to choose only autumn varieties, because only they will contain such a large amount of useful substances. In order for the finished drying to still taste like an apple, it is advisable to choose sour or sweet and sour varieties. In addition, their acid will indicate a high content of ascorbic acid.
- Everyone wants to get beautiful drying as a result, so many people cut apples into slices. Undoubtedly, such drying looks great, but be prepared, the drying process of such round pieces can take much longer. Therefore, it is better to cut the fruits in the usual way - into slices. This way, you will get drying much faster, and the likelihood that it will deteriorate is reduced significantly.

- The slices should be cut into small thicknesses, because fruits cut too thick can take too long to dry, or even completely deteriorate during the drying process. And they shouldn’t be too big in size. Many people don’t like the peel, but don’t rush to remove it from a ruddy apple, because it contains the largest amount of vitamins.
- Want to get the perfect dry white color? There is one secret that will help you achieve the desired result: after cutting the fruits, dip the finished slices in a saline solution for a few minutes, then rinse them in clean water. Place the apple slices on a paper towel to absorb excess moisture. And for the solution you will need 50 g of salt per 3 liters of water.
- There is another way to process apple slices, which you will definitely like much more than the previous one. You will need to place the future drying in a citric acid solution, but if you want apples with a lemon flavor, then use fresh lemon juice. But if you care not about the appearance of the future workpiece, but about its taste, then you don’t have to waste time on processing.
- We place the slices on special racks or simple baking sheets; large wooden boards are also suitable. If you are an experienced specialist in these matters, then you probably have a special frame with stretched cotton fabric. This option will be simply ideal for obtaining the desired result.
- If you still couldn’t resist and cut the apples into perfectly even slices, then for quick drying it is best to string the finished slices onto wooden sticks. Well, or you can just string them on a thread and hang these apple garlands in the interior. So, you will prepare the drying and decorate the room, and besides, the aroma emanating from the fruits that are in the process of drying will simply enchant you.
Drying apples at home is an important process; many people dry apples for themselves, and some people dry them for sale. Therefore, everything must be perfect.
How to know when dried fruits are ready
In such an activity, it is important to control the process all the time, because you can dry out the fruit. We are talking about a method of drying fruits using an oven.
After all, an overdried product will not only lose its taste, but will also lose those beneficial vitamins for which we started all this.
But even under-dried apple slices are not suitable for us, because their long-term storage will be simply impossible.
Half-raw dried fruits will simply rot if stored in a bag, which we will probably hide in a dark closet.
Our drying will not have a chance to deteriorate, because there is a method that will help determine the degree of its readiness.
So, select one of the slices and try to bend it between your fingers. The finished dried apple is quite elastic, which allows it to bend easily.
But if it turns out to be fragile and breaks into two parts right in your hands, then this means that the product is not ready yet.
Sun drying - how to dry apples
This method has been familiar to us since childhood, but it is not always possible to dry late apples in the sleepy rays of the sun.
After all, we can find the most ripe apples only in the fall, but this is not a problem. There are special summer varieties designed specifically for drying.

Of course, such a process will take much longer than in the oven, but for lovers of a natural way to dry apple fruits, we offer this option.
The ideal time for this kind of activity is in September, when there is already a sufficient variety of apple harvest, and the sun is still shining like summer.
Residents of apartment buildings can place prepared apples directly on their balcony. This is the only well-ventilated place in the apartment that receives enough sunlight. But if there is no balcony, then this is not a problem.
You can even place the dryer on the windowsill, but with the condition that the room will be constantly ventilated.
- We select undamaged fruits that must be thoroughly washed. Next, cut the apple in half, remove the core, and then cut it into small slices.
- To preserve the snow-white color of the fruits, dip them in salt water for a couple of minutes, then rinse them under running water to get rid of salt. Remove excess moisture with a napkin and place the apple slices on a flat, flat surface.
- We place our future dryer on the balcony and leave it under the gentle rays of the sun. But at night it is better to take the workpiece into the apartment, because due to the lack of heat, the fruits can absorb moisture, which can interfere with the cooking process. It is better to cover them with some kind of cloth, which will serve as protection from summer insects.
- Throughout the day, it is better to “check” our apple slices from time to time so that the process of drying the fruit occurs evenly. If one side of the slices is already dry enough, then it’s time to turn them over to the other side.
On average, fruits can dry from 4 to 6 days, but these indicators will vary depending on factors influencing the situation: the intensity of sunlight, air temperature, and the thickness of the slices themselves.
How to dry apples at home using an oven
If you have found your ideal apple variety, but it is too late to carry out natural drying, because it is late autumn outside, do not worry.
The drying process can also be carried out in apartment conditions, and it is usually carried out using an oven.
Using a wire rack to dry the apples is ideal, but a baking tray is also a good option. Only in this case, you need to constantly turn the slices so that they dry evenly.
- It is necessary to set the temperature to no more than 60 degrees, because high temperatures can damage the structure of the fruit, as a result of which the beneficial substances contained in them will be lost. It is also important to keep the oven door ajar from time to time for better air circulation.
- When the slices have lost most of their moisture, causing them to wilt a little, lower the temperature slightly.
- It is necessary to keep the product in the oven until you are sure that they are dry enough for long-term storage. After all, under-dried fruits will begin to quickly deteriorate, and your harvest of dried fruits will simply be ruined.
Drying apples at home using an oven is much easier and more profitable if you live in an apartment.
How to dry apples in an electric dryer for the winter
Electric drying is good because during the drying process the fruit is provided with constant air circulation. Thanks to this, they are dried with the help of heat and air, and are not dried out due to exposure to high temperatures.
To ensure even drying, place the slices in one layer on a special round-shaped mesh.
The temperature should also not be higher than 60 degrees. Under such conditions, drying will be ready after 8 hours, although this time may vary depending on the thickness of the slices.
How to dry apples in the microwave
If you are a busy housewife and you do not have time to control this complex process, then use the help of a microwave. So, you will get drying in a matter of hours, but keep in mind that some vitamins may be lost.
- Having chosen undamaged apples, you need to wash them thoroughly and cut them as you like. We take a plate and line it with a thin natural cloth, after which we lay out our slices on the prepared surface. We also put the same fabric on top.
- We set the mode to 200 W and leave the future drying for 3-4 minutes. As a result, we get a quick drying option that will be stored for quite a long time.
Storing apples - important rules
Properly dried fruits are only half the battle, albeit a very important one; this allows you to preserve dried apples for the winter. But in order for drying to retain its taste and beneficial properties, it is necessary to provide it with acceptable conditions.

Usually such dried fruits are stored in plastic bags, which is not very correct. The fact is that polyethylene does not allow air to pass through at all, and this can lead to rotting of dried fruits.
Therefore, the ideal option, of course, would be a bag made of natural cotton fabric. This fabric allows air to pass through well, which will help the slices to be stored for as long as possible.
If you put ready-made dried fruits into a bag, this does not mean that you can forget about them before the first desire to cook compote. From time to time it is necessary to check their condition, because such dry fruits can be a real delicacy for various insects.
In addition, it may happen that mold overtakes your workpiece. But this will only happen if the air humidity in the room increases or if the fruits were not completely dried.
Although the process of drying apple slices may seem impossible in apartment conditions, this is actually not the case. It’s just that not everyone knows how to dry apples correctly.
There are several alternative solutions to the usual drying of apples in the sun. In addition, it will not take you much time, because your task is only to prepare the fruits for the main processing. Drying fruit is much easier than making jam or sealing compotes.