How to heat a greenhouse in winter: heating systems and heaters, projects, photos. Do-it-yourself potbelly stove. Affordable and effective ways to heat greenhouses and greenhouses at any time of the year
A heated greenhouse is a great way to extend the growing season and fruiting of vegetables. There are several ways to set up a heating system; the choice depends on the area of the greenhouse and its purpose, as well as the resources available to you. You can install the heating system yourself.
It is advisable to install heating systems in greenhouses for year-round use or for early spring planting of vegetables, herbs and flowers.
Effective methods of heating greenhouses include:
- stove heating, including with air and water circuits;
- water heating based on solid fuel, gas or electric boiler;
- heating using a gas gun;
- electric heating using convectors or infrared heaters;
- heating the soil with a heating cable or water heating pipes.
The methods can be combined, for example, by installing stove heating as the main heating source and a heating cable as an additional one.

When installing a boiler and installing a water heating system, soil heating is also done with water, connecting the pipes with a separate circuit.

Heating with gas guns is quite effective - the room warms up quickly, and the gas consumption is small. The gun takes up little space and is quite safe to use.

When using electric heating as the main one, it is recommended to use infrared heaters - they heat the soil and the plants themselves without drying out the air. Convectors heat the air, while in the lower part of the greenhouse - in the root zone - the temperature remains low, and at the top - excessively high. For this reason, convectors are usually used only for temporary heating.

Stove heating of a greenhouse
Ovens for greenhouses can be metal or brick. The second option is preferable - the brick takes longer to heat up, but at the same time retains heat well and cools down for a long time, and the temperature in the greenhouse remains stable. When heating with a brick stove, the air does not dry out, the humidity remains within acceptable limits.

Metal stoves heat up quickly, but have a low heat capacity and heat only as long as the wood burns. At the same time, the walls of the devices become very hot and dry the air. For this reason, metal stoves are often equipped with a water circuit with registers or radiators - the heated water in them cools down gradually, smoothing out temperature changes.
Metal stoves for greenhouses
- metal stoves are mobile, they can be installed for several cold months and removed in the summer;
- they do not require a foundation and do not take up much space;
- by choosing the appropriate model, you can connect the water circuit;
- the price of metal stoves is not too high;
- installation and installation can be done with your own hands, even without the knowledge of laying stoves.

Disadvantages of metal stoves:
- the heating process cannot be automated; the stove will have to be heated manually;
- metal stoves dry the air, so it is necessary to install containers with water in the greenhouse to humidify the air.
The stove can be installed either in the greenhouse itself or in a vestibule or utility room by connecting an air or water circuit to the greenhouse. The chimney from a metal stove can be placed in the greenhouse space, installing it at an angle of at least 15 degrees - this will provide additional heating. In this case, an uninsulated metal pipe is used. To pass through the roof or wall of the greenhouse, it is necessary to use special heat-insulated boxes.

Long chimney creates additional heating
Note! When installing the stove, it is important to ensure its stability! If the stove tips over, it may cause a fire or damage to the greenhouse!

An overview of popular and inexpensive models of metal furnaces is given in Table 1.
Table 1. Furnaces for heating industrial greenhouses.
| Models, illustrations | Short description |
|---|---|
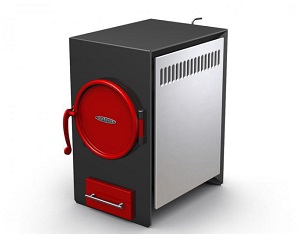
| Compact and inexpensive stove with the simplest design possible. Thermal power of 4 kW allows you to heat a greenhouse with a volume of up to 80 m3, that is, an area of 25-30 m2. The stove body is made of steel; wood is used as fuel. The surface of the stove can be used as a stove, for example, to heat water for irrigation or humidification. |
| The stove is small in size, made of heat-resistant steel, and equipped with side convectors that distribute warm air. Power 6 kW, designed for greenhouses up to 60 m2. The firebox door has a viewing window with glass, which allows you to control the process of burning wood. On the upper surface there is a burner on which you can heat water. Fuel - wood or burnt waste. |
| A 5 kW stove for heating greenhouses with an area of up to 50 m2. Equipped with a casing with convection holes that promote uniform heat transfer. There is a burner on the surface. Fuel - firewood. It is distinguished by its stability, small size and weight. |
| Power 6 kW, greenhouse area – 60-80 m2. The sides of the oven are protected by casings, so they do not heat up to temperatures dangerous for plants. The casings are equipped with convection holes. The door is firmly locked, which eliminates smoke. A convenient box for ash allows you to collect it and use it as fertilizer. |
| Power 6 kW, area – up to 60 m2. The firebox is designed like a gas generator and has two combustion chambers. In the first, wood is burned, in the second, combustion gases are burned. The walls of the firebox are formed by hollow pipes. Cold air enters there from below, heats up when the stove is fired and exits through the top. Thanks to constant air exchange, the oven does not overheat. Air ducts can be connected to the pipes, and the stove itself can be installed in an adjacent room. The stove has a long burning mode – up to 10 hours. |
| A 6 kW furnace for heating a greenhouse up to 60 m2 is equipped with a water jacket located around the walls of the firebox. Connects to a water heating system. The stove operates as a gas generator and is equipped with a long-burning mode. It has compact dimensions and high efficiency. Any firewood, wood waste, branches, cardboard can be used as fuel. Easy to maintain and safe. |


Note! The choice of stoves for greenhouses is very large; when choosing, you need to pay attention to thermal power and functionality.
Installing a metal stove in a greenhouse
Step 1. Prepare a solid base from paving slabs, bricks or tightly compacted earth. It is better to place the stove in the center of the greenhouse so that heating is more even. Furnaces with an air or water circuit are installed in any convenient place, observing the fire safety distances specified in the passport.

Step 2. Install the stove on the prepared surface, check whether it will be convenient to load firewood and remove ash. If there is a main wall, the stove is installed with the back wall facing it.

Step 3. Connect a chimney of the required diameter to the smoke pipe using heat-resistant sealant. The chimney installation must be carried out in accordance with the diagram. Narrowing of the chimney is not allowed.

Step 4. If necessary, connect a water or air circuit.

Note! Stoves with a water heat exchanger cannot be fired without a filled heating system, as this will lead to damage.
Brick stoves for greenhouses
Brick heating stoves are usually used in year-round greenhouses. A brick stove can effectively heat a greenhouse even during the frosty winter months due to their increased heat capacity. Any heating stove is suitable for a greenhouse, the main thing is that the heat output matches the area. Below is the technology for laying a simple brick oven.

To build a brick kiln you will need:
- solid ceramic brick – 220 pcs.;
- fireclay brick – 80 pcs.;
- clay masonry mortar – 80 l;
- fireclay masonry mortar – 30 l;
- concrete for the foundation - 0.25 m 3;
- finished cast iron products - grate, combustion, ash and cleanout doors, smoke damper;
- cuttings of roofing felt or glass insulation.

A sectional drawing of the furnace is shown in the figure. The height of the stove to the chimney is 215 cm; the structure can be placed in almost any greenhouse of standard sizes. The horizontal dimensions of the oven are 51x77 cm.

Step 1. Construction of the foundation. Any brick oven requires a solid foundation. It is made of reinforced concrete with a thickness of at least 20-30 cm. Under the foundation, soil is removed from an area of 70x100 cm to a depth of 35-40 cm. The bottom is leveled with coarse sand with a layer of 20 cm, and formwork made of boards is installed around the perimeter. Reinforcement rods Ø12 mm are laid in the form of two rows of lattice with a pitch of 20 cm. Concrete is mixed and poured into the prepared pit. Dry the foundation for at least three weeks, moistening the surface from time to time.

Step 2. Laying the ash pit and firebox. They begin laying the furnace according to the diagram. The first 4 rows are made of red brick on clay mortar. Install the ash pan door, securing it in the masonry with wire.

Attaching the legs to the frame of the combustion door: 1 - door; 2 - frame; 3 - paws.
Overlapping the combustion door: A - with an overlap; B - “to the castle”; B - wedge-shaped brick

Rows 5 to 12 are laid out of fireclay bricks on refractory mortar. In the 5th row a grate is laid. A fire door is installed in rows 6, 7 and 8. Rows 9 to 12 form the arch of the firebox.

Step 3. Rows 13 to 15 are also laid with fireclay bricks on refractory mortar. Rows 13 and 14 cover the arch of the firebox, and in row 15 a cleaning door is installed. From the 16th row, the masonry is again done with red brick. In row 16, the installation of the cleaning door continues. Rows 17 to 21 form smoke channels. The first smoke damper is installed in row 22.

Step 4. Rows 23 to 27 continue the smoke channels. In the 28th row a narrowing of the channel is laid out, in the 29th row a second smoke damper is installed. Rows 30 and 31 form the roof of the furnace. Starting from the 32nd row, lay a chimney of the required height from 4 bricks with a dressing.

The process of laying the stove is shown in detail in the video.
Video - Laying a small heating stove
Note! For greenhouses of low height, you can build a stove with horizontally located smoke channels.

Water heating in a greenhouse can be done in two ways: by connecting the greenhouse to the heating system of the house or by installing a separate boiler. The connection to the general system is made with a separate circuit so that it can be turned off and the water drained.

If a separate heating system is installed, a boiler is installed in the greenhouse.

Depending on the most accessible and cheapest fuel, this may be a boiler:
- gas;
- solid fuel;
- electric;
- universal.
A gas boiler is considered the most economical and convenient to use. It maintains the set mode automatically, while heating the greenhouse is inexpensive. To remove combustion products from gas boilers, a coaxial chimney is used, the surface of which practically does not heat up.
Solid fuel boilers, depending on the modification, can operate on wood, coal and pellets. This fuel is also inexpensive, but the level of automation in most solid fuel boilers is low; they require constant monitoring and loading.

Electric boilers have a high level of automation and can maintain temperature in day and night mode. They are compact, silent and completely safe. They have only one drawback - the high price of electricity.
How to choose a boiler for a greenhouse
The choice of boiler for a greenhouse depends, first of all, on its size and the type of crops grown. If there is gas on the site, it is more profitable and convenient to heat a greenhouse of any size using a gas boiler. In non-gasified areas, you have to choose between other types of boilers.
In a year-round greenhouse with an area of more than 50 m2, with available firewood, it is better to install a solid fuel boiler. In this case, the costs of installing it and installing the chimney will pay off in 1-3 years.

In a small greenhouse with periodic use, it is not advisable to install a solid fuel boiler. It is easier to install a low-power electric boiler - it does not require a specially designated area and installation of a chimney, and energy costs in this case will be low.
Winter greenhouses made of polycarbonate have long ceased to be a rarity: modern technologies make it possible to create the necessary microclimate in them and grow herbs, vegetables and even berries for your table or for sale. Read more.
Calculation of the number of radiators
To ensure a favorable microclimate in the greenhouse, it is necessary to first determine the required number of radiators. Calculation for greenhouses with a height of less than 3 meters can be carried out according to a simplified scheme - by area.
The area is determined by the formula:
S = a * b,
WhereS – greenhouse area, m2;a andb – length and width of the greenhouse, m.
The estimated thermal power of the greenhouse is determined by the formula:
P = S * 120,
WhereP – design thermal power, W;S – greenhouse area, m2.
Calculation of the number of radiator sections:
n = P: p,
Wheren – number of radiator sections of the selected type;p – thermal power of one radiator section, indicated in the data sheet, W.
The resulting number of sections is evenly distributed throughout the greenhouse, distributing them over several radiators.
Note! For greenhouses, it is better to choose radiators of minimum height - this way the root space and soil will be fully warmed up.
Installation of a water heating system
Regardless of the type of boiler chosen, the greenhouse water heating system is installed according to the same scheme.
In addition to the boiler, the system includes:
- pipes and radiators;
- circulation pump;
- expansion tank;
- security group;
- coarse filter;
- balancing valve
- in the case of heating several circuits - a collector unit.
For solid fuel boilers and high-power greenhouses, it is also recommended to install a heat accumulator. The heating circuit connection diagram is shown in the figure.

Step 1. Boiler installation. To install a solid fuel boiler, it is better to equip a vestibule or boiler room. Gas and electric boilers are located directly in the greenhouse.

Depending on the type, the unit is installed on the floor or hung on a solid wall. For floor installation, it is necessary to prepare a solid horizontal base - a concrete foundation or paving slabs laid on a sand bed.
Step 2. Connection to the chimney. This step is performed for solid fuel or gas boilers. For solid fuel boilers, a sandwich chimney made of stainless steel is used. It is brought out through the roof or wall in accordance with the diagram.

For gas boilers, a coaxial chimney is used. It is taken out directly through the wall where the boiler is installed. Due to the complete combustion of gas in boilers, the output is water vapor and carbon dioxide with a small content of other elements, so the smoke from gas boilers is not dangerous for the walls of the greenhouse and the respiratory system of people.

Step 3. Connecting radiators to the heating system. Radiators are mounted on the walls, evenly distributing them throughout the greenhouse. An air valve is installed on each radiator - a Mayevsky tap, as well as valves with which you can shut off the flow of water into the radiator. Radiators are mounted according to the chosen scheme. For the heating system, pipes Ø20-Ø25 mm are used.

Step 4. Installation of expansion tank. For a forced circulation system, a closed membrane type expansion tank is usually used. It does not have strict requirements for the installation location. The membrane expansion tank is a sealed cylinder, the internal space of which is divided by a polymer membrane. One part of the tank is filled with air, the other with coolant. When the coolant heats up excessively and expands, the membrane bends, and the air in the other chamber is compressed. In this case, the pressure in the system is equalized.

The tank is installed in the system anywhere, usually immediately after leaving the boiler or before the circulation pump. The connection is made from below through a valve.

Step 5. Installation of a security group. The safety group consists of a pressure gauge, a safety valve and an air vent, which are placed on a steel manifold equipped with a coupling for connection to the system. Connect the safety group immediately after the boiler in a place with maximum temperature and pressure.

Step 6. Installation of a circulation pump. A circulation pump is necessary to maintain stable pressure in the system. It is installed on the return pipe before entering the boiler. A coarse filter must be installed in front of the pump.

Step 7 Air pressure testing. It is carried out to identify defects in equipment and installation. After installation is completed, a special compressor is connected to the system, all valves and Mayevsky valves are closed, then the pressure specified in the passport for the boiler and radiators is applied. After the pressure has stabilized, inspect all joints and assemblies, check them with soap foam: apply it with a sponge to the joints and make sure that there are no bubbles.

After successful pressure testing, the boiler and system are filled with coolant, and a test run of the boiler is carried out. The air is bled using Mayevsky valves and the system is balanced using balancing valves on the radiators.
Note! Gas and electric boilers with a high level of automation can be equipped with a circulation pump, expansion tank and safety devices. Before installing the system, carefully read the instructions for the boiler.
Electric heating of the greenhouse
Infrared heaters are usually used to heat a greenhouse: they heat the soil and create a feeling of warmth, while objectively the temperature in the greenhouse can be moderate and energy costs can be low. In some cases, other types of heaters are also used.

Calculation of the required number of infrared heaters is carried out according to a simplified scheme: for every 10 m 2 of greenhouse, 1 kW of heater power is required. For example, a greenhouse with an area of 30 m2 requires heaters with a total power of 3 kW. This power is evenly distributed across several devices.


Infrared heaters are suspended from the greenhouse frame on brackets and connected to the electrical network. If necessary, you can automate the heating by connecting temperature sensors located at a height of 80-100 cm. Light from the heaters should not fall on the sensors, otherwise measurement errors may occur.
34861 50230 0
 43880
0
43880
0
Ecology of consumption. Homestead: Heating a greenhouse in winter is probably the biggest expense item. Let's look at how to organize heating of a greenhouse in winter, if possible without investing large amounts of money.
Without a doubt, a greenhouse on a personal plot is a necessary structure.
This irreplaceable building for a gardener acquires even greater value when the possibility of heating it is provided.
Growing early vegetables, herbs, strawberries and seedlings, and with year-round use of a heated greenhouse - and obtaining such products in winter - isn’t this an obvious benefit?
Especially for those who make money this way: vitamins in winter and early spring are not a cheap pleasure and the demand for them is great.
The ability to harvest 2-3 crops makes this business even more profitable.
Growing tropical and ornamental plants has now become a fashionable hobby. And it is possible to provide them with appropriate climatic conditions throughout the year only in a greenhouse or winter garden, where heating is present.
How to build a greenhouse with heating? or add heating to an existing one?
How to make heating in a greenhouse?
There are many ways to heat a greenhouse with your own hands. For these purposes, different schemes are used:
- stove heating for greenhouses
- gas heating greenhouse
- electric heating of greenhouse
- steam heating in a greenhouse
- hot water
You can, for example, when laying the foundation of a greenhouse, attach an electrical circuit to it using heating cables for heated floors. This option practically does not take up the space of this building, while providing good heating of both air and soil.
But the use of electric heaters is not a very convenient solution.
The fact is that in the absence of normal air circulation, the greenhouse area will warm up unevenly, i.e., if one part of the space turns out to be excessively overheated, then the heat will not reach the other at all.
You can normalize the movement of air flow by installing a fan. However, the process of its operation also leads to cooling of the air. There is another negative point here - energy costs will increase significantly.
To make heating a greenhouse with your own hands rational, to create comfortable conditions for plant growth, especially if you are heating the greenhouse in winter, you should choose a type that will ensure complete heating of the soil and air.
Selecting a heating system
When choosing a greenhouse heating system, you should consider:
- building dimensions
- heating method for a residential building
- your financial capabilities.
Each option has its own advantages and disadvantages.
It is important that the heating system matches the type of greenhouse.
It is known that heating film greenhouses, for example, requires more heat release than heating greenhouses made of polycarbonate - a material that itself is a worthy heat insulator.
It is necessary to take into account the features of the system. For example, some of them, due to their high cost, are completely unsuitable for standard, small-area greenhouses. Other systems require professional installation and configuration.
This is especially important when it comes to heating industrial greenhouses, where advanced technologies are used, such as heat pumps, infrared heating and others.
Having decided on homemade greenhouse heating, the first thing you need to do is “feel” the entire process technology, take into account all the pros and cons of the selected heating system.
It is necessary to correctly calculate the heating of the greenhouse in order to achieve the most rational distribution of heat in a given room.
Now briefly about each heating method.
Water heating
It is possible to install water heating for a greenhouse, running on both electricity and gas.
The heat source is hot water circulating through pipes that are laid inside the greenhouse or under the floor.
The diagram and principle of operation of water heating in a greenhouse is as follows: a coolant (heated water) circulates through pipes closed in the system, which, having released heat into the atmosphere, again enters the boiler, where it is heated again.
A larger number of pipes allows you to lower the water heating temperature. It should be noted that the pipe system tends to heat up rather slowly.
The boiler is the main element of such heating for greenhouses. Its choice is determined by the specific situation.
In areas where a gas pipeline is laid, gas boilers are often in demand as the most economical option.
While the heating is powered by electricity, the following happens: the water heated in the boiler is supplied through a circulation pump into pipes that can be laid along the walls of the greenhouse or between the plants.
When installing a water heating system, copper, steel and plastic pipes are used. The latter are exactly what is needed in this case. They are lightweight, affordable, and do not rust.
The circulation of water in the system is usually forced, facilitated by an installed pump, or less often - natural.
When connecting thermostats to pipelines and radiators, it becomes possible to maintain a certain temperature automatically.
When laying pipes for subsurface heating, you need to take into account that steel is not suitable for these purposes. Metal corrosion will destroy and disable such a heating system.
The disadvantages of water heating of a greenhouse include the complexity of installing the pipe system, the high price and the need for constant monitoring.
The positive side is that simultaneous heating of the air and soil occurs.
Connection to an existing heating system
Before you do anything, you need to make sure that the boiler can provide the required pressure.
In addition, it makes no sense to connect to an existing system if the greenhouse is located at a distance of more than 10 m from the house.
And since the pipes laid to it must be insulated, it will not cost much. It is also necessary to take into account that the greenhouse needs heating most of all at night. This is when adjustable heating systems can lower the temperature. Here it is important to consider the priority of connection to the greenhouse.
Infrared heating
For infrared heating of greenhouses use:
- infrared lamps for greenhouses
- infrared heaters
If we take into account the fact that such an energy carrier as electricity is the most expensive, then it becomes clear why the plan heating system is gaining momentum.
Possessing high efficiency, they heat plants and soil without heating the air.
Then, the already heated soil and the structure of the room release heat into the surrounding atmosphere. Moreover, it is warmer below, i.e. the soil warms up well.
Savings become possible due to the fact that the infrared heater does not work constantly. It can be equipped with a thermostat that controls the temperature. The IR heater turns on only to maintain the required temperature.
It is essential that infrared radiation is completely harmless to people and plants. By using infrared heating in a greenhouse, it is possible to create different temperature bands for different types of plants, which is very comfortable for planting.
This heating is ideal when you need to raise the temperature in the greenhouse in a short period of time. The heaters reach the set temperature in just ten minutes.
Air heating
It is easier to build air heating for a greenhouse with your own hands than water heating.
With this method, air is used as a coolant.
It is pumped between the walls of the boiler and the firebox, heating up, and then it is distributed through the air duct system.
A perforated polyethylene sleeve is laid around the perimeter of the entire room. Warm air flows through it, which evenly warms the soil.
The advantage of this method is the quick heating of a greenhouse of any size.
The disadvantage of this heating system is that you have to constantly monitor the humidity in the greenhouse. This heating method helps to sharply reduce it.
Wood heating
When choosing a heating option for a greenhouse space, taking into account the increase in electricity and gas tariffs that occurs with enviable regularity, it is worth paying attention to an alternative method - heating the greenhouse with wood.
Buleryan type ovens are very suitable for this purpose. Their use allows you to organize the heating of the greenhouse in such a way that night trips for the next laying of firewood are not required. The room heats up quickly, and the temperature is maintained at the set level for a long time.
One stack of firewood is enough for 6-8 hours. The stove body does not heat up, which completely ensures safety.
You can build a stove for heating greenhouses with your own hands, or, as an option, a stove with a horizontal chimney.
Its structure is as follows: in the vestibule a firebox is made of brick, and in the greenhouse, along its entire length, a chimney is laid under the shelving. It is through this that carbon monoxide passes and leaves the room through the pipe on the other side.
The heat released during this process warms our building.
Combined heating method
Combined boilers are used quite widely. They are convenient because they make it possible to instantly respond to changing operating conditions.
At the same time, the disadvantages of one heating method can be successfully covered by the advantages of another. For example, a power outage will not take you by surprise if heating is provided that runs on wood, gas, or coal.
When there is a backup heat source, you can safely calculate future profits from a rich harvest.
Which method to choose for heating a greenhouse is up to everyone to decide for themselves.
To choose the optimal method of heating a structure that is so necessary in a suburban area, you should very carefully calculate each available option. And in the end, understand for yourself which heating is better for a greenhouse, more economical, more profitable and more convenient. published
Join us on
Warm rooms are used for year-round cultivation of plants or early seedlings. The required temperature is maintained using fairly simple heating systems.
If you have minimal skills in repair and construction work, you can heat the greenhouse yourself.
Heating a greenhouse is necessary to compensate for heat loss that occurs through the walls and ceiling of the structure, as well as due to the entry of outside air. To reduce heating costs, it is first necessary to properly insulate the greenhouse and minimize air exchange with the street.
In addition to the material from which the greenhouse is made, special attention should be paid to the tight fit of the structure to the soil. To do this, it is better to make a shallow foundation insulated from the inside when constructing a greenhouse. It must reliably hold the structure in strong winds, prevent the formation of cracks and minimize heat exchange with the street through the top layer of soil.
To solve the last problem, even in the conditions of the northern regions, a depth of 30 centimeters is sufficient, since the thermal conductivity of the soil is very low. The intensity of vertical heat exchange between the soil layer inside the greenhouse and the underlying soil layer is very small. In winter, snow can be used as a natural external insulation along the edges of the greenhouse.
Snow is an excellent thermal insulation material. However, the greenhouse structure must be able to withstand additional weight, and the material must not bend under its weight.
For normal plant growth, it is necessary to maintain the temperature of the air and soil-vegetative layer in a certain range. If the greenhouse operates continuously, the fertile soil will be heated due to heat exchange with the internal air. Moreover, its temperature will be almost the same as under natural conditions in summer.
The soil and ground layers freeze in winter to a depth depending on the geographic latitude of the region and the structure of the rock. To warm the soil and the adjacent top layer before planting, it is necessary either to maintain a positive air temperature for a very long time (up to a month), or to carry out special actions to transfer heat directly into the soil. This can be done using a system of underground pipes into which coolant is supplied.
The amount of energy spent on heating the greenhouse depends on the following factors:
- The surface area of the walls and roof of the greenhouse. The lower this indicator, the less heat loss. Therefore, to save energy, it is better to use a rectangular or semicircular shape of the structure.
- Thermal conductivity coefficient of the material. The lower this parameter, the better the material retains heat.
- Temperature difference between indoor and outdoor air. The higher its value, the greater the heat loss.
- Air exchange through leaks. To reduce energy costs, it is necessary to eliminate the uncontrolled flow of cold air.
The wide variety of private greenhouse designs and the quality of their installation seriously complicate temperature regime modeling. Therefore, it is possible to accurately determine the amount of energy required to heat a particular object only experimentally.

Such methods approximately calculate the required power of the heating device. The problem is the difficulty of determining the dispersion coefficient for a specific object
Autonomous heating based on fuel combustion
Using the combustion process as a heat source is the most commonly used method of heating small greenhouses. Such heating has some specifics, since it is necessary to take into account the increased tightness of the room, the desirability of heating the soil and the need to maintain humidity.
Stoves and solid fuel boilers
One of the simplest devices used to heat greenhouses during cold periods is a stove. The popularity of using such a device is due to the low cost of fuel. It can be uncalibrated firewood, dry grass, coal and coal dust, garbage and flammable liquids.
When heating with stoves, it is necessary to ensure stable draft, since ventilating the greenhouse if combustion products get inside will lead to its cooling.
When using a metal stove, heating occurs quickly and energy is transferred to the surrounding air. It is also the cheapest and easiest to use heating method.
A stone stove heats up more slowly and retains heat longer. This is more suitable for heating small spaces with a medium or narrow temperature range. However, such a stove must be folded and, if necessary, cannot be moved, like its metal counterpart.
There is an idea of heating space in a greenhouse using hot combustion products. To do this, it is proposed to place the stove in a pit, and lay the chimney horizontally below ground level with its subsequent exit to the surface.

With this placement of the chimney, there will be a significant increase in its length, as a result of which hot gases will give off more heat inside the room
This option will really increase the heating efficiency. However, during practical implementation the following difficulties will arise:
- The air temperature leaving the furnace is very high. Therefore, the chimney should not have good heat transfer, otherwise the soil around it will burn out. Asbestos pipes can be used as a material for removing combustion products.
- It will be necessary to provide inspection windows in the chimney to clean it from soot. Therefore, you need to lay the pipe between the beds.
- A long horizontal section does not contribute to the creation of normal draft, so it will be necessary to install a smoke exhauster. This means the need to supply electricity to the greenhouse or periodically recharge the battery.
Therefore, the idea of underground chimney placement has not found wide application in practice.
Instead of a standard stove, you can use long-burning solid fuel boilers. They burn fuel more efficiently and do not allow rapid heat release, which eliminates the possibility of damage to plants from high temperatures. Such factory-made boilers are easy to use and maintain, and are also compact.
Gas boilers and convectors
For greenhouses, a good alternative to stove heating is the use of a gas boiler or convector. For small private buildings, equipment operating on the basis of gas cylinders is usually used.

Before installing a gas boiler in a greenhouse, it is necessary to thoroughly strengthen one of the walls to which it will be attached
It is better to place the gas cylinder outside the greenhouse. But in this case, it is necessary to solve the issue of preventing freezing of the gearbox during a long period with negative temperatures.
Connecting a greenhouse to the gas network is a rather complicated bureaucratic procedure. In addition, during the annual mandatory inspection by a gas service specialist, comments will be made.
In any case, the presence of a combination of gas supply and the use of open fire in a confined space requires increased safety measures. The best solution is to have a gas analyzer, as well as an automatic flame extinguishing system that is triggered when the maximum permissible concentration of a flammable substance in the air is exceeded.
From the standpoint of comparing the financial costs of installing and using stoves and gas equipment, it is impossible to draw an unambiguous conclusion. A simple gas convector costs about 12-14 thousand rubles. This is more expensive than metal devices running on solid fuel:
- the cost of metal and consumables for self-manufacturing a potbelly stove is about 3 thousand rubles;
- A small factory solid fuel installation (for example, the NVU-50 “Tulinka” model) costs about 6.6 thousand rubles.
- a long-burning installation (model NV-100 “Klondike”) costs about 9 thousand rubles.
A stone stove will be more expensive than a gas convector due to the cost of building the foundation and laying it.

It is advisable to install a stone stove if you are sure that the greenhouse will be located at this location for more than one year
The cost of liquefied or natural gas spent on heating any room will be cheaper than purchased firewood and coal. However, greenhouses are heated, as a rule, with free or cheap combustible waste, which is always sufficient in rural and dacha areas.
The problem of air leaks and humidity
The use of heating devices in which open combustion of fuel occurs leads to the need to remove combustion products through the chimney. In this case, compensation for the volume of exhaust air is necessary. In buildings, it is possible through uncontrolled inflow (infiltration) which occurs due to the presence of cracks and holes in the walls and ceiling.
The design of modern greenhouses, such as polycarbonate, creates an airtight space. In this case, the problem of air intake is solved by the presence of vents and the installation of a special supply opening. It should be placed in such a way as to avoid a concentrated flow of cold air onto the plants. It is also possible to use several small holes to organize a distributed inflow.
Exhaust systems for closed-type gas convectors are already equipped with a pipe for the flow of outside air into the combustion chamber.

In a convector with a closed combustion chamber, outside air does not cool the room, and combustion products cannot get inside
Often after operation of furnaces and boilers, the effect of air drying is observed. This is due to the lower absolute humidity of the incoming cold flow (especially frosty) in relation to the warm air leaving the greenhouse through the chimney.
To maintain accurate air humidity parameters, a humidifier with a hygrometer is used, which can operate from a local energy source. If there is no such need, you can place an open container of water in the greenhouse. Then, in the event of strong drying of the air, the process of evaporation will naturally occur.
Ways to distribute heat evenly
For small greenhouses, placing one heating source is sufficient. Air circulation in the room will be ensured due to the vertical temperature difference and, thus, warm air will be distributed.

In any greenhouse, when it is heated, a slight vertical temperature difference occurs. This must be remembered when placing thermometers
In rooms of large area or complex geometry, it is possible to form zones with different microclimate parameters. This is sometimes done on purpose in industrial greenhouses, but in most cases this phenomenon is undesirable. To distribute heat evenly, two methods are used:
- Creation of artificial air circulation. Blade fans are usually used. Sometimes an air duct system with integrated pumps is constructed so that air is taken in at one end of the room and exhausted at the other.
- Heat transfer throughout the room using an intermediate coolant. As a rule, an ordinary water system with forced circulation is used. Pipes can be laid both around the perimeter of the greenhouse and under the soil layer.
Forced heat distribution is also necessary to prevent the formation of a high temperature zone near the heater. Otherwise, plants located near the stove or boiler may suffer thermal damage.
Popular heating methods without open fire
The use of open fire has some limitations, since combustion waste is released, and fire safety measures must be observed. Therefore, other methods are often used to release heat into the greenhouse room.
Application of electrical appliances
Using electricity to heat a greenhouse in winter is the most expensive method. However, it is also the simplest, since the installation of such heating only includes electrical wiring and installation of devices. The use of simple automation systems frees people from the need to participate in constant microclimate monitoring.

The connection diagram for several heaters via a thermostat is quite simple. The only problem may be a power outage, so you need to consider connecting additional power sources
Electric heating of a greenhouse can be done using the following devices:
- Heater. The simplest and cheapest device that you can make yourself.
- Convector. The presence of a fan allows, in addition to heating the air, to distribute it evenly throughout the greenhouse.
- Heat pump. A powerful device for heating air in large-volume greenhouses, which is often used in conjunction with an air duct system to distribute heat.
- Infrared lamps. The specificity of the operation of such devices is to heat the surface on which the radiation hits. Thus, it is possible to level out the vertical temperature gradient in the room without using air circulation.
- Heating cable. It is used to heat local areas in a greenhouse.
In the case of small premises, the use of electric heating is justified due to its simplicity and safety. In large and industrial greenhouses it is advisable to use other methods.

The heating cable is well suited for heating the ground. Its maximum temperature is not high, so there is no fear of the effect of burning the soil with loss of its qualities
Biochemical heat generation
One of the interesting methods of heating is to add unrotted organic fertilizer to the soil - animal manure or bird droppings. As a result of the biochemical reaction, a large amount of energy is released, which increases the temperature of the fertile layer and the air inside the room.
When manure rots, carbon dioxide, methane, as well as small amounts of hydrogen and hydrogen sulfide are released. Manure also has a specific odor. All this imposes certain restrictions on its use related to the need to ventilate the room.
In winter, as well as during prolonged cold spells in spring and autumn, intensive air exchange is undesirable. In this case, restoring the thermal balance after ventilation may require a significantly larger amount of energy than was released as a result of the process of rotting manure.
The use of such a “biological” method of heating the earth and air is justified in late spring, when ventilation occurs at positive daytime temperatures.
Systems with external heat source
Heating of the greenhouse is possible due to the close location of the house or other heated building. This simplifies the entire procedure, since there is no need to install an autonomous heat source. Using wired or wi-fi relays, you can remotely receive information about the temperature in the greenhouse and regulate its microclimate from home.

An ordinary wi-fi temperature complex consisting of a sensor and a relay costs about 2 thousand rubles. When the temperature goes out of range, it transmits its values to devices running Windows or Android
Creating a separate heating circuit
If the house uses water or steam heating, then it is possible to create a separate circuit leading to the greenhouse. It must be equipped with a separate pump, since the total horizontal length of the new segment will be large.
You also need to install an open expansion tank in the greenhouse to remove air from the system. The area of open water in the tank must be minimized to prevent intense evaporation of hot water into the room.
Radiators are rarely installed in a greenhouse, since the design of its premises plays a secondary role. If there is a lack of heat, it is better to lengthen the pipe contour, as this is cheaper and reduces the risk of leaks and breakdowns.
The outdoor segment of the circuit must be insulated to avoid heat loss and minimize the risk of freezing. The underground option for placing pipes is best suited for these purposes.
Connecting the heating segment of the greenhouse to the general circuit can be done using a three- or four-way valve.

Standard connection diagram for an additional heating circuit. The location of the taps in the house allows you to remotely regulate the air temperature in the greenhouse
It is also possible to create an automatic temperature control system. This can be done in the following ways:
- Changing the volume of hot water passed through depending on the readings of temperature sensors. In this case, it is necessary to purchase a pump with power control.
- Turning the greenhouse heating circuit on and off. For this purpose, automatic crane control systems are used.
Instead of manually changing the position of a three- or four-way valve, servo-based devices can be used. Its electronic control unit is adjusted to the readings of temperature sensors located in the greenhouse. If it is necessary to change the heating mode, a control signal is sent to the motor, which turns the rod, setting a different position of the valve.

The servo drive for automatic adjustment is large relative to the crane. Therefore, to install it, it is necessary to remove the heating pipe from the wall
Heating using extract air
Good heating can be obtained by using warm air from the exhaust ventilation of a residential building. By directing an insulated ventilation duct inside the greenhouse, you can obtain a constant incoming flow with a temperature of 20-25 0 C. The only condition is the absence of excess humidity and impurities in the air, typical of kitchens and bathrooms.
Air outflow from the greenhouse can be organized in two ways:
- Local exhaust vent to the street in the form of a tube without a fan. It must be of small cross-section to create a high flow rate. In this case, at negative street temperatures, the condensation formation zone will be located at some distance from the tube, which will prevent the formation of ice.
- Return the flow back using an additional air duct and obligatory connection to the general house hood. Otherwise, odors from the greenhouse will spread throughout all areas of the house.
This method is the most economical in terms of one-time costs for installing the system and recurring costs for fuel use. The only question remains whether the hood volume is sufficient to maintain the required temperature. It is better to check this experimentally.
If sometimes, during extreme cold snaps, the air temperature in the greenhouse drops below the permissible level, then you can build a small air heater into the air duct, or install an additional electrical device at the facility itself.
Conclusions and useful video on the topic
Homemade stove with a long chimney for heating a greenhouse:
Several options for wood stoves in a real greenhouse:
Gas burners as a heat source. Piping throughout the greenhouse:
There is no universal option for heating a greenhouse. The choice in favor of one of the methods or their combination must be made taking into account its reliability, low cost of installation and use of equipment, energy prices and battery life. Most projects can be implemented in-house, which will reduce their cost and provide the opportunity for further independent modernization.
What does high-quality heating give us for a stationary greenhouse? Possibility to grow crops all year round. It is for these purposes that many people arrange to heat greenhouses with their own hands from any materials - polycarbonate, glass, even film. To constantly maintain and maintain a favorable microclimate inside for plant growth. The question “How to do it yourself, and what to consider?” remains relevant for many, so let’s consider it in more detail.
Real and unrealistic methods of heating greenhouses
We want to figure out how to make greenhouse heating with our own hands from available materials, and even in an economical way?
Therefore, we will consider real, and not fantastic and too expensive options that can be found on an industrial scale.
- Electric heating is a thing of the past. This method exists, and it even works very productively, but we can easily buy expensive potatoes, as well as tomatoes and cucumbers at the market all year long - it will be cheaper.
- Gas is also not our option. Putting a gas pipeline in place or storing cylinders on site is expensive, inconvenient, and even dangerous. In addition, you will not be able to work with gas without specialists; you will simply be fined. It turns out that this is no longer heating greenhouses with your own hands, but with the involvement of professionals, where your lot is “bring it and serve it.”
- with a hog - this is normal stove heating with a horizontal chimney. Very practical, accessible to all “Homemade” people, inexpensive. But it’s “angry”, albeit cheap. It is necessary to place the stove inside the greenhouse itself or in the vestibule, lay horizontal chimney pipes under the shelves, and ensure normal exhaust and draft. The downside is the long length of the homemade chimney, the obligatory fistulas in the connections and the penetration of a small amount of carbon monoxide into the greenhouses.
- Do-it-yourself water heating in a greenhouse is a process of seriously improving the stove option. It takes longer and costs a little more, but has a reasonable argument: high efficiency, safety and low fuel costs. Especially if you install a pellet or pyrolysis stove.

Retreat-advice!
Why is it worth paying attention to the latter option, especially with pyrolysis ovens? The stove, as already said, has high efficiency, but the main advantage, which is very important for modern summer residents, is the time between laying firewood. Or not wood, but any other type of fuel, it doesn’t matter.
You can also install a liquid fuel boiler as a heating unit. It will also add advantages to your autonomous greenhouse heating system: it has automation of the combustion process itself, as well as a fairly long period of fuel loading (refueling).
Do not forget about the “old-fashioned” methods of warming the soil, and additionally use natural products. For example, horse manure is an excellent way to warm the soil even without heating systems.
After being applied to the fertile layer, horse manure will heat the soil in your greenhouse to +60 within a week, and then will maintain this temperature for at least another three months, and in general – up to 150 days! Isn't it better to buy horse manure from a neighbor in the country rather than install a soil heating system under the shelving? In this case, heating the air will suffice.
Practice: making heating in a greenhouse
Initial data
Let’s take a polycarbonate greenhouse as “Given” and create heating in the greenhouse with our own hands from scratch. (See) Let the area be 25 m2, then it will be easy to start with calculations and technology for your own volume. And we’ll immediately take into account the possibility of subsequent expansion of your greenhouse: you never know, you’ll like it and you’ll design another place for watermelons. Under the melon, that is.

Let's not stir up the manure, and we will assume that you did not purchase it. Well, nowhere, in Moscow and the region, there are so many horses! Then your heating system will consist of two circuits or parts:
- Ambient air heating system.
- Ground (soil) heating system.
Rationale
It is clear for what purposes soil heating is needed. There are roots in the soil, and the environment for them also needs to be heated. And soil is a much better conductor of heat than air. Accordingly, the cold.
If the optimal regime is not maintained, the plants will seriously slow down their growth or simply die, and you will not have a single tomato in the winter.
Warming up the soil is similar to a heated floor system in a house, but is slightly different:
- The pipe through which water flows or hot air passes is laid in the drainage or not. To install drainage, it is preferable to use small expanded clay as the main material, and cover it with geotextile on top (this special material, which allows water to pass in one direction, is sold in abundance in specialized stores). The covering is necessary so that the soil (soil) does not penetrate into the drainage.
- Instead of a concrete base, such a “warm floor system” has loose soil, which is also constantly moistened.
Variations on an aerial theme
We have decided on heating the soil, now we need to choose a method of heating the air, that is, in fact, a heating option. Let's focus on two:
- The classic option: do-it-yourself heating of greenhouses with registers around the entire perimeter, completely welded from thick-walled pipes of fairly large diameter. The problem is in the material itself, which has seriously risen in price recently, and the problem is in a normal welder who will weld all the seams beautifully (in the sense of hermetically sealed and for a long time). It will work out anyway – not with your own hands.

When choosing this option, take into account the biggest disadvantage - the huge working volume of the coolant, and also the relatively small area where the heat exchange process occurs. In this case, the efficiency of your boiler is greatly reduced.
- Batteries around the perimeter – there is less water in the system, and all the advantages associated with this point. Including, there is no need to call a welder. The heat exchange area is large, the output is maximum. The efficiency is higher. You can install a variety of batteries, especially those that you removed from the house yesterday when you were making a new heating system. It won't cost much at all!
In general, it doesn’t matter which batteries are installed, because they will all have approximately the same efficiency. When installing, keep in mind that the maximum coolant pressure will be no more than 1.5 bar, while almost any battery is designed to withstand a pressure of 5-6 bar. You don't have to worry too much about the strength of the connections. At least there is no need to paint the carvings.
Pipe question
Much attention must be paid to the piping system so as not to spend more than is required for the normal functioning of the equipment. If you are installing radiators, there is no point in running expensive metal pipes from the boiler to the radiators; you can get by with unstacked polypropylene.
- Firstly, it's cheaper.
- Secondly, polypropylene pipes do not corrode.
- Plastic can withstand “defrosting the system” well when we “overlooked” and created an emergency situation. The ice that forms in the pipes during “defrosting” will not tear the polypropylene, while the metal will fail not only in the joints, but also in the seams, if the pipes are seamed. If they are seamless, so much the worse: the gap will be in the most unexpected place.
- Polypropylene is an excellent heat insulator, so the coolant will not lose temperature as it approaches the radiator.
Bottom wiring is preferable, especially during installation - the issue of convenience of attaching pipes is resolved. Especially if the radiators are not mounted on flimsy polycarbonate walls, but are installed directly on the foundation with bottom mounting.

At the entrance to the radiators, it is advisable to equip the pipes with ball valves or thermal valves in order to regulate the temperature in different parts of your huge greenhouse for specific plants.
Boiler and chimney
With heating, this means not only hanging radiators and laying pipes, but also installing a boiler with a chimney.
The heating boiler can be placed either inside the greenhouse itself or placed in the heated room itself, which will further increase the efficiency of the entire system. The heat transfer from the boiler to the surrounding space will be unambiguous, so the air temperature in the greenhouse will increase.
But in the first option, you don’t have to go inside the greenhouse at all while loading the boiler with fuel. The second option not only improves productivity and efficiency, but also seriously saves space.

Laying out a brick oven is not an option, because for a greenhouse it will be too bulky and labor-intensive, unless you have a greenhouse of regional significance. Ready-made heating boilers are not that expensive, but they are compact, efficient and easy to use. The boiler issue is closed.
Now the chimney: this is perhaps the most important part of the entire heating system. It’s probably worth putting the chimney on a light foundation, installing a supporting channel or pipe and attaching the main structure to it. This is for black pipes, that is, for ordinary material under the chimney.
We shallowed out the horizontal version of the chimney. Therefore, we do not expect high efficiency from the smoke removal system in terms of air heating. We make the chimney as short as possible and reliable in terms of sealing, so that combustion products do not get inside the greenhouse. It is best to buy a sandwich chimney and place it vertically directly from the boiler - then there will be no need for a foundation.
Install the structure not higher than 7.5 meters, but not lower than 6 meters- this is the optimal height for good traction. Both the boiler and the chimney can be mounted using a simple, classic heating scheme. And now connect the circuits to the boiler - according to your project.
Conclusion
A long-burning boiler is the best option that yours wants. With such a system, you will not live near the loading door of the firebox, and the plants will grow in an optimal microclimate. The main thing that is needed for this is desire and a measured approach. Spontaneity is for lazy people and adventurers!