Full length pencil drawing of a walking man. Pencil drawing basics. Drawing the face and clothes
How to draw a person? You will certainly think that this is quite a difficult task for both a beginner and an experienced artist, but in fact there is nothing difficult if you do. What is more important is your desire and love for creativity.
Even a child can draw a person. It's quite simple, believe me. If you want to draw not just a person, but a fairy tale hero, you can. Thanks to the method step by step drawing You can easily learn how to draw and.
There are many on the Internet various lessons drawing a person and, of course, everyone chooses what is simpler and clearer to them. Maybe, to the young artist It will be easier to learn how to draw using lines.
But it is best to depict people from life, since in this case it is much easier to maintain all the proportions. But, even if there is no sitter, you can draw a person, if you follow some simple rules.
To draw a person you will need:
1). Paper;
2). Set of colored pencils;
3). Gel pen;
4). Pencil;
5). Eraser.
If everything you need has already been prepared, then you can start depicting a person:
1. Draw a vertical line and divide it into eight equal parts. The height of one part is equal to the size of a person’s head;

2. Draw the head and neck;

3. At the level of the fourth segment, draw a horizontal line, the length of which is approximately twice as long as the length of the head. This line represents the widest part of the pelvis. At the top, where the neck ends, draw another horizontal line the same length as the bottom one;

4. Draw two triangles as shown in the figure. Thanks to this, you can determine the waist line;

5. Draw the contours of the body;

6. Draw the arms to the body. In one hand, draw a ball;

7. Draw the legs. Knee-joint should be located at the junction of 6 and 7 segments;

8. Draw fluffy hair on the girl’s head. Draw the eyes, nose and mouth;

9. Draw clothes, draw details and grass;

10. Trace the outlines with a pen;

11. Remove the sketch with an eraser;

12. Start coloring. First, color the girl's face using nude and pink pencils. Paint over your eyes blue, and eyebrows and hair - brown and yellow;

13. Color the girl’s arms, legs and clothes, as well as the ball and grass;

14. Shade the background blue pencil.

The girl's drawing is completely ready. Using these rules, you can draw a male figure. To color the finished image, you can use not only pencils, but also paints, for example, gouache or watercolor.

I hope the lesson was not difficult for you. Now you probably know.
Draw with pleasure and joy!
See you in the next drawing lessons!
Good afternoon Today we will draw a person, this time a teenage boy. This lesson on drawing a person is simpler, since it is basic, does not contain complex details, shadows, and was created by us so that you consolidate the proportions human body.
Step 1
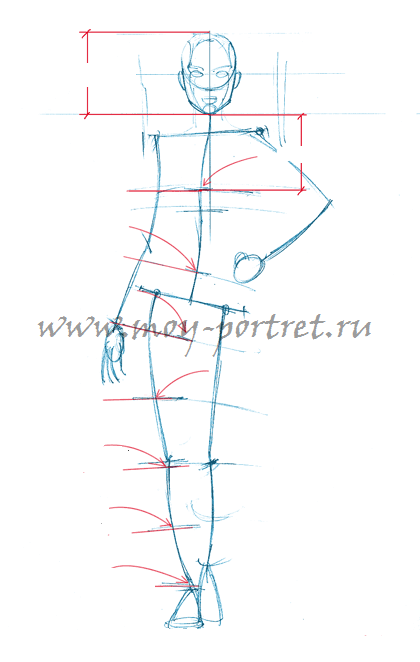
First, let's look at a person's height - this parameter will be the same from all three angles. The height of a person fits into 7 heads, of which 2 heads are on the torso, about 3 on the arms, and 4 on the legs. Please note that the first stage in our case is to draw hands without arms. The width of the shoulders (from the edge of one shoulder to the edge of the other shoulder) is 2.5 times the width of the heads, and the line of the pelvis should be significantly narrower than the line of the shoulders (by the way, these lines are approximately equal in length). By the way, it should also be noted that all lines and proportions are approximate, since the build of all people is individual - for example, if we draw a very elderly person, we will add a little stoop by changing the line of posture, and if we are talking about drawing physically developed person, we will make the shoulders even wider.
More important point— a person’s pose does not change from all angles, we just look at him from different angles — this is precisely why there are differences in the three stickmen. The line of the body should not be straight, because it approximately repeats the curves of the spine. But the shoulders, arms and legs are drawn with straight lines, bends are present only in the area of the joints.

Step 2
Now let’s outline the stickman to create a silhouette.
The neck looks from all angles like a short cylinder on which the head is attached. Sloping lines of shoulders extend from it, this can be seen from the first angles. The torso has a slight, smooth narrowing from the chest to the waist - by the way, this is noticeable from every angle.
The hands look like elongated cylinders, only from the side, at the third angle, they are most voluminous. The groin area in the first two looks like a triangle. The legs, like the arms, are similar to cylinders, only they are more voluminous and have a pronounced narrowing from the waist to the knee. The bend is also interesting calf muscles— note that everything said about the legs applies to all three angles.
Yes, don’t forget to mark the head from the first angle with the line of the eyes (horizontal, approximately in the middle) and facial symmetry, this is a vertical line, it also passes through the center, but bends slightly at the top.

Step 3
A very simple step. We outline the hairstyle and eyes, as well as the mouth, do not forget about the eyebrows. Notice how different the hairstyle looks in each step.
And here you can very well consider the rule of facial proportions: the upper tip of the ear lies in the same plane as the eyebrows, and the lower tip with the tip of the nose. Look at the third angle, and you definitely won’t get confused.

Step 4
We are drawing a boy of about 15 years old, which means he needs appropriate clothes. We draw the outlines of his shirt; it should be open in front and hang rather than tight. However, it fits more tightly in the back area, you can see this in the corresponding picture. The third angle clearly shows the distance at which the shirt is from the body, more precisely, its front part. Folds in the area of the upper forearms (sleeves are rolled up) are present in all types.
Jeans slightly follow the contours of the legs - they also narrow at the knees and also widen after them, only these curves are smoother than those of the legs themselves. Jeans, moving away from the hips, become more distant from the legs, this can be seen from the first angle.

Step 5
Now we draw the facial features (not at all difficult, in a few lines) and clothes on the entire body of our hero. The folds are very interesting here. Look at the back and you will see once again that the shirt fits tightly to the body, because there are almost no folds there. The place where the sleeves turn up may be difficult, but here you just need to know that all the folds in the lapel area, inside it, are horizontal, and higher up they become more and more vertical.
We also draw folds on the jeans, then outline and edge the back pockets. The folds here are longitudinal, transverse are found only in the areas of the knees and at the very bottom.
Our bright step-by-step illustrations will help you learn how to draw a person. With their help, anyone can draw a human figure on paper.
By following simple steps, you can learn to draw human figures and faces beautifully. We will tell you how to make the silhouette proportional, give a natural pose, and expressiveness to the face. Having mastered such techniques, you will be able to use them to create your own compositional solutions, draw people of different body types, in any outfit. It will take some practice, but learning will not be as difficult as many imagine.
To depict a person realistically with a pencil, it is important to convey the most significant features his appearance, emotional state, and so on. In addition, from our lessons you will understand the easiest way to emphasize the differences between women and male figures. To make a picture look alive, it is not necessary to immediately work on its photographic accuracy or maximum portrait resemblance.
It is enough to indicate the main external characteristics person, make the drawing more voluminous with the help of shadow, and you can surprise everyone you know with your work. Well, after seeing the first results, you will probably want to learn more about drawing, improve your technique, try to work not only with pencil, but also with paints and pastels.

On this page of the site I suggest you learn how to draw a person in full height with a simple pencil step by step. The most difficult thing to draw is a person’s face, so only real artists who have studied drawing for several years can draw a portrait correctly and accurately. Our drawing lessons are intended mainly for children, so the eyes and other facial features in the drawing of a person are drawn schematically, without carefully drawing the details. There are additional lessons on the site about how to learn to draw a portrait of a person with a pencil, draw eyes and even how to draw a person’s lips.
First of all, some tips how to draw a person correctly in pencil. Some people have the habit of drawing with broken lines and then tracing them. Try to learn how to draw lines in one motion, don't be afraid to make mistakes. When drawing a person, especially in motion, you should see the entire future image, the contours of the intended lines, and all you have to do is draw them on paper.
And yet, in fine art, the most important thing is not the accuracy of the proportions and lines of a person’s drawing, but the image of the main, most important thing in the image of a person. A person’s mood, his character, the expression of his eyes, some other features that characterize him.
There are different ways to draw a person

Now let's find out a few basic steps on how to draw a full-length human figure. Often, when drawing a person, the proportions of his figure are distorted. The arms and legs are drawn short or too long, the head is too big, etc. In order to avoid this, it is convenient to divide the entire full-length drawing of a person into separate sections. The human figure, together with the head, can be divided into seven parts, equal to the seven circumferences of the head and neck. We will not use this diagram in this lesson, we will draw a person in a different way, but you can additionally use this marking so that the drawing of the person turns out to be proportional.
1. How to draw a person, initial outlines

So, let's start drawing a person by drawing a quadrilateral with aspect ratios of 3:4. In the center of this figure, draw a long straight line, slightly longer than the longitudinal side of the drawn quadrilateral. Draw an oval shoulder line on top. And since our person will be in summer clothes, then at the bottom of the rectangle draw the outline of future clothes, a T-shirt.
2. Marking parts of the human body in full height

let's continue drawing of a man and make markings using circles for the head, neck, shoulders and collarbone, and knees. First you need to draw an oval for the head, then an oval for the shoulders and circles for the knees. This is not at all difficult to do even for a child, and it is not at all necessary to draw geometrically accurate shapes of circles, except for the outline of the head. Draw the head and neck as accurately as possible.
You probably noticed that many of the lines in the picture are drawn rather carelessly. I deliberately do not try to draw them beautifully, since these contours will have to be removed from the drawing in the future, and they serve only as temporary guidelines for further steps.
3. We begin to draw the general outline of the figure

Moving on to the next step, at first it will seem to you that it is not clear what now needs to be drawn for our person. But take a closer look, you only need to draw two circles for the elbows and feet and two more winding lines on the sides of the person’s torso and connect them with the contours of the knees.
4. Draw arms and legs

Using the circles for the shoulders and elbows in the picture, draw the arms. The hands in my drawing are not drawn entirely, but if you want, you can also draw palms. Maybe the person will have some object in his hands. It is also not difficult to draw legs, the only thing you should pay attention to is how the feet are drawn. Shoe toes turned out different sides. At this step, be sure to check the proportions of the person's arms, legs, and torso. In the next step it will be more difficult to correct errors.
5. Remove unnecessary contours and the person will “come to life”

First, carefully remove all previous contour lines, if you touch any line with an eraser, then restore it. This step is the most interesting and simple, because you don’t need to draw anything, and the person will “appear” like a photograph in a developer. Only three simple details still need to be drawn. This is the line of the neck and sleeves of the T-shirt, and the bottom line of the trousers.
6. Draw the face and clothes

Now, based on the contours, you need to draw clothes, and the main thing is to draw in detail the person’s face and head. You can find a lesson on how to draw a portrait of a person on the website. When drawing clothes, do not forget, for greater realism of the drawing, to draw folds on it. Be sure to make shadows on clothing in the direction of the light source. If the light comes from the left, then you need to draw a shadow on the right.
7. Finish drawing a person

This full-length drawing of a man is very approximate and is more designed to study the location of the proportions of the figure of a man standing at full height. To learn more about how to draw a person, you can watch other lessons. For example, how to draw a person’s eyes and others.
Draw a person or it will always be easier for an animal to learn on its own or teach a child if you carry out the drawing step by step. The main thing is to correctly make preliminary markings of the position of the head, shoulders, arms, and legs. And then, step by step, add more and more image details to the picture.
Drawings of a person’s face, portraits are the most complex look visual arts. Learning to accurately draw a person, even with a simple pencil, requires not only time to learn, but also talent. The complexity of drawing a person lies in the ability to convey the emotional state of a person, his facial expressions, the depth of his gaze, etc. But it is quite possible to learn a simple technique for drawing a person on your own, especially if you draw a person step by step.
The lesson “How to draw a ballerina” is designed for those who already know how to draw a person well. Drawing a picture of a ballerina is especially difficult, since the drawing needs to convey the grace and elegance of the dance, the beauty of the body and human movements.
Let's try to draw a hockey player in motion, with a stick and a puck, step by step. You might even be able to draw your favorite hockey player or goalie.
Eyes are the basis of anime drawings. All pictures of girls drawn in anime style are distinguished by their huge eyes - black, blue, green, but always huge and expressive. The eyes are the most important and complex element any drawing of a person.
Eyes are the most attractive part of a person's face. And since this element takes on more attention, it must be drawn correctly. In this lesson we will learn how to draw a person's eyes with a pencil step by step.
In order to draw Spider-Man, you must first learn how to draw the human figure. Drawing Spider-Man in motion is very difficult, since you need to convey the dynamics of human movements in the drawing and be sure to accurately draw all the proportions of the human body.
Just like Spider-Man, drawing Iron Man is difficult. But if you do it exactly preliminary contours, then drawing Iron Man will be easier and simpler. To make the drawing look bright and effective, you must color it with colored pencils.
This article will help you master the basic principles of constructing the human figure. The proportions of the body are the point with which the aspiring artist must be most careful at the early stage of his training. But most, including me during my early years as an artist, ignore this knowledge. Now it seems to me that proportions are one of the main points in drawing a person. This material shows that we need to be more careful with the proportions of the human body (especially female figure) when you draw. There are many detailed books and websites on this topic, and what you will read here is really just the old way I determine the proportions of my own drawings. You've probably read in many illustrated books about the eight-head rule. In painting perfect body has a height of 8 heads. However, the body proportions of each individual are relative, and can sometimes range from 7 to 9 depending on physiological characteristics and the artist's view. The same is true with cartoon characters. Since comic book art mostly glorifies perfection human form, then the rule of eight heads also applies when creating animated masterpieces. We suggest you begin your study of proportions by drawing your characters in simple poses (standing or sitting).
When drawing a human figure, always start your drawing with axes and guides. This will make the task easier, and you will be able to set the proportions and pose right away, without going into too much detail. Once you have the base of your figure figured out, it will be very easy to complete the drawing. Artists often draw women's bodies slightly curved with bulging hips and a thin waist. In the figure, you must immediately determine the size of the head; this will be your “centimeter” for the rest of the body, which you will use in further measurements. I tend to be as detailed as possible at this stage, but that's a whim and not a rule.
The head length proportions will be your basis for the eight head rule.
- The height of one head fits from the chin to the middle of the chest; in a woman, as a rule, this line may indicate the middle of the chest area around the nipples.
- The distance from the chin to the shoulder is usually 1/4 of the length of the head.
- The distance from the chest down to the abdomen (navel area) is also proportional to the height of the head.
- If we put our “centimeter” down from the navel in descending order, we will end up right at the bottom of the intimate zone.
- The height of one head is up to half the hip area.
- A head lower than the upper part of the legs, setting aside another size of the head, we will find ourselves just below the knees.
- Continuing to set aside the base size, we will get more or less half of the drumstick.
- And the last of the eight downwards will hit a point just below the ankle.

If you notice, the leg is not a measurement element, that is, an improvised “centimeter”. This is because the length female legs may actually vary depending on the height of the shoe. Also, I noticed that some artists have various options length when it comes to the legs, where sometimes different parts can be a little shorter or longer. This mainly depends on anatomical preference.
The width of the shoulders also varies depending on the physiological structure of a person. But usually it is equal to the size of two heads located side by side, one ear to the other. Don't make this size less than twice the width so you don't end up with a weird silhouette. Hips are also not the same in all people. Their width, like the shoulders, is approximately equal to two sizes of the head, maybe a little more, but in no way less than two heads together without ears. Contrary to some opinions, a woman's shoulders can indeed look wider, but only in rare cases when her entire body is muscular. Broad shoulders thin waist and relatively wide hips can contribute to a sexy figure. Arm length is not usually a problem for beginners. The distance from the shoulder to the elbow is equal to one head height and another half of it. From the elbow to the wrist you can also set aside the size of your head.

People are made up of basic geometric shapes, which ultimately together constitute one whole. Just as with other parts of the face, we rely not only on knowledge of proportions, but also on our perception of the surrounding world, and when constructing a human figure, the image depends on how you interpret the various parts of the body. For every beginner, extensive knowledge and understanding of anatomy is required at an early stage of training. Imagine a robot and how it is designed. It features cylindrical shapes for the arms and legs, elliptical shapes for the shoulders and joints such as the knees and wrists. The bust, as you remember, is located on a line distant from the chin downwards by the size of the head. This is where the middle of the bust will actually be.
Always try to use free ones curved lines , especially when portraying a woman. There are no straight lines in a person. All people are covered with soft muscles on top, and this should be visible in your drawings. At this stage you can see very clearly whether there are things you need to improve: posture and body. It is important to make any necessary changes now before finishing the drawing. If everything is in order, you can go ahead and do the finishing touches.

To draw the girl's figure, I used an HB pencil because it is easier to scan onto the computer. In general, usually for drawing, I take one sheet of paper, an eraser, a 2H pencil to construct my drawing and H or HB pencils for shading. Once the figure is constructed, all that remains to be done is to draw the clothes. Then you should remove the old and unnecessary lines, but for this tutorial I left them in to show how everything is done at the drawing stage.