Step-by-step drawings for children 4 5. Drawing lessons for children. Features of the image of a child's body
Kids really like to draw, but by middle preschool age their works of art barely resemble anything realistic. How to organize drawing classes for children 4-5 years old so as to instill in the little ones a love of fine art and teach them how to draw simple drawings? We'll tell you where to start, what the benefits of such lessons are, and what art supplies you can use.
The benefits of drawing
Classes creative activity- This important element in the process of child development. For children preschool age typical visual-figurative thinking, so drawing lessons have great importance at this age stage.
Drawing helps in the development of:
- imagination;
- abstract logical thinking;
- fine motor skills;
- logic;
- creative thinking;
- attentiveness.
Drawing is also a reason to spend more time with your baby, which has a significant impact on his psycho-emotional development.

Accessories
What supplies you need for class depends on what you plan to draw with. And you can do this in different ways:
- fingers;
- palms;
- tassels;
- pencils;
- felt-tip pens;
- cotton swabs;
- cotton wool
You can use coloring books or just landscape sheets.
To make drawing for children as effective as possible, use various items and forms of lessons. For example, you can show your child several creative techniques using colored pencils, and the next day reinforce these techniques by drawing with crayons on the asphalt, etc. Children 4-5 years old may not like the monotony of drawing with felt-tip pens or pencils, so it is important to periodically change the methods training.

5 learning ideas
To teach a child to draw, you need to know a few interesting techniques that will instantly get your little one excited about learning. Consider them and start with the most suitable one.
- Blots.
This is a simple method, but kids love it very much. You will need album sheet, paints and brushes. Fold the sheet in half, draw a butterfly wing on one side, then press the halves tightly together so that the wing is imprinted on the empty part. In this way you can draw not only a butterfly, but also a leaf, a flower, two friends, etc.
- Geometric figures.
Use ones familiar to your baby geometric figures. For example, to draw a girl step by step, use a circle, line and triangle. First, we draw the head (show the baby how to draw a circle), from the circle you draw a dress in the form of a triangle, the legs and arms are drawn, respectively, with lines.
- Stencils.
Prepare in advance various stencils that the child will first trace and then paint. Gradually he will remember the image and shape, and he will no longer need a stencil to draw a certain object. If the baby has a stencil of a square, triangle and rectangle, then he will be able to draw a house. Then he will begin to imagine what else he could draw from these figures.
- Prints.
At 5 years old, children love to color in something and then make prints. You can start with your palms, then take prints from convex surfaces. Curly seals are now being sold, from which a child can create images. From the flower prints you get a flower field, and above it you can draw a sun from a geometric figure - a circle.
- Applications.
Combine drawing with others creative techniques. You can draw a background ( blue sky, mountains, rocks, etc.), and other objects (stars, clouds, trees) are cut out of paper, painted and glued to the background. You can also use colored sand or beads.

Conclusion
Drawing with children is part of your communication with them. During classes, you constantly talk to your child, ask leading questions, and when he thinks about them, he comes to certain conclusions. This is how his ideas about the world are formed. When drawing the sea, a child may have never seen it, but he already knows what color it is and that there are waves on the sea. By depicting a tree, the baby remembers what it is made of and that the time of year can be determined by the foliage. Be sure to include drawing lessons in your child’s activities, because it contributes to the full formation of his personality.
Good day, dear parents. Today we will talk about how to teach a child to draw step by step. You must understand that this method is as accessible as possible for young children. We will consider age characteristics, as well as the basic rules and methods of reproducing some paintings using special algorithms.
What are the benefits of drawing
- The child develops fine motor skills.
- The drawings reveal the worldview, convey emotions and feelings.
- The baby develops his own opinion.
- When a child draws, the right and left hemispheres of the brain actively develop. Thus, he, in essence, plays and shows his creative inclinations.
- Promotes the development of visual skills, speech, memory, touch and thinking.
- The process allows you to develop discipline, self-organization and perseverance.
- The baby gets used to finishing what he starts.
- Drawing can be considered as a way of relaxing time, which replaces active games.
A step-by-step method of creating drawings
Step-by-step drawing is a method of depicting drawings, which makes it possible to do it sequentially, following simple instructions and diagrams. First you need to teach your child to draw simple drawings, and then move on to more complex ones.
Often, even adults find it difficult to understand how to draw a particular creature or object. Knowing how to do this using simple geometric shapes will make the drawing process much easier and simpler. That is why this method Well applicable when teaching children.
When I was little, my mother bought a special book for me step-by-step drawing. I didn't buy this for my son. Somehow it turned out that my child began to immediately draw entire compositions, without thinking about anything for a second. I received and still receive great pleasure from this process.
Learning at home

First you need to take care of purchasing necessary tools to create a child's first masterpieces. To do this you will need:
- quality album;
- soft simple pencil;
- good eraser;
- a set of colored pencils;
- schemes for step by step drawing.
Don't be surprised that this moment so little equipment needed. Better first It’s a good idea to introduce your child to drawing with pencils, and only then move on to crayons or paints.
You also need to make sure you have a comfortable table, chair, and good lighting. When the lesson begins, eliminate all distractions and irritants.
It is necessary to remember to comply certain rules in the learning process:
- haste is a bad adviser;
- you need to make every effort;
- you must try to depict the drawing in the same sequence as indicated in the diagram;
- you need to reproduce the picture, thinking about it and remembering your actions, so that later you have the opportunity to do it yourself, without using diagrams;
- the first jobs should be fairly easy and simple to complete, then you need to consistently move on to more complex tasks;
- Remember that you cannot complement the baby’s drawing. Your actions will only upset him.
We teach children from three to four years old

- For a 3-year-old child, you need to select only soft pencils. This is due to insufficient pressure.
- We show the baby how to hold it correctly. If necessary, we help with our own hands.
- Remember that children at 3 and 4 years old are not yet able to confidently hold a pencil, and, therefore, draw straight lines. Therefore, at first you will have to practice doing exactly this.
- For children of this age, it is recommended to purchase special printed notebooks in which you can trace finished pictures.
- The next stage is getting to know simple geometric shapes. We draw a triangle, circle, oval, rectangle, square.
- As soon as the child has mastered geometric shapes and they have begun to work out for him, we move on to transforming them into new objects. For example, you can create a bus from small circles and a rectangle.
We introduce children from five to seven years old

- If a child who is already 5 years old was previously familiar with simple techniques drawing, then you can from a simple pencil move on to a set of colored ones, also to felt-tip pens or paints. Explain to your child that his image can be colored by giving different colors to certain objects.
- At the age of 6, a child will be able to learn how to create compositions and entire plots in his paintings.
- At this age, children can be asked to draw on a piece of paper everything they notice in everyday life.
- If your daughter or son has questions about creating paintings, you must always pay attention and try to find answers to them.
- A child of 7 years old will already consciously convey his emotions through drawings.
Examples
I bring to your attention a plan of four step-by-step drawings. Start with the simplest thing - a tree or a rose, and finally try the method of drawing a person step by step. You will see that creating such pictures is not so difficult; any child can cope with the task.
Drawing a tree

Convey to the child that it should consist of a trunk, leaves and branches.
- Draw a trunk, pay attention to the fact that at the base it is much wider than at the top.
- Think about what kind of tree you are depicting. Remember that, for example, a birch trunk is quite thin and has curves, while an oak trunk is massive.
- Now we need to add branches. Please note that they are wider at the base. You also need to understand that they are larger at the bottom of the trunk. It must be remembered that the branches of a tree begin to grow from about a quarter of its entire height. The branches are depicted directed towards the sun, that is, raised upward.
- Try to draw small ones on thick branches to add realism to your drawing.
- For the first time, you don’t have to draw each leaf, but depict the crown as one mass.
- Now you can color the resulting tree.
Create a rose

- Let's draw smooth line, which will be the stem of the plant.
- Draw leaves on the stem.
- Draw an oval. This will be our future bud.
- Inside the oval we depict the main petals, there are two of them. We draw it so that the center of the petals resembles a rolled roll.
- We finish drawing the small side petals.
- All that's left is to add some color.
Drawing a cat step by step

- Let's draw the head in the form of an oval.
- Now you need to draw a triangle in the center of the circle. This will be the nose, above it there are two circles - eyes.
- Draw the muzzle, add two arches that originate from the nose.
- Now we need to do the torso. For this purpose, draw an oval.
- Draw the paws and add a tail.
- Now let's add two triangles, placing them on the head. These will be the ears.
- Inside each resulting triangle, add one more.
- Add mustache.
- The cat is ready, all that remains is to decorate it.
Drawing the first man
Such an object is quite complex, and it is better to leave it for last when getting acquainted with the step-by-step drawing.
However, it is worth knowing that after acquiring certain skills in step-by-step drawing, even such a drawing will not seem heavy and will be easily recreated by a child.
- To depict the head, draw a regular oval.
- Now you need to add a rectangle directly below the drawn oval. This will be part of the torso, from the waist to the head.
- Next you need to connect the drawn parts. This will give you a neck.
- Under the rectangle we draw another one, the same in width, but more elongated in length.
- The resulting rectangle needs to be divided into two halves, these will be the legs.
- Next, you need to depict the arms by drawing thin, long rectangles along the upper part of the body.
- Now you can dress the resulting little man. Let's add a neck for the sweater, draw trousers, shoes and hands.
- Add facial features and ears.
- So it turned out to be a little man. All that remains is to brighten it up by decorating it.
Now you know how to teach your child to draw. The main thing is to be patient and do not put pressure on the baby. He will be ready when the time comes. Try to explain his mistakes as much as possible, remember that you cannot interfere with the children’s work and make any adjustments to it.
Master class: Decorative composition "Flowers" with step-by-step photos.
Master class on finger painting using toothpaste.
Author: Natalya Aleksandrovna Ermakova
Teacher, Municipal Budgetary educational institution additional education children "Children's Art School named after A. A. Bolshakov", Velikiye Luki, Pskov region.
Hello, dear guests!
Drawing with toothpaste unusual look creativity, which reveals the child’s artistic abilities and brings him great pleasure. Such fun also calms and relaxes. Helps the child get rid of his fears, become more attentive and kind, reveal his inner potential, develop visual memory, spatial thinking and the ability to imaginative thinking. Smells control mood, calm overexcited nervous system, increase performance.
Description: The work can be done with children 8-9 years old, simplifying or complicating the task. The material may be useful to parents and educators preschool institutions and teachers of additional education.
Purpose: Such works can decorate the interior of premises, as well as serve as a wonderful gift for family and friends.
Target: creating a decorative composition "Flowers"
Tasks:
-teach children the technique of working with multi-layer toothpaste;
-improve composition skills;
- teach the child self-expression and the ability to manage emotions.
Material:
-sheet of A4 paper
-toothpaste two types (different color combinations)
-flower sprayer
-watercolor paints
-brush No. 3
-colored pencils
-water jar
- napkins (for fingers)

Progress of the master class.
We begin work by drawing flowers; presumably we will have three main ones, around which the entire composition will be built. We will draw with our fingers, in one-time strokes. To do this, take a three-layer toothpaste (blue-red-blue) and squeeze a small drop onto your finger, you can simply press your finger to the paste and lightly press on the tube. We select the starting point - the center of the flower and make strokes in different sides. Each stroke is done once, and for each new petal there is a new drop of paste.

The result is picturesque relief petals with different shades. We make all the following strokes around the central ones, trying not to mix them.

We do the second flower differently, we draw large petals, and on top of them we draw smaller ones - the second row, it will be in the center of the flower. For each petal, a new drop of toothpaste.

We will draw daisies in the same way, but with a different two-layer toothpaste (blue and green).

Place the flowers and add leaves.

We draw simple leaves with two strokes. Big leaves we draw from a simple shape by adding strokes along the edges and connecting them in the middle.


Next, we work with a palette (sheet of paper), mix toothpaste, each separately.

Add color spots from the palette with lilac and draw with your finger using the “poke” method.

This is how the composition turned out. As the toothpaste dries, it loses its brightness, so I recommend varnishing it. You can use hairspray, it is less toxic and less safe to use with children, and dries instantly.

In fact, painting with toothpaste is an extraordinary activity. Impossible to stop in literally you relax your soul and body. For people who love experiments and are hungry for creativity, I propose to continue and complicate the work.
Next we will paint on the damp background; for this we use a flower sprayer and generously cover the entire surface of the work with water. The advantage of toothpaste is that the composition will remain unchanged. Pour generously, without fear green color between the inflorescences and leaves, we work with watercolors and a brush.

The raised edges of the flower arrangement will direct the paint in the right direction, or stop it in time.

In some places I add red and a drop of black, also on the damp background. I add yellow shades with my finger.

Now I’m working with a brush, painting with black watercolor paint contours of the petals.


If desired, you can supplement the work by drawing details with colored pencils. Drawing with them on a wet background creates the effect of working with watercolor pencils.

My children and I really like this technique, here are a few more options for compositions drawn using toothpaste.
Finger palette with gouache finishing.

Finger palette.

Finger palette.

Finger palette + monotype.

Design from paper + finger palette.


It is better to start drawing from childhood - this is one of the most fertile periods for mastering the basics visual arts.
Step-by-step drawing for children - a way that will help you develop Creative skills your child, regardless of his natural abilities.
You will spend many exciting hours learning the basics of drawing step by step and then be able to turn all your creative fantasies into reality.
Step-by-step drawing is a drawing method that allows you to create a drawing sequentially, in stages, from simple to complex.
Sometimes the whole thing stands still simply because a person does not know where to start. Often a child asks mom or dad “Draw a turtle,” and the parent would happily fulfill the child’s wish, but doesn’t know how.
And if he had a diagram of a step-by-step drawing of the same turtle in front of him, he could easily cope with this task.
For children, step-by-step drawing is a good help: firstly, they learn to draw without mistakes, following a certain order of actions, and secondly, in the process of repeated training, they develop an algorithm that will subsequently allow them to accurately depict many things without a diagram.
Finally, it’s just very interesting and exciting to watch how a whole image emerges from small figures and strokes, and failures rarely happen.
How to teach a child to draw step by step?
Of course, first it would be nice for the parents themselves to master this simple method. And if the child watches how he tries to creative work mom or dad, the desire to repeat after the elders will definitely arise.
At first, during step-by-step drawing lessons with a child, convenient and understandable diagrams are needed.
The essence of the method is that drawing something takes place in several stages.
That is, when drawing a cat, we will not start with the tail or face, but will follow a certain pattern that will allow us to avoid mistakes and inaccuracies in proportions.
The easiest way to start mastering step-by-step drawing is with pencil sketches. Paints and pastels will come in handy later.
Lessons on drawing a house step by step
To organize the process you will need:
- sketchbook good quality(the paper is quite thick and does not wrinkle in use);
- pencils of different softness;
- eraser;
- diagrams in which everything is clearly visible.
If pencil drawing has already been mastered, or you want to immediately move on to pastels or paints, all this should also be available.
Provide the aspiring artist with excellent workplace: comfortable table and chair, good lighting, absence of all distractions. The child should be comfortable.
If you have a board or easel nearby, great, you can attach the diagrams there. You can also use a book stand or wall.
Before you start drawing, be sure to tell your child about the following rules:
- there is no need to rush, everything works out only for those who try;
- you need to act strictly according to the scheme, especially if you are just starting to learn to draw;
- remember what you are doing, and next time you may not need the diagram;
- start with the simplest ones, gradually moving on to more complex drawings.
Next we show the child interesting schemes. Offer several schemes to choose from, let young artist will choose what he likes. Remember that it is best to start with simpler diagrams: first we master the step-by-step drawing of animals and patterns, and later we move on to drawing a person.
Examples of step-by-step drawing
How to draw a hare

Let's start with a stylized, cartoonish bunny, which can be easily created by a preschooler.
- We draw a large horizontal oval, and under it a small vertical one, but without a top.
- Draw the paws to the small oval.
- A small oval and two circles in a large oval - draw the muzzle.
- We draw the nose and pupils - exactly according to the diagram.
- We draw identical ears.
- Drawing small parts- mouth, eyebrows, mustache, fingers. The bunny should have a flower in its paw.
- And now all that remains is to draw a skateboard under the bunny’s paws - our bunny is very sporty and mischievous.
Cat drawing

Now let's draw a cute cat.
- First we draw a circle - this will be the head.
- Two triangles on top - they turned out to be ears.
- Inside each triangle there is another small one.
- Two dots and a triangle nose - a muzzle begins to emerge.
- From under the nose there are two arms going in different directions – the cat’s mouth. Let's not forget about the luxurious mustache.
- Draw the body - start with an arc.
- We draw a collar for our cat.
- On the other side we draw the foot.
- It remains to draw one more paw.
- Now you can take pencils or paints and make our cat colorful. Ready!
Drawing a dog

Now let's draw a charming puppy.
- We start with an oval and a semi-oval, they should not be connected!
- Now we draw the eyes and tail.
- Ears, nose, spot around the eye - we continue to draw the muzzle.
- We draw a tongue and connect the head with the body and the ears with the head using thin rectangles.
- Draw the paws.
- All that remains is to decorate the puppy. That's all!
Drawing a rose

- Draw a simple oval on a thin stem.
- Draw leaves on the sides of the stem.
- Inside the oval we draw two main petals.
- Inside the petals is the base of the bud, like a rolled up roll.
- Draw the side, small petals.
- Add colors and the charming rose is ready!
Drawing cornflower

- Draw a circle on a thin stem.
- Draw the core and small stems on the large stem.
- We draw buds on the stems. Separate the petals.
- We finish drawing the buds, highlighting the teeth of the petals.
- Erase the line of the circle with an eraser.
- We paint the cornflower in color.
Drawing a man

This simple circuit will help your child master proportions in drawing a person.
- We draw the head (oval), neck and triangle - the future base of the body.
- At the bottom of the large triangle is a small triangle, legs (knees are drawn).
- We draw the hands based on the marks indicating length.
Tank drawing

Any boy will want to learn how to draw a tank, and it’s not at all difficult.
- We draw the base, observing the proportions as much as possible.
- We draw the caterpillar wheels and the barrel.
- Let's focus on the small elements.
- Using pencils we draw a tank in color.
How to draw a pattern
Perhaps, after mastering the drawing of these elements, the child will be interested in painting on wood - a very interesting, traditional creativity.
Drawing the “Grass Ornament” pattern

- A few curls will be the basis of the ornament. They should be smooth and graceful.
- Draw red petals in the two large corners.
- All that remains is to draw the smaller black petals.
Pattern "Leaves"

Many examples of Khokhloma painting contain these elements.
- A thin stalk is a small, curved line.
- We draw an elongated oval on the stem in green.
- To “pair” him with two more leaves, in which yellow draw the veins.
So, step-by-step drawing is a method based on order and schematics. In order to consolidate a certain algorithm in the creative mind of a child, it makes sense to resort to this method. You should start with simple stylized drawings, images cartoon characters etc. It is simple and interesting, and the result will be successful.
When a child masters the basics of step-by-step drawing, he may want to continue his creative activities in a fine arts studio or art school. Or maybe he will continue to improve his ability to draw using patterns that will become more complex.
If you take a closer look, children differ from adults not only in their size. The proportions of the body and face in children are not at all the same as in adults.
That is why, before drawing children, you need to carefully monitor the relationship of all proportions. After all, a small adult depicted on paper or canvas is not yet a child.
Differences in head size between a child and an adult
The main difference is the size of the head. In young children, the frontal part in relation to the face is much larger. The skull of a small child is not yet fully formed, so the face is still small.

Features of the proportions of a child's face
Children's chins are also not yet fully developed. When drawing a baby's face in profile, this fact must be taken into account. The chin should not protrude to the level upper lip. At the same time, children often have what adults call a double chin.
In the following picture you can clearly see the differences in the proportions of the face of a child and an adult:

The eyebrows are located quite close to the nose due to the fact that the face itself occupies a small area. And only the iris of the eyes is already full size, which is why children’s eyes appear so large.
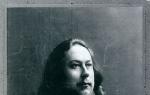
Features of the image of a child's body
The body itself, in relation to the head, seems disproportionately small compared to the body of an adult. In fact, the difference in the ratio is not that great, but it must be taken into account. We also note that children have not yet developed a long “swan” neck, which is why the head again appears much larger.

Before you start drawing, try to study the “nature”. Look at the child, find more good photos and drawings. And go ahead!
Drawing a child's portrait in profile
Let's try to draw a child together. To work we will need a simple pencil, an eraser, a sheet of paper and a little patience. As a result, we should get a pencil portrait of the baby in profile.
Let's look at each step step by step:
- First, let's outline the most basic things. On a piece of paper, draw... a square. This will be the baby's head. We will need a square to mark the proportions of the face. Divide it with thin lines into 4 equal parts.
- You need to inscribe a circle in the lower left square. Maybe it won’t be even right away, but it wasn’t the gods who fired the pots. The baby's face will be located here.

- Inscribe another circle in the large square. Here are the proportions: big circle- the whole head of the child, the small one - his face.

- In the middle of the left side of the small circle, draw the contours of the face in profile - a small snub nose, lips and chin.
- Now draw a smooth line from the bridge of the nose to the forehead. Outline the head.
- In the bottom right square draw an ear. Draw out the back of the head, which goes into the neck.

- The eye will be located at the level of the bridge of the nose. Don't forget, babies' eyes are quite large, but still not saucers. The pupil is usually drawn wide, although in ordinary life this almost never happens. But a small dot instead of an eye does not look very nice in the drawing.
- Draw the eyebrows just above the top line of the left square.
- Draw the details of the ear, eyes and lips.

- Now - an unexpected trick. Use an eraser to erase your sketch so that the pencil marks are barely visible. Now you have hidden traces of your marking squares.
- We take a pencil and start again. Outline the contours of the head, details of the face and finish the hair. Here, the portrait is almost ready.

- All that's left is to add some shadows and retouching. Do light shading on the face, leaving the cheeks, forehead and around the eyebrows lighter.

- More soft pencil you need to shade the eyes, nose and mouth. The pupil is the darkest part of the eye, the iris has a transition from dark to lighter tone. Don't forget to leave a small highlight on the iris - as if from reflected light.

- Shade those parts of the face that are not exposed to light. Don't forget the parts inside the small ears.


- We draw the hairs on the crown and back of the baby’s head, paying special attention to the tones and individual hairs.


The drawing is ready! Want to try again?
Making a full-face portrait of a child
Let's draw another portrait, only now the child will look directly at you. You already know everything about the intricacies of proportions. Let us only add that if the child’s face is located frontally, then the eyes, nose and mouth will be located in the lower half of the circle representing the head.
- Draw an oval, slightly wider at the top.
- Draw a horizontal line in the middle part of the oval - it will indicate the level of the eyes.
- Just above the eyes, draw a line for the eyebrows.
- Approximately in the middle of the lower part of the oval, mark the place where you will draw the nose and lips. As you can see, the proportions have been preserved - the baby’s face should be much smaller than his entire skull. The marking is ready.

- Sketch out the eyebrows in arcs. A small oval - in place of the nose; use a circle to indicate the location of the ear - just below eye level.

- Now draw the details of the face more clearly. Don't forget to sketch out the hair lines.

- Erase the extra lines and start highlighting the contours of the face, hair and head.

- We design the child’s face in detail, not forgetting about the shadows - we do them using pencil shading and shading of individual elements.


We depict a small child in full growth
The lying baby looks very cute. Let's try to make a drawing like this.
 In a small child, the ratio of the size of the head to the body is much smaller than in an adult. Let's not forget about this. In addition, you will need to take into account the cute baby swelling.
- First of all, draw a circle. On it, as in previous master classes, we outline the part on which the baby’s face will actually be located.

- Since we are drawing a lying baby, mark the eyes, nose and mouth on the left side of the circle. Don't forget about proportions.
- Around the future face, draw the contours of the head and outline the lower part of the surface on which the child lies. Let it be, for example, a baby scale.
- You already know how to do the rest - eyes, nose and mouth. Yes, just a small ear.

- Now let's try to draw the body step by step. First, outline them with simple lines - how the arms, legs and body are located. Since the baby is very small, his neck is not visible at all.

- After this, draw the chest and arms. More roundness, you can draw a fold on the wrist.

- Next is the turn of cute plump legs.


- Now draw the outlines of the baby scales.

- The resulting drawing can be shaded, shaded and colored.
Not so difficult, right?