Children's drawings on a winter theme in gouache. A colorful house, a bunny and snowflakes - a fun winter. Materials and tools for drawing
Today's lesson will be experimental. I will try to gather as many (if not all) readers who are interested in this topic as possible -. Those who often surf the Internet, I think, know how I will do this. If not, just enjoy =)
How many people love winter pencil drawings?
Purely for statistics, I wonder how many people will read this lesson? Whoever read it, write +1 in the comments! Let's see how many of us are here! Here, I said everything that was on my heart. Now let's move on to the topic. In today's lesson we will learn... Imagine a frosty January day... All the fields and roads were covered with fluffy snow, which sparkles so wonderfully in the sun, the rivers were covered with ice, and... And I just want to go outside to play in the snow or go sledding. And as in the song: “If there were no winter in cities and villages, we would never have known these happy days...” Can you imagine? This means that inspiration is our traveling companion for today.
How to draw winter with a pencil:
Step one. Let's define two lines of the earth's surface on the sheet: we start from a hillock, go down into a small ravine where a river will flow, rise a little higher and draw the surface to the edge of our drawing. A little higher, on the hill, there will be a house, so let’s immediately draw its outline. Let's draw a contour of the earth's surface from the house. From above we will show the boundary between the sky and , it is smooth, but not very smooth. approximately the same size, but still different from each other. Along the edges of the landscape we will draw the outline of two trees, as if limiting our drawing with them.  Step two. Let's draw a snowball on the roof of the house. The winter is snowy this year and everything is dusty. On the left above the tubercle we will draw the outline of the fence. Let's mark the snow and branches on the trees.
  Step three. First, we finish drawing the trees that we placed along the edges of our drawing. Then we draw the house: the windows, the door, and the pipe. Surely someone lives in it (maybe?), and lights the stove on such a frosty day, which means there is a column of smoke coming out of the chimney. And now between the level of the sky and the top line of the earth, one, two, three... and so on we fill the entire background. We have already talked about this.
  Step four. We finish drawing the fence, make the trunk of the trees more winding, draw snowdrifts, large and small. A small branch of a tree sticks out from one of the snowdrifts, which will turn green in the spring. On the left, right above the river there will be a small cliff. Let's imagine a little and try to carefully draw it, approximately as shown in the picture.
  Step five. Let's draw a river. First, its upper border, and then the shimmering water itself and, in some places, ice, and even large ice floes. From the house we draw footprints to the river, because we remember that someone lives there and, probably, goes out for a walk.
 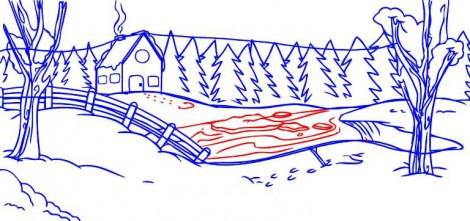 Step six. And the most colorful. Take colored pencils or markers in your hands and use your black and white drawings- cheerful and bright! May it lift your spirits!
  Do you have your own works on the topic? Send them
Being a parent is not an easy task. Moms and dads need to take care not only of physical health children, but also pay due attention to intellectual development.
Children are inquisitive and enthusiastic people (another thing is that all hobbies, as a rule, quickly fade away), so in different period Your child may be interested in gluing airplane models, making crafts from plasticine or clay, doing wood burning, or drawing all sorts of pictures.
And you and I have to urgently master all these arts: drawing, modeling, origami. How often do moms or dads have to make crafts for kindergarten or school with their children?
In our article today, we will reveal to you some secrets that will help you master drawing a winter landscape with gouache and teach this simple art to children.
This skill will definitely come in handy. Firstly, in school and preschool educational institutions very often people are asked to draw landscapes.
Not every child can cope with such a task (what a child, not every adult can depict a landscape: this requires certain skills and imagination), so your help will be useful to the child.
Well, secondly, inquisitive fidgets themselves often ask their parents to draw something for them. In this case, you will not only please the child beautiful view landscape, but you can also explain to him how to correctly draw such pictures step by step.
Tools
Of course, we will paint the landscape with paints - pencils and felt-tip pens are not suitable for this purpose. Usually watercolor or gouache is used. It’s up to you to decide which paint to choose, but we strongly recommend using gouache. This material has several main advantages over watercolor:
- the density of the applied layer is easily adjusted with water;
- You can not erase a pencil sketch, but draw directly on top of it, which is very important for a painting, the drawing of which takes place in stages (a significant saving of time and effort);
- the paint has virtually no odor.
However, it is not without its drawbacks: if you apply gouache on paper it is very thick layer, the paint may crack and crumble.
In addition to paint, we will need brushes (one hard and thick, for large strokes, and one thin, for drawing small parts and outline symbols), palette and water container. To mix paints, you can use regular school plastic palettes or a flat plate. It’s better to take several jars of water so you don’t have to run around later.
What gouache should I use? You can purchase standard “children's” paint or artistic gouache. The latter is more durable, which is reflected in its cost.
The instrument is ready - it's time to decide on the plot. We decided to depict a landscape, but what will be its basis? We invite you to master step by step drawing winter landscape.
Of course, a lawn with spring flowers or sand beach no worse, but exactly winter story has an inexplicable charm and fabulous atmosphere.
In addition, such a task is very common in school curriculum, so you will kill two birds with one stone: you will get aesthetic pleasure and help your child prepare the task.
Winter drawings are attractive because they are created using a minimum of colors. Winter evening, a dark forest in the distance, foreground- snow-covered spruce and little house.
Warm light splashes from its windows, and it becomes clear that a cozy room is hidden inside, in the middle of which there is an oak table laden with cups with aromatic tea.
Let's start creating
Idyllic pictures will not leave anyone indifferent. So let's go through all the steps and master the step-by-step drawing of such a masterpiece.
Stage 1
Sketch it out. The drawing should be approximate, the contours of objects should be barely guessable. Do not press hard on the pencil: paint will flow into the grooves left by the lead, causing the sketch to turn out uneven. It is also better not to draw dark thick lines: they will appear through the gouache layer.
Stage 2
Prepare jars of gouache. The contents of the jars should be thick enough. If the paint is old and cracked, add a little water and thin it to the desired consistency.
We will paint over the sketch step by step, and will start with the sky (after all, it takes up a considerable part of the sheet). The evening winter sky should be light blue at the horizon and inky at the top.
You will need black, blue and white paint. Start painting the sky from above with a mixture of black and blue gouache (the desired shade can be obtained by mixing colors on the palette), gradually move to blue, and add a little white closer to the horizon.

Stage 3
Now let's start decorating the house. Your task is to convey the texture of the wood as accurately as possible. Therefore, we draw using several colors.
The main one is ocher (something between yellow and brown; usually it is not included in sets, so you will have to mix paints). So, paint the log with the resulting ocher shade. Add a few strokes below Brown, and on top of them - a little black. This will create the illusion of volume.

Stage 4
Paint all the other logs in the same way. We draw attic boards in the usual way brown using vertical strokes. It's the window's turn.
Since outside - winter evening, it is very important that the gloomy landscape is diluted with warm light. Paint the middle of the window yellow, apply brown along the edges (note: you want the colors to smoothly flow into each other, without clearly defined boundaries). Add a little white to the center.
Using a thin brush, paint a brown frame. To create a blurred effect, do not connect the crossbars of the slats. You can paint the shutters with any pattern.

Stage 5
No landscape is complete without a forest. Mix black and white colors(you want a shade slightly darker than the background), dip a thicker brush into the puddle of gouache and paint on background a few light vertical strokes. The forest is far away, its contours are blurred, so we will not draw the details.
Those trees that are closer need to be shaded with dark blue gouache, giving them a more intense color. Color the lake. This is not difficult, the process is very similar to drawing the sky, only all actions are performed in the reverse order. Give volume to the snowdrifts on the roof of the house and around it, playing on the contrast of shadow and white snow.

Stage 6
In the foreground we will draw a shaggy spruce. It will be covered with snow, so there is no need to add much detail to the tree.

There are only a few details left: cover the spruce with white snow, paint a chimney pipe (use a mixture of black, white and brown paints) with curling smoke and a few birch trees right behind the house (birch trees need to be marked with a thin brush), depict a snow coating on the ice of the lake.
Now you know how to draw a landscape in gouache step by step and make your children happy. You can complement similar winter drawings with other details: a fence, a kennel, a snowman. Ask the children what they would like to see in the picture, because children's imagination has no boundaries.
Not big house ik with a snow-covered roof, fir trees and bushes stand in the snowdrifts - here you have a winter drawing, depicted with colored pencils. Of course, you can add other details - a snowman, a sled with children, falling snow, animals or birds behind the fir trees, branches of a snow-covered rowan tree or a coniferous tree in the foreground. This list can be enumerated endlessly, because everyone associates winter differently.
If you don’t know how to draw winter step by step with colored pencils, then this lesson is just for you.
Necessary materials:
- - colored pencils in green, blue, brown and black tones;
- — Blank sheet paper;
- - a simple pencil;
- - eraser.

Drawing steps:
- When depicting any landscape, at the first stage a special role should be assigned to the horizon in the drawing. Finding the cent of the future winter picture and draw three tubercles one after another.

- Now let’s place three Christmas trees on the first hill on the left side, but on the right side in the foreground there will be only one conifer tree. Since this is a sketch, we depict the Christmas trees in the form of simple lines.

- In the background we will place a large house. Let's draw the lower part in the form of a cube, and the upper part in the form of a volumetric triangle.

- Around the house and on the third hillock we will draw bushes and trees in the form of lines.

- Let's add details to the winter drawing. On each tree we will draw snow and tree branches. Draw a window and a door on the front of the house. There will also be snow on its roof and other areas. Let's draw a small path on the first and second hillocks, which leads to the entrance to the house. Trees and bushes can also be detailed and snow placed on their branches.

- Using green pencils of different tones, we begin to decorate the branches of the Christmas tree, which are visible under a thick layer of snow.

- Use a light blue pencil to color the snow on each branch of the tree, as well as on the roof of the house and its small parts. The hills of the landscape should be completely decorated with this pencil.

- Darker tones of blue color We add depth and volume to the snow cover in all areas of the winter pattern.

- Let's move to the background. Use brown and black pencil to decorate the branches of bushes and trees. There will also be snow on each branch. Therefore, we use blue pencils.

- Finally, we work on the house: roof, walls, window and door. We use brown and black pencil.

The winter drawing with colored pencils is now complete. You can place it in a frame under glass and admire the painting every day.

Winter is a fabulous time of year, associated with snow-white snow falling from the sky, small but very beautiful snowflakes, cold weather, and bright characters animated cartoons and part-time heroes of children preschool age. List the entire list of beauties and wonders winter time possible ad infinitum. True, it is simply not possible to depict all aspects on a white sheet of paper! Therefore, in today’s article we decided to show our readers a version of the work that can reflect all the beauty of December, January, February, and related holidays. Winter landscapes pencil drawing - good idea to create a thematic drawing. Due to the variety of proposals and master classes that are presented in today’s article, artistic oses are suitable for beginners, children, adults who prefer art sketches according to the principle “step by step for beginners at home.” The options in the photo selection below can even help students in grades 7, 2, 5 and 6 get an excellent grade at school.
Untouched nature, covered as if with a snow carpet with a diamond shine, small but noble bullfinches sitting on the branches of trees, small houses with the lights on and fences between areas in the form of a wooden fence - no worse crowded city with high-rise buildings, illuminated streets, decorated parks and cheerful children sledding.
Master class step by step with photos:
1) On album sheet sketch a house and a fluffy fir tree. This must be done on a horizontal plane, starting from the middle.
2) After the first part of the winter landscape is drawn in pencil, draw two more houses and one Christmas tree. On the left side there is a house with a spruce tree in the background, on the right there is just a house whose foundation is hidden under a mound of snow.
3) In the background, draw a couple more trees and fir trees under the snow cover.
4) The last part of the sketch will be the fence.
5) The final stage is coloring. For it you will need colored pencils, felt-tip pens or paints - at the choice of the author of the work.


Master class: winter landscape in the suburbs, pencil drawing
This version of the winter landscape involves the outskirts of the city, the beginning of a forest belt, sledding hills and a distant suburb inhabited by people. In addition to the main aspects, the figure shows: full moon, falling to the ground, a finished snowman and the height of the heating season.
Step-by-step drawing for beginners:
1) Repeat several stripes that will become the basis of the design.
2) Draw a forest, a snowman and houses.
3) Complete the remaining parts of the winter picture, erasing unnecessary details.
4) Color the landscape drawn in pencil using watercolors.


Winter night pencil drawing, photo
Landscape combining white, blue, blue, brown, yellow and green color, transforms into very interesting picture. The most important thing is not to be afraid to combine several shades at the same time.
The following stationery supplies can be used as drawing tools: pencil, eraser, gouache.
The master class in the photo below will help you understand the technique of sketching and step by step image every detail of the drawing. The most important thing is not to change the idea by painting extra parts of the winter landscape.


Winter landscape with a river and a bridge
A pencil drawing can be presented depicting not only snow and trees, but also structures built by people. It's about about a bridge that helps you cross a river without swimming across it to get from one bank to the other, and also cozy house with all conviniences.
Drawing should begin with objects located in the foreground, gradually moving to the buildings and nature standing behind.


The beauty of the winter forest
The winter forest is no less beautiful than in spring, summer and autumn. It looks especially interesting and mysterious at night, when Moonlight falls on the snow, giving the already luxurious landscape a special charm and shine. A marvelous ensemble combined with a palette of bright and rich colors is something that will surely attract the attention of not only a child, but also an adult.
For coloring you can use gouache and watercolor paints, capable of conveying all the naturalness of a winter night landscape.


Christmas house with wreath and garlands photo

Gingerbread house photo

As soon as the ground is covered with snow, every person, loving winter, a holiday appears in the soul. So why not try painting a winter landscape in oils yourself? As soon as you start painting, frozen winter landscapes will seem so picturesque to you that you will immediately want to reproduce them on canvas. In this article we will look at the basics of painting in oils, and also, rest assured, we will learn the basics of drawing pictures that depict snowy winter landscapes. Paintings winter landscapes artists are admired by the whole world, because the Slavic winter is truly the most beautiful!
Preparation and materials
What do we need to know to paint a beautiful winter landscape in oils? Snowy winter landscapes, oil paintings for inspiration and your desire to create something wonderful - that's almost all you need. You can paint with bristle brushes or palette knives, using thinner or working without it, mixing paints with linseed oil, which helps create a special structure finished work. In order to make the painting of a winter landscape truly impressive, it is recommended to use palette knives of different sizes, a canvas measuring approximately 30 by 40 centimeters on a stretcher, as well as oil paints and napkins with which you will wipe the palette knives while working on your creation.
Provide yourself with an apron that you don’t mind ruining with oil paints, and also be sure to cover the area where you will be working on the painting with transparent oilcloth or an unnecessary sheet. No matter how beautiful the picture turns out in the future, it will not be very pleasant for you to later wash your apartment and yourself of paint, which, by the way, can ruin the carpet on the floor or your favorite sweater.
What's first?
When prescribing winter, you should know that the canvas must first be painted in a neutral color, for example, with a liquid primer mixture using a wide brush. After an hour of drying the primer, you can begin to apply the sketch, while not forgetting about the composition of the future painting. Wait until the canvas is completely dry and sketch using soft pencil, for example, 2B or 3B. Snowy winter landscapes in oil paintings have always enchanted those who look at them.

Draw the sketch carefully, trying not to press too hard on the canvas. The pencil will be covered with oil paints, but such accuracy is necessary so that you get used to the composition and can immediately think about what you will paint and in what color. Having completed a rough sketch of the future painting, proceed to preparing the paints.
It's time to apply paint!
For a winter landscape in oil, you must first mix and knead on a palette with linseed oil to achieve a consistency that will help the painting be more effective. There is no need to mix the remaining paints with oil, because when working you will mix bright colors with white, and in them linseed oil is already present.

In any painting, the sky appears first. In winter, especially on cloudy days, it is quite pale, so after mixing the blue color with white, you need to paint over the entire space allocated to it using a palette knife. Closer to the horizon line for the realism of the picture you need to add blue color, closer to the border of the picture - grayish or white. You can add a few white strokes to create clouds.
And after the sky - snow!
After you have painted the sky in the picture, proceed to the remaining large spots - snow on the slopes, lake, winter forest. In order to achieve realistic effect, add blue and brown paint to the snow, carefully mixing it with white on the palette. Write your strokes horizontally, slightly tilting them where there are smooth ascents or descents on the terrain.

Carefully examine what you get - there should not be a single unpainted spot on the canvas! It is better to notice the gaps at this stage, because later it will be more difficult to remove them, as you move on to registering the small details that complete the winter landscape.
Don't forget the details
Since you have decided to paint a picture of winter snowy landscape oil, achieve maximum realism. That is why, if you have a lake or any other body of water at work, do not forget about the reflections in the water. They are usually a little distorted, the colors are not as bright as on real objects. Don’t forget about the islands of snow that lie on the frozen surface of a river or lake, register them using brown paint, well diluted with white.
Trees and bushes, painted with broad strokes, need detail in order to achieve the most realistic look. To do this, use a thin brush or the edge of a palette knife.
Last strokes
When you finish painting a winter landscape in oil, scatter snow over most of the objects you depicted. For example, on the roof of a house, the tops and branches of trees, a boat moored near the shore. Using whitewash and a bristle brush, create the effect of freshly fallen snow by mixing a little blue paint into the whitewash. The movements should be light and careful, since the painting is almost ready, and you, of course, would not want to spoil it with one wrong stroke.

Leave the finished painting in a dry, ventilated area, allowing it to dry and the smell oil paints- weathered. Only after your winter oil landscape has completely dried can you take care of the place where it will be placed. Frame the painting in beautiful frame, for example, white with gilding, with carved patterns and abrasions. You can leave the canvas without a frame - this way it will create the impression of an unfinished painting, but take care of the side edges of the canvas: paint over them with streaks of paint that seem to have accidentally spilled over the edges of the painting.