How to draw a tiger's face. Important details when decorating an animal. Painted pictures of a tiger
Let's draw a beautiful tiger, hollow in height, stretched vertically, grinning his mouth. Such a tiger Can be drawn with both pencil and brush.
1. Sketch
A pair of circles of the same shape will serve as a sketch, marking abdominal position And heads, as well as several lines - tail And front paw.
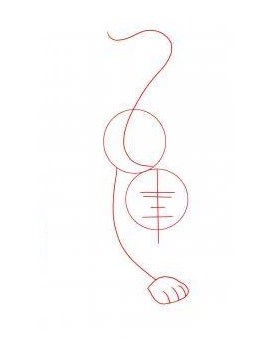
We will also mark the lines of facial features on the muzzle, which at the next stage will take on an acceptable, recognizable appearance.
2. Body shape and muzzle outline
The top two horizontal lines on the tiger's head are distance between eyes. The lower ones are the boundaries of the nose and the beginning of the mouth, from which concentric lines go upward - the cheeks.
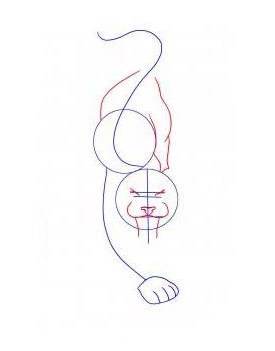
3. Specification of forms
Using simple lines and triangles we draw the tiger’s fangs, as well as the shaggy face along the edges of our circle outlining the tiger’s face.
More important point. Pay attention to the tiger's eyes. Draw them half closed, making the angle of inclination as shown in the figure. This will give the tiger fury and expressiveness to his gaze - the gaze of a predator.

4. Details
There are 4 leading claws and one lateral claw on a tiger's paw, similar to a human palm. Just five.
Let's draw the pits on the ears and mustache. The lower canines are very similar to the upper ones, but smaller in size.

5. Stripes
The tiger stripes are quite close to each other. It is worth following one rule when drawing stripes. You need to draw them in the wrong shape. Straight or simply rounded ones will make your tiger look like low-class work. Look at the picture below - the stripes are not even, in some places they narrow, in others they break off.
It's hard to underestimate important role, which the stripes play in recognizing this beautiful predator.

Here you go! The tiger is ready, all that remains is to paint it the appropriate color as desired. Good luck with your practice!
How to draw the face (head) of a tiger
Let's draw the face of a beautiful Amur or Ussuri tiger with a pencil, and then paint it with paints.
1. Sketch
Let's draw a tiger's head with a pencil. Let's start by marking the circle of the head. You can use a round mold for this job, but I prefer to do a lot of repeated circular motions, constantly adjusting the correct shape of the circle. In the end it turns out quite correct form circle without aids.
Having drawn a circle, divide it into two parts with a vertical line. The line is the same divide into two parts, placing a dot in the center of the circle.

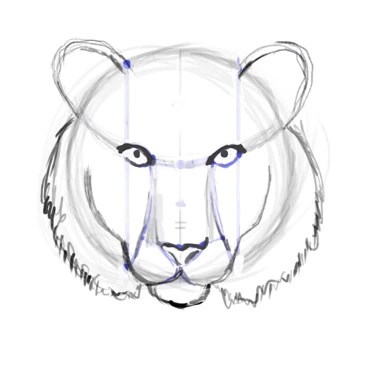
2. Marking parts of the face
We put two more vertical lines that divide the two halves of the tiger’s muzzle into two more parts. Thus it turns out that the tiger's head is divided into 4 equal parts vertically.
We will also draw an oval line, as shown in the figure.

Certain parts of the tiger's face have already begun to be recognized. Eyes, nose and mouth with cheeks.


Let's draw whiskers And ear frames. The eyes should be drawn slightly closed, and the pupils should be drawn closer to the upper eyelids. This placement creates the effect that the tiger is looking from under his brows, giving him a menacing, believable, impressive view.
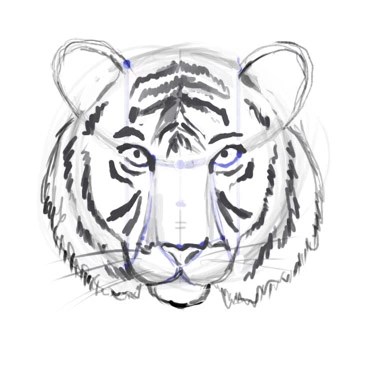
3. Draw tiger stripes on the head
Repeat the position of the stripes on your canvas and the work on the linear drawing of a tiger can be considered complete. Next we will paint.
If you leave it this way, you will get an excellent white tiger.
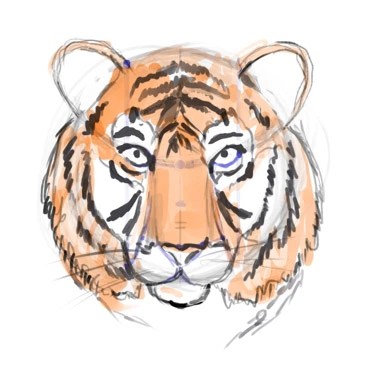
4. Painting
If you paint a tiger with paints, then you can very successfully paint it in orange .
Please note - the entire face of the tiger is painted red, except for the ears, places above the eyes, eyebrows, cheeks and near the mouth.
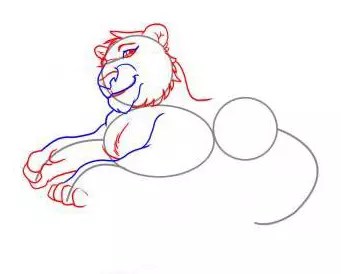
1. Sketch
Here we will figure out how to draw cartoon lying tiger. Just like in the previous drawing processes, let's start with the geometric contours of the main components of the tiger's body. Draw the head, chest, pelvis in circles, and use lines to mark the line of the eyes and mouth, tail and position of the paws.
2. Outline the face and paws
The bottom line on the sea will be the lines of the mouth, from which a furry chin goes down. Look at the picture below and try to repeat the same. Big nose is between two lines.

3. Small details on the face and paws
Celebrating small details on the head of a lion - ears near the head circle, chupchik And whiskers, which by their nature are similar to a herringbone pattern.
We outline the shape of the claws and paws of the future tiger. Claw pads raised up, which gives them realism and believability.
4. Tiger Body Shape
At this stage it is very important to successfully mark back shape and the line of the hind legs. This determines how beautiful the resulting predator will be. Try repeating the lines shown below.

5. Details on the body, tail, paws
Let's draw the hind legs, which are strongly tucked under themselves due to the fact that the tiger is in a lying position. Having also outlined the volume of the tail, this will be the final stage of drawing the body, you can proceed to the most important part - tiger stripes.

6. Stripes
The main rule when drawing stripes on cartoon tiger- this is their location not along the tiger, but perpendicular. This rule applies everywhere, both on the tail and on the paws. On the face of a predator, stripes are usually outlined around the structural parts of the muzzle, also very reminiscent perpendicular lines.

7. Done
If you paint a tiger well in a rusty red color, you can get a wonderful illustration.
I am sure that this guide is quite detailed, and if you try to go through all the stages carefully, the result will turn out no worse, and the feeling that you drew it will give you confidence and satisfaction from the creative process.

Tiger drawing video
Two parts of a video with the process of drawing a tiger with a pencil. High level, needless to say!
How to easily draw a tiger with a pencil step by step - for children and adults. Let's learn to draw a beautiful tiger step by step with a pencil together with your child. Find out how to quickly and easily learn to draw a beautiful tiger cub.
Every person in his life dreams of learning how to draw beautifully, especially children, they are interested in learning to draw not only trees, the sun, people, houses, flowers, but also various animals.
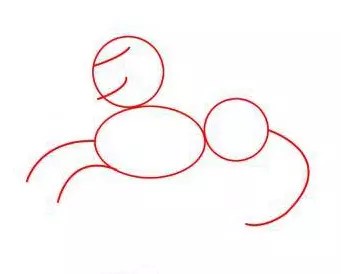
Today we’ll see how you can quickly and easily learn to draw a tiger. Take a sheet of paper and a pencil, look carefully at the picture where a tiger is drawn. Look at the location of the tiger, how and where its body, head, tail, paws are located.
In the center of the picture the body of a tiger is drawn, the head of a tiger is drawn on the left, the tail of a tiger is on the right, and the paws of a tiger are drawn below. Now, in the same way, mentally, divide your sheet of paper for different parts body of the tiger, first of all determine where the body of the tiger will be drawn.
Start drawing the tiger from the body, it consists of two identical circles, there should be a small distance between the circles, draw one circle higher, the second lower, connect these two circles with a line from below.
Now draw a little higher from the tiger’s body big circle– this will be the head of the tiger and connect the head of the tiger and the body with two lines.
Draw the tiger's muzzle, it should be round and slightly pointed towards the bottom, draw the tiger's eyes.
Now draw the two front legs of the tiger, they should be drawn in the form of curved lines.
Draw the tail of the tiger, it should be drawn from the right side to the top, long and curved.

Now you need to draw the tiger's face.
Draw the ears of the tiger, they should be drawn at the top in the form of small triangles, the edges of the ears should be slightly rounded, draw the eyes in the form of small ovals, with pointed corners at the ends.
Draw the eyebrows of the tiger, they should be drawn in the form of two small arcs. Draw the nose in the form of a small oval, extended to the left and right. Draw the mouth in the form of a small curved line.
Apply a small shading on the tiger's head on the right and on the chest - this will be the tiger's fur. In the picture, everything that needs to be drawn is drawn in red.

Now connect the tiger’s head and body with a smooth line - this will be the tiger’s back, around the bottom circle draw a curved line that ends in the center of the bottom circle - this will be the tiger’s back paw, because in the picture he is sitting. Draw the front paws of the tiger. In the picture, everything that needs to be drawn is highlighted in red.

Draw the tiger's front paws and fingers. Draw the tiger's hind paw and its toes; the second paw is not visible because the tiger is sitting sideways. Draw the tail of the tiger, it should be long and beautiful. Trace the outline of the tiger, erase the extra lines, color the tiger so that it is beautiful and striped.


Now let's draw another tiger, he is drawn standing and looking in the other direction

Look carefully at the picture, the tiger's body is located in the center of the picture, the head is drawn on the right and the tail is on the left, the tiger is standing, so all four paws are visible.
Take paper and pencil and start drawing the tiger from its body. First draw two identical circles - this will be the body of the tiger. Draw another circle a little higher, a little smaller - this will be the head of a tiger.
Draw the tiger's ears, they should be drawn in the form of two small triangles, the edges of the triangles should be slightly curved at the edges. Apply a small shading around the head - this will be tiger fur.

Now draw the tiger's face. First you need to draw the eyes, draw two small arcs, then draw the tiger’s nose in the form of a small oval. At the bottom draw a mouth, it should be drawn in the form of small curved lines. Everything that needs to be drawn in the picture is drawn in red.

Draw the tiger's eyes in the form of small ovals elongated and pointed at the corners, draw the lower part of the tiger's head. Everything that needs to be drawn in the picture is drawn in red.

Now you need to draw the two front paws of the tiger, draw toes on the paws. Connect the head and body of the tiger, draw the chest and put a small stroke on it. Everything that needs to be drawn in the picture is drawn in red.

Connect the head and body of the tiger curved line and connect the front part of the body and the back part from below. Draw the hind legs and toes on them. Everything that needs to be drawn in the picture is drawn in red.

Now draw the tiger's tail, it should be drawn on the left long, almost to the ground. The tail in the picture is drawn in red.

Trace the outline of the tiger, erase the extra lines that you no longer need, draw stripes on the tiger, color them.

Look what a beautiful tiger you have made.

Courses for the development of intelligence
We also have interesting courses, which will perfectly pump up your brain and improve intelligence, memory, thinking, concentration:
Development of memory and attention in a child 5-10 years old
The course includes 30 lessons with useful tips and exercises for children's development. In every lesson useful advice, several interesting exercises, an assignment for the lesson and an additional bonus at the end: an educational mini-game from our partner. Course duration: 30 days. The course is useful not only for children, but also for their parents.
Secrets of brain fitness, training memory, attention, thinking, counting
If you want to speed up your brain, improve its functioning, boost your memory, attention, concentration, develop more creativity, perform exciting exercises, train in game form and solve interesting problems, then sign up! 30 days of powerful brain fitness are guaranteed to you:)

Super memory in 30 days
As soon as you sign up for this course, you will begin a powerful 30-day training in the development of super-memory and brain pumping.
Within 30 days after subscribing you will receive interesting exercises and educational games to your email, which you can use in your life.
We will learn to remember everything that may be required in work or personal life: learn to remember texts, sequences of words, numbers, images, events that happened during the day, week, month and even road maps.

Money and the Millionaire Mindset
Why are there problems with money? In this course we will answer this question in detail, look deep into the problem, and consider our relationship with money from psychological, economic and emotional points of view. From the course you will learn what you need to do to solve all your financial problems, start saving money and invest it in the future.

Speed reading in 30 days
Would you like to quickly read books, articles, newsletters, etc. that interest you? If your answer is “yes,” then our course will help you develop speed reading and synchronize both hemispheres of the brain.
When synchronized, working together both hemispheres, the brain begins to work many times faster, which opens up much more possibilities. Attention, concentration, speed of perception intensifies many times over! Using the speed reading techniques from our course, you can kill two birds with one stone:
- Learn to read very quickly
- Improve attention and concentration, as when fast reading they are extremely important
- Read a book a day and finish your work faster
We speed up mental arithmetic, NOT mental arithmetic
Secret and popular techniques and life hacks, suitable even for a child. From the course you will not only learn dozens of techniques for simplified and quick multiplication, addition, multiplication, division, and calculating percentages, but you will also practice them in special tasks and educational games! Mental arithmetic also requires a lot of attention and concentration, which are actively trained when solving interesting tasks.

Conclusion
Learn to draw yourself, teach your children to draw, to draw two tigers step by step, it took you a little time, but now you know how to draw. We wish you good luck in your future works.
Already drawn +26 I want to draw +26 Thank you + 112
Learn to draw a tiger's head with a pencil step by step
- Step 1
Start by choosing your pencils. I used an HB pencil for sketching/shading, a B pencil for dark lines/shadows, and an H pencil for shading the fur with light lines.
- Step 2
Start with a basic sketch of the tiger's head. Use auxiliary lines construction, if necessary.

- Step 3
Your sketch should end up looking something like this.

- Step 4
First, mark the lines of the stripes, starting from the forehead.

- Step 5
Draw stripes on the rest of the muzzle.

- Step 6
Draw in the teeth and sideburns.

- Step 7
Use an HB pencil and a cloth or paper towel to shade the shadows of the black stripes of fur.

- Step 8
Use an eraser to erase highlights, including the mustache.

- Step 9
Start drawing out the eyes. Use a B pencil for dark streaks.

- Step 10
Paint in the stripes on the forehead.

- Step 11
To make a shadow on the fur, use H and HB pencils. Always stroke in the direction of hair growth.

- Step 12
Now let's move on to the central part of the muzzle. Let's work on the nose and wrinkles.

- Step 13
Use a B pencil for shading dark fur and HB for light fur.

- Step 14
Lightly outline the mustache. Start with an HB pencil.

- Step 15
Shade both cheeks. Continue using pencil B for the stripes. Use H to outline.

- Step 16
Shade top row teeth. Use the H pencil for the gums and teeth and the B and HB pencils for the dark parts.

- Step 17
Make a shadow in the rest of the mouth.

- Step 18
Finish the drawing by shading the rest of the fur and background. I hope you all enjoyed this tutorial.

Video: how to draw a realistic tiger head with a marker
In this video tutorial you will see how to draw a realistic tiger head with a marker. The lesson lasts 5 minutes and will be useful for beginners and experienced artists. Click Thank you if you liked the lesson!!
Draw a tiger's face with a pencil step by step
To draw portraits without looking at the model, you need to study it very well. And it doesn’t matter what kind of model it is, a person or a tiger. I study my models from photographs. In principle, drawing an abstract tiger, based on geometric constructions and some experience, is not at all difficult.
- Step 1
Draw a circle

- Step 2
Divide it in half and put a dot in the middle. This will be the middle of the bridge of the nose.

- Step 3
Draw a line on which the eyes and ears will lie.

- Step 4
Now we set the key points that will be based on when drawing the eyes, mouth and ears. Divide half of the arc approximately in half (or a little closer outside) and place a dot for the outer corner of the eye. We do the same on the other side. Now we divide the arc located between the outer corners of the eye into four equal parts. Perpendiculars to the circle date the points for the ears and lips.

- Step 5
Divide the bottom half of the vertical into three equal parts. From the inner corners of the eyes we draw segments to the lower key points on the circle. We draw an arc at a distance of 1/3 from the bottom. We divide this arc into four equal parts. Now we will get the outline of the nose

- Step 6
Now we draw the main contours of the muzzle: cheekbones, form lips, a triangle of the nose, a chin the width of this triangle. The ears, for now they turned out to be a little different heights, but then I will fix that.

- Step 7
We draw the tiger's sideburns and chest:
- Step 8
;Draw the eyes and nose. The upper contour of his nose resembles the flapping wings of a bird. The pupils of big cats round. The eyes are usually slightly closed and therefore the pupil is closer to the upper eyelid.

- Step 9
Now we draw the stripes. It's not that simple. The stripes are of course individual, but they have one pattern that is visible in all tigers. Now we will analyze it. - Location of stripes on the forehead

- Step 10
Location of stripes around the eyes

- Step 11
Arrangement of stripes on sideburns

- Step 12
Location of white spots and light areas:
- Step 13
;As a result, we get the following picture:

What You'll Be Creating
Big cats are my favorite subject to draw. They are elegant and powerful and have a simple but beautiful rhythm. Today, I would like to show you how to draw a tiger - from the "skeleton" and muscles to the fur, details and stripes. I will lead you step by step, so you can follow me at your own pace and not get lost.
This is a lesson for beginners, with only one result. If you want to learn more about drawing tigers, their anatomy and subspecies, or about big cats Overall, check out this tutorial:

Where to start drawing a tiger
We'll start with a sketch, a set of guide lines that will become the basis for the final lines. The sketch should be drawn so that it can be easily erased - with very light lines, an erasable tool, or on a separate sheet of paper.
Step 1
Draw a circle. It doesn't have to be perfect or a continuous line, so don't worry if it's uneven. This will be the widest part of the chest.
Step 2
Draw a curve from this circle connecting it to another, smaller circle. These will be the thighs.
Step 3
Connect the large circle with another smaller circle in front. This circle should have two "weapons". This area will become the paw and shoulder.
Step 4
Draw a line at the top of the "shoulder". This will be the spatula.
Step 5
We've got all the guide lines you need to build the torso! Add some curves to finish it off.
Step 6
It is very important to determine the distance to the ground before we start drawing the legs. It should be slightly longer than the height of the body.
Step 7
Draw one front leg and one back leg - quite symbolically and simply, just so you know where they are.
Step 8
To make the pose more interesting, let's add another shoulder...
And another pair of legs.
Step 9
Time for a head. Cats don't have very long necks, so draw a circle for the "head" just in front of the shoulders.
Step 10
Finally, draw the tail.
2. How to draw a tiger's body
Does your sketch already look like a tiger? Wonderful! If something is wrong, take a moment to fix it. It is very important to achieve the correct proportions; If they are wrong, even the smallest details will not make the whole tiger correct. So take a good look at your "skeleton" and fix everything that needs to be fixed.
Step 1
Sketch the shoulder blades carefully.
Step 2
Connect the shoulder to the paw.
Step 3
Add some muscle to your torso.
Step 4
Sketch the elbow.
Step 5
Add wrists and ankles.
Step 6
Draw the paws using a block method. Think of them as hooves on at the moment!
Step 7
Connect your wrists and paws.
Step 8
Connect your ankles to your hips in one large curve.
Step 9
Finish the outline of the thigh.
Step 10
Sketch the calves.
Step 11
Sketch out the ankles.
Step 12
Add some lines to make the limbs more precise.
Step 13
Draw circles along the tail to plan its width. It should gradually taper towards the tip.
Step 14
Outline the tail.
3. How to draw tiger paws
Step 1
Let's add toes to those “hooves”! Draw blocky middle toes to each foot. The frontal ones should be slightly tapered.
Step 2
Add a couple more fingers to the sides.
Step 3
Round the corners of each finger.
Step 4
Add " thumb» visible inside right leg and a bony landmark on the ankle.
Step 5
Add the tip of your thumb.
Step 6
Add a wrist.
4. How to draw a tiger head
Step 1
Divide the circle in half, horizontally and vertically.
Step 2
Make the face slightly triangular by “cutting” the sides of the circle.
Step 3
Draw a circle (snout) at the bottom of the circle.
Step 4
Divide it into two halves too.
Step 5
Draw the brow line directly above the middle horizontal line.
Step 6
Connect it to the bottom horizontal line, creating a nose.
Step 7
Create a forehead by connecting the muzzle to top part heads.
Step 8
Make some space for the ears.
Step 9
Draw the ears.
Step 10
Let's return to the muzzle. Divide the bottom half in half again.
Step 11
Use these guide lines to sketch out the nose and mouth.
Step 12
Draw oval eyes.
Step 13
Add details around the eyes.
Step 14
Emphasize the bones around the face. Make them round for a typical tiger look.
Step 15
Sketch the fur on the face.
Step 16
Draw a furry chin.
Step 17
Make some space for the mustache.
Step 18
Draw the corners of the mouth.
Step 19
Sketch out the cheeks.
Step 20
Add additional guide lines that we will need later.
5. How to finish a tiger drawing.
We're done with the guides, finally! You can now switch to the last tool, or just press harder for more visible lines.
Step 1
Darken the eyes and draw eyelashes.
Step 2
Draw the details around the eyes.
Step 3
Draw the nose.
Step 4
Draw the muzzle.
Step 5
Draw the ears.
Step 6
Draw the entire face shape.
Step 7
Sketch out the paws.
Step 8
Draw the front legs.
Step 9
Draw the hind legs and torso.
6. How to draw tiger stripes
Step 1
Before you draw the stripes, it's best to sketch them out lightly to see how they all look together. First, think over a sketch of the design on the head.
Step 2
If the sketch looks good, darken it.
Step 3
Do the same with the rest of your body. Try to emphasize the volume with curved lines.
Step 4
Finally, draw a dark outline of the tiger to complete the drawing.
Step 5
If you wish, you can add simple shadows to the tiger to make it more dimensional.
Beauty!
What a cute kitty! If you want to draw other animals using the same method, you will enjoy these tutorials:
And if you want to deepen your knowledge about drawing instead simple drawing step by step, you can also watch these courses.
Do you want to learn how to draw a tiger? No problem! In this master class we will demonstrate step by step how to draw this animal. Seat the kids closer! Let's get started!
Required materials:
- black marker;
- regular pencil;
- eraser;
- pencils in orange, brown and yellow tones.
Stages of drawing a tiger:
1. Outline the shape of the body with a pencil. Let's draw the head on the left side in the form of a small circle. A little to the right, draw a circle with a slightly larger diameter and connect it with an arc to the head. A semi-oval will be drawn on the right side. Let's connect it to a large circle with two arcs.

2. After this, you will need to draw another arc on the right side. In the future this will be the tail. We also perform the same manipulations to create a neck and a line to create general outline tiger

3. Draw lines for the location of the paws and the outline of the head.

4. Add ears and eyes to the animal’s head and draw paws. It should be noted that the hind legs will be longer than the front legs due to the fact that the tiger will be standing on an uneven surface. Extending the line of the tail.

5. Let's completely finish the work on the paws. Next, let's draw the base under the beast. It will be an uneven surface. We also draw the muzzle.

6. Let's make the tiger's tail a little thicker than the auxiliary line.

7. Let’s clarify all the details on the muzzle. Use an eraser to remove all unnecessary elements. We define the contour of all parts of the body. We outline with a pencil important lines. Now you need to draw striped fur on the tiger’s body; it will also be on the face, but in smaller quantities and much thinner.

8. Outline step-by-step drawing marker or felt-tip pen. Let's draw with a pencil the fur, the main features on the face and the rocky base under the paws of the animal.

9. We begin to apply the color with a yellow tint. This does not mean that we will have a tiger of this color, just that this color will be the basis for other shades.

10. Now we will make smooth transitions on the head, body and legs from yellow to orange.

11. Add shadows in dark places brown. We will do this smoothly, but you can also use rough strokes. We will also color the rocky surface with brown pencils.

12. The tiger drawing lesson has come to an end.


If you find an error, please highlight a piece of text and click Ctrl+Enter.