Setting up a brush for painting in Photoshop. Painting with a soft or hard brush in Photoshop
Adobe Photoshop provides very wide opportunities for working with photography and images. You can change the photo beyond recognition, correct flaws and shortcomings, or draw something new. You don't have to be an artist and create paintings. Drawing skills will be useful when processing photographs and collages.
In this article we will look at the main tools Adobe Drawing Photoshop and show you how to learn how to draw in Photoshop.
In the photo editor you can draw with brushes, pencils, draw straight lines or build geometric shapes.
Of the variety of drawing tools, the most useful are the following:
- Brush Tool. The size, density and shape of the brush can be changed.

Right-click on the tool icon "Brush" and select a brush or pencil to paint with.
Mixer Brush Tool/Mix Brush Tool. This brush allows you to mix colors and works almost like a real painting tool.
Custom Shape Tool/Tool « Free figure» . By right-clicking on it, a group of drawing tools will open geometric shapes and forms. At the same time, the library can be expanded and supplemented with your own forms.

- Rectangle Tool
- Rounded Rectangle Tool
- Ellipse Tool/Ellipse Tool
- Polygon Tool
- Line Tool
- Custom Shape Tool
- Eraser Tool removes parts of the image.
At the top of the Photoshop window is the settings menu for the selected tool.
Let's look at the tool parameters Brush Tool/"Brush".

The main brush parameters are shown in this screenshot. So, you can change the brush size, its hardness and shape (you can create your own brushes and download sets from the Internet), density and fill level.


Hard brush


Try experimenting with brush settings and painting on a white background with brushes different shapes, density and size, change colors and type of tool.
Let's now figure out how to draw a simple picture in Photoshop.
It is better to draw separately from the background, on transparent layers, placing each logical element of the picture on a separate layer.

Click on the color selection icon and set the active color. Let it be a shade of yellow. After this we select Paint Bucket Tool/Fill Tool and click on any fragment of the empty white layer. The paint will flood the entire canvas.
Let's create a new transparent layer using the command Layer → New → Layer. After this, a transparent layer will appear in the layers panel. The transparent layer works like tracing paper: we don’t see it, but we can see what’s drawn on it. You can turn off the visibility of the layer using the eye icon, or change the size and shape by moving the tracing paper along with the image.

Select a different color and click on the tool "Brush" and let's try to draw!

Just move your mouse with the left key pressed across the canvas.

Of course, it is better to use a graphics tablet for drawing. When working with it, the size and density of the brush will depend on the degree of pressure on the pen, and using the tablet you can more accurately control the brush.
Adobe Photoshop has a workspace designed for artists. It differs from the space for photographers in the arrangement of panels and tools. You can access it using the menu Window → Workspace → Painting.

Here the brushes are arranged in a list and there is quick access to the color palette.

- decreasing brush size: [
- increasing brush size: ]
- reducing brush hardness: {
- increasing brush hardness: }
- switch to previous brush: ,
- switch to the next brush: .
- switch to the first brush: <
- switch to the last brush: >
- swap colors: X
- default color setting (black/white): D
By changing brush types and their settings, you can control the appearance of the brush and adjust the size and density of strokes. And this will allow you to achieve realistic effects when drawing.
Brush Tip Shape
The good news is that the brush settings have remained virtually unchanged since the sixth version of the program. Two parameters in this window duplicate those discussed earlier, namely the ability to select the brush shape and its size. If you have previously changed the brush size, you can set the default size by clicking the Use Sample Size button. Let's consider the remaining parameters: Angle. Determines the angle of the brush. Naturally, this option can be used with all brushes except round ones. Roundness (Shape, Roundness). The brush can not only be rotated around its axis, but also compressed (this parameter is entered as a percentage and characterizes the ratio of the initial and final radii). An undoubted advantage is that the angle of inclination and the amount of compression can be set by eye, changing the appearance of the brush in a small window located on the right. You can change both the numbers in the input fields and by dragging
markers with the mouse, as shown in the figure
Hardness. This parameter adjusts the rigidity of the edges of the drawn line. Here you can get both extremely hard and clear edges, and soft ones that smoothly blend into the background. Spacing. The line you see when drawing with any tool that uses a brush is formed by repeated repetitions of prints (a single print is obtained by pressing the left mouse button once without moving it). The distance between prints is determined as a percentage relative to the brush size. To be able to change the amount of space between brush marks, you need to check the box next to the name of this parameter. Then a number field will become available in which you can enter a percentage value, and a ruler with a slider for setting the interval by eye. If you set the Spacing value to 100%, each print will follow the previous one without a space. Compare the first and second images in the figure below: in the first the interval is 1, in the second it is 100%. If you turn off the Spacing parameter, the line will turn out to be non-uniform - such as in the third option in the figure below. This effect is obtained because the prints are repeated at certain intervals. If you move the brush slowly, the line will be solid, as in the first image; if you move it quickly, it will be dashed. And since the speed of hand movement is not constant, especially on curves, the line turns out to be uneven. By adjusting the amount of space, you can create different effects. The maximum value of this parameter is 1000%.

Shape Dynamics (Brush Dynamics)
This dialog box shown in appears after clicking on the line of the same name in the Brush Presets palette.

By varying the parameters in this window, you can turn a regular brush into a dynamic one, that is, one that changes its properties over time. This allows you to get very unusual results.
Size Jitter (Size Variation). Here you set the maximum deviation of the brush size from the original in the range from 0 to 100%. The picture below shows an example of dynamic resizing.

Now let's look at the parameters in the Control window, located under the Size fluctuation slider. By default, it is "Off"
- Off - the brush does not undergo any changes;
- Fade (Fade, Transition) - the brush gradually changes its properties;
- Pen Pressure - this parameter, like all subsequent ones in this list, becomes available when working with a graphics tablet. If it is set, the brush reacts to the pressure of the pen;
- Pen Tilt - dependence on the tilt of the manipulator;
- Thumbwheel - scrolling dependency;
Minimum Diameter. Here you can set the minimum diameter of the brush mark, thereby limiting the lower threshold of size variations.
Angle fluctuation (Tilt Scale) degree of possible change in bevel relative to the vertical axis Shape fluctuation (Roundness Jitter, Roundness variations)- when this parameter is activated, the changes will also affect the compression force of the brush.
Minimum shape (Minimum Roundness, Minimum roundness) This parameter limits the minimum roundness value.
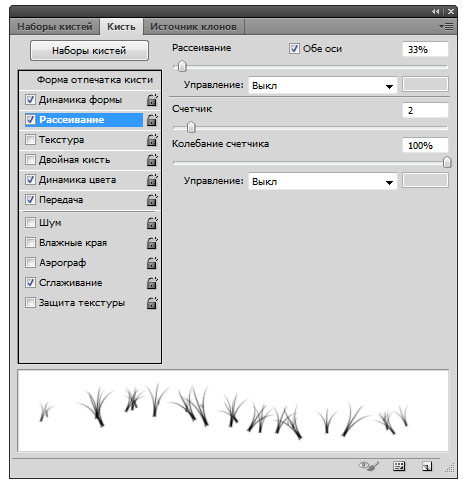
Scattering
Here you set the parameters for spraying brushes from the “spray gun”.

Both Axes. If this checkbox is checked, the prints are shifted along both axes, otherwise only along the vertical axis. Scattering (Scatter). Here the scattering amplitude is set, Counter(Count, Quantity). This value determines the number of scattered elements. The higher this value, the more elements are “sprayed” per mouse click. Counter fluctuations (Count Jitter, Quantity Variations). This is another dynamic setting that allows you to implement a time-varying number of scattered elements. As a result, their concentration will be uneven.
Texture

You can choose ready-made textures or upload your own. In addition, you can change the following settings. Scale (Scale, Scale). Here you set the scale of the applied texture, that is, the relationship between the sizes of brush marks and texture elements is established. Texture Each Tip. Checking this box allows you to configure additional parameters, which gives you greater freedom of action. Blending mode (Mode). Texture blend mode. Depth. This value determines how clearly the texture will be visible. To achieve a more visual result, you should increase this parameter, but if you want to get only slightly textured brush marks, then decrease it. Minimum Depth. A parameter that determines the worst visibility of the texture. This is necessary when activating the dynamic operating mode. Depth Jitter (Depth Variations). Here you can set the limits for changing the visibility of the structure in dynamic mode.
Dual Brush

This is a very interesting and sometimes irreplaceable parameter. I recommend paying special attention to it. The possibilities offered here allow you to mix two different brushes. The brush set in the main window of the Brush Presets palette is taken as a basis, and the second (overlay) is configured in this window. You can set the following brush blending options: Diameter. Diameter of applied brush, Spacing. If you want to make your brush marks sparser, use this option. Both Axes. This setting controls the direction in which prints are applied. Scattering (Scatter). For uneven prints, increase the scatter force. Counter(Quantity, Count). Number (concentration) of superimposed elements.
Color Dynamics
Foreground/Background Jitter. Limits for changing foreground and background colors. Color variations (Hue Jitter). Range of color changes. Saturation Jitter Variations. Sets print saturation limits. Brightness Jitter Variations. Range of changes in brightness values. Purity. The degree of possible color deviation from neutral.
Noise
When this checkbox is checked, monochrome noise is added to the brush mark, which is somewhat reminiscent of the effect of the filter of the same name, only it does not apply to the entire image, but only to the brush mark. In the picture below, the same brush was used, only the image on the left was obtained without introducing noise, and on the right - with the Noise checkbox turned on. 
Wet Edges
The next Brush Palette option we'll look at is Wet Edges. It received this name because the result of its application is somewhat reminiscent watercolor drawing, although the similarity is distant. Let's draw two lines with the same brush with the Wet Edges option turned off and on. In the first case, the line will be the same throughout its entire thickness, while in the second, in the middle, it will be more transparent and darkened at the edges. The differences are clearly visible when you zoom in:

Other Brush Palette Options
Other Dynamics. At this point you can set the dynamics for concepts such as Opacity (Transparency) and Flow (Flow). Airbrush. Previously, the airbrush was a separate tool, but now the developers decided to include it in the palette under consideration as a modification of the brush. It is a sprayer that sprays not individual brush marks, but paint according to the shape of the latter. The longer you hold down the mouse button, the stronger its effect will be and the larger the print (however, it will not exceed the set maximum brush size). Smoothness. This checkbox allows you to make the brush action softer and smoother. Protect Texture. If this checkbox is checked, the texture pattern used in the brush settings will not be changed.
In previous three lessons we talked about processing ready-made images. In this and the next four articles we will talk about the means of creating your own drawings from scratch - drawing tools, of which there are plenty in Photoshop.
Today I will talk about the group's tools. There are four of them in total.

- Brush. Simulates painting with a real brush. You can change its size, color, shape.
- Pencil. Perhaps the most understandable instrument of the group, because a pencil real life I'm sure everyone used it. If the contours of lines drawn with a brush are blurred, then pencil lines have clearly defined edges.
- Changing colors. Recolors already drawn objects. Thanks to it, you can easily change the color of an element already in the picture.
- Mix brush. A new tool that also imitates a brush, but with it you can mix colors on the canvas and on the brush itself, set the paint humidity, etc.
Now let's take a closer look. Create a new Photoshop document with a white background and experiment with the tools: drawing is useful, fun and won't hurt anyone. To display the tools, click the icon twice with the left mouse button or once with the right mouse button.
Brush
If you have ever painted with a brush (and you have, after all, painted), then you don’t need to explain the meaning of the tool. After activating it, you will be able to draw by dragging the pointer across the canvas while holding down the mouse button.
Take a look at the options bar: all the settings for the brush, like any other tool, are there.
Clicking the icon will access the brush settings. Here you can select a brush from the already ready set or create your own template. You can set the shape, size, rigidity and angle of the tool.

But you can fully enjoy the settings by executing the Window -> Brush command from the main Photoshop menu.

On the left side of the window there are checkbox tabs that allow you to configure, enable and disable certain brush properties.
- Brush imprint shape. The tab open by default contains the parameters we have already discussed.
- Dynamics of shape. Using the elements of this tab, you can configure how the properties of the brush will change directly during the drawing process.
- Drawing. The scattering slider allows you to change the density and width of the lines created. The counter sets the number of scattered elements - the higher the value, the “thicker” the brush draws. The oscillations of the counter allow the elements to be sprayed unevenly. If you check the Both axes checkbox, the paint will also be sprayed horizontally.

- Texture. Here you can select the design pattern and customize it. In particular, set the brightness, contrast and depth of colors.

- You can add another brush to the main brush, the settings of which are set on this tab.

- Color change settings over time: Color tone, saturation, brightness, purity.

- Allows you to set dynamic changes in saturation and transparency.

- The settings determine how the virtual hand holds the hand. In particular, you can set the appropriate tilt angle, rotation and pressure.

- Noise. This is a checkbox that will add noise to the brush mark.
- Adds color to the edges of the brush mark, creating a watercolor effect. The tool does not have a settings window.

- Overlay. Placing a checkbox creates the effect of spray paint splashing from a can. The longer you hold the mouse button down, the stronger the effect.
- Smoothing. By default, the checkbox is selected. Remove it if you want the outlines of the lines you draw to become clearer and sharper.
- Texture protection. Check this box if you want the texture specified in the default settings of the selected brush to not replace the one you set.
These settings should be enough literally “for all occasions.” Experiment to understand their practical application.
Pencil
By choosing this tool, you can create sharp, clear, thin lines, as if you were drawing with a regular pencil. The tool parameters are the same as the brush parameters, even the settings window will be the same (Window -> Brush).

In the options panel, in addition to the icon that opens the template set window, there are several more elements.
Color replacement
The tool allows you to recolor already created objects, and the abundance of settings makes it possible to do this with the highest quality possible, while preserving textures. You can change the values either in the options bar or in the window, which can be opened using the main menu command of the program Image -> Correction -> Replace color.

Mix brush
This tool differs from the already discussed regular brush in that it allows you to mix the color of the brush with the color already in the picture, achieving a more subtle processing of the image. The settings are almost identical to the parameters of a regular brush, and we have already talked about it.
This lesson is over, and I suggest you move on to the next one, from the next one you will learn how to very quickly create even geometric shapes.
Genre: Illustrations
In this lesson, I would like to explain to beginners (or people who “came” from other programs) the principles of working in Adobe Photoshop using the example of creating an ordinary portrait (͡° ͜ʖ ͡°) Long lesson.
1. Getting started

So. Here we have a Photoshop window. A person who sees this for the first time most often simply does not know where to start. I have highlighted the main tools that you will work with in this program. 1. What causes problems for most beginners in using this program. A person simply does not know how to mix colors when the brush goes with one solid bold color. To avoid hassle on this topic, click on the highlighted buttons. They are responsible for pressure and color intensity. You can also play with opacity for ease of drawing. (Windows appear only if the Brush tool is active) 3. Brush tool. 4. Eraser. 6. Reference to point number three. In the window that appears if you click on the arrow, you can change the brush size and the brush itself. In the adjacent right window you can change the brush settings. (Windows appear only if the Brush tool is active) 2. Everything here is simple and clear. Layers as they are. Create a layer and delete a layer. I’ll say right away that if you draw on the background, you will no longer be able to draw anything underneath it, since the background is filled with white by default, unlike the initial background in SAI, which, in principle, is transparent. 5. Rotate the sheet, magnifying glass and palette. 7. Pipette. Don't think about it, it's not for stealing colors from photos. It is called by the left alt key and thanks to it you can mix colors by applying layers of color on top of the base. Hm. It turns out to be a tautology.
2. Pressure and color intensity

An example of how the buttons numbered 1 in the first paragraph work.
3. Sketch

To start drawing, be sure to create a new layer. Choose a brush that is convenient for you. I drew a simple sketch portrait for display.
4. Base

Let's create a second layer under the first. We throw the primary colors on it.
5. Shades

On the same layer on top we draw highlights, shadows, add different colors to make the drawing look more voluminous and interesting.
6. Mixing colors

Here we return to using the eyedropper and brush. The principle is simple: press alt and apply. We press and apply. Many will tell you that nothing depends on the brush. So, in reality this is not at all the case. Depending on your brush choice, your subject will have different shapes and smoothness.
7. Shaping

If you are not yet tired of scrolling through pictures that are similar to each other, then we continue. Create a new layer above the sketch. We begin to smear, smear, smear the color on top until we achieve a result that is pleasing to the eye. The degree of elaboration depends on your laziness and time `v`
8. About blending modes and clipping masks

We have reached the stage where we want to edit our work. But how? Let's figure it out. In Photoshop there is such a thing as blending modes. The button responsible for blending modes is located directly above the layers and is set to “Normal” by default. To open a window, you need to left-click on it and select any mode with the same LMB click. In addition, there is such a thing in Photoshop as a clipping mask. It is called by right-clicking on the layer (To avoid accidentally turning part of the picture into a clipping mask, create a new layer and right-click on it). What does a clipping mask give us? In essence, this is an analogue of the “Attach Layer”, which SAI users are probably familiar with. A clipping mask limits the drawing area from the entire sheet to what was drawn on the previous layer. If you create a clipping mask over another clipping mask, they will act on the layer that the first mask is attached to. That is, if we draw as an example of our portrait, then the mask will only act on the last layer where we finalized the drawing. It's not going well. However, without using masks, we will paint over all the layers below. Oh! We covered the background!
9. Highlighting colors using blending modes

To highlight special places in a drawing, show light, or simply layer a gradient on top for a “pretty” look, we can use the same blending modes. In the drawing I marked the places where light can fall. Create a new layer with the value "Soft Light". Using the brush tool, apply White color to allocated places. Even though I used a five-minute sketch as an example, but even from it you can see that a certain sense of volume and atmosphere appears.
10. Gradient and blending modes

Create a new layer with the value "Soft Light". To use a gradient, you must select the button that is located under the "Eraser" and draw a straight line on the drawing. Eat different kinds gradients, but for now we will consider only the default view. If you did not select a gradient from the menu that automatically appears in the second top panel and opens by clicking on the arrow, then the gradient will correspond to the colors of your palette. If your first color is pink and the other is blue, then your gradient will be pink and blue. The gradient can only be of one, gradually dissolving, color. To change the structure and color of the gradient (for example, if you still selected a sample from the menu), open the same menu of gradient samples. The first two gradients correspond to the colors in your palette. The first is two-color, and the second is translucent. Draw a gradient line on the layer with the value “soft light”. It seems our drawing has become a little warmer =)
11. A little about curves

Hm. Let's draw a bunny. At some point you decided that it turned out too pale. Don't be afraid, this can be fixed. In my case, the "Correction" window is located above the "Layers" window. If you do not have this window, left-click on the "Window" item in the top panel and select "Correction". You can select any icon on the panel and experiment. For example, I'll take "Curves". Let's set a random value for our two points and our bunny will become much brighter! You can take more than two points on a curve, although in general you will only need these two.
12. Last steps

And now, when our image is almost ready, we can edit the color to give the drawing atmosphere, lightness, etc. and so on. Playing with brightness and contrast. Create a new layer with a value, say, “Soft Light” and mark the places you need with color `v` That's all! Our portrait is ready. P.S. Many thanks to Vornava for corrections, tips and pointing out typos =)
Understanding the basics of Photoshop, you can’t ignore Brush tool. This is very important tool, which is not as simple as you think. It has a large number of functions and all kinds of settings. Within this article you will be able to learn to use the brush tool. Go!
Brush Tool located on the toolbar.
If you click on the small triangle, you will see all the tools included in this group: “Pencil”, “Color Replacement”, “Mix Brush”. For quick use, click hotkey - B.
This tool also has an options panel, which we will look at in detail and learn how to use. This is what she looks like:
I assigned each element numeric value. Let's look at them all in order.
1 element - Brush sets.
On the left is the tool icon itself, which once again reminds us that the Brush is now active, and not any other Photoshop tool. Please note that there is a small black arrow next to the icon. Clicking on it will open a drop-down menu - 3 Tool setting data (ToolPresetPicker):

Let's refresh our memory and touch on all the settings presented. On the left are the names of the settings, and on the right are their parameters. Begin.
1. . We already know this function. She opens the brush library, where you can see their print and change their size.

2. .
— Here you can specify the size of the brush diameter. This function measures the number of pixels of the brush and subsequently prevents other settings from increasing this value. Nearby there is a button in the form of a rounded arrow - it restores the diameter value to its original position. Flip X
— — reflects the brush impression along a horizontal projection. Flip Y
— reflects the brush impression in a vertical projection.
Both of these parameters can be used. Superstructure Angle can change the angle of the brush. Shape or Circle (Roundness)
changes the shape of the brush within a circle. Next to these parameters is a circle with an arrow pointing up. When changing the values, this circle will be deformed, and at the bottom of the window you will see how the brush will look with the given settings. Hardness
— regulates the pressure, but does not work with all brushes (it works 100% with standard round ones). Spacing

3. — the distance between brush marks. The higher the value, the greater the distance and vice versa. Shape Dynamics.

Here you can adjust the fluctuations in size, angle, circumference and reflection. By setting the parameters to high, random settings will be used. Here you can change the fluctuations of those parameters that we have already seen in the previous menu.4. Scattering.
5. Sets the number and location of brush marks. Texture.

Here you can use the texture to the brush. An important parameter is Text each print (TextureEachTip) . If there is no checkmark next to it, then the texture will be applied to the entire area where the brush is applied. If the checkbox is in place, then apply to each brush impression separately. Parameter Scale
affects the scale of the overlay. Mode
works like . Only the quantity is much smaller. Depth
6. Dual Brush . You can customize a two-brush print.

7. Color Dynamics. Photoshop allows us to play with the shades of the selected colors. when drawing. To do this, set any foreground and background colors. Next, this function will independently select the desired shades.
Example of color dynamics (green and red are set as background and main colors):


The last group is symbolically separated by a horizontal line. They do not have their own parameters; you just need to check the box to apply the properties for the brush.
- Noise(Noise). Click if you want to add noise.
— Wet edges. The brush becomes like watercolor.
— Airbrush. We'll talk about this function separately, in the next element of the Brush tool options bar.
— Smoothing. Smoothes out the sharp edges of the brush, making them smoother.
— Protect texture. Sometimes a brush has a personal texture. To avoid changing the texture we preset from time to time, use this parameter.
4th element - Drawing modes
I will not dwell on this element within the framework of this article, because... A lot of work has already been done on lighting “what is it and how to use it”— . Let me remind you that Drawing Modes = Blending Modes and represent the mixing of colors using a series of mathematical formulas that work on each pixel.
5th element - Opacity
Using the slider, you can change the color intensity of the brush. You can learn more about opacity here - or here -. ![]()
The value of this parameter can be changed either with the mouse or with the keyboard using numbers: 0 is 100%, 1-10%, each next number will change the opacity value by 25%.

6th element - Pressure controls opacity
This button is useful for those who use graphics tablets. By clicking on it, Photoshop will automatically change the opacity of the brush depending on the force applied to the tablet.
7th element - Pressure
You can draw a parallel with the pencil you use to draw at home. The harder you press it, the brighter and harder it draws and vice versa. Photoshop works on the same principle.

8th element - Turn on Airbrush mode
Interesting feature. It is like a sprayer. By left-clicking, the brush will be continuously applied to your document. Imagine that you are holding a can of spray paint in your hand and spraying it on the walls at one point. Gradually this point will become richer and richer from the abundance of paint, and so it is here.
To best see this effect, set the Pressure parameter to minimum.
9th element - Pressure controls size
As with the 6th element, this button is needed for those who use a tablet. In this case, the pressure will affect the size of the brush.
If you notice an error in the text, select it and press Ctrl + Enter. Thank you!