What beautiful things can be drawn in an engraving. Creative activity: engraving for children. Review of ready-made kits and a guide to home creativity using this technique. How to make an engraving with your own hands without wax or paraffin
I continue to tell you, my dear readers, about various methods that help a child develop his Creative skills.
Today my review is dedicated to engraving for children.
Engraving is a great opportunity to not only have fun, but also usefully spend time creating beautiful picture.
My daughter's passion for engraving began about two years ago, when she was about 5 years old.
We began our acquaintance with engravings for children with SMALL engravings under the trade name LORI.
The drawings in this series are the simplest, since the image is made using a small number of lines.
There is not a lot of shading in a small engraving, it is not complicated, its size is only 95 * 145 mm.
To make an engraving, the set for children has everything necessary for this - a base with an outline of the drawing, a stiching pen and instructions for performing the work.
A shtikhel is a special pen-shaped device with a pointed metal tip.

Using a pencil, with short, gentle pressures, the outline of the design is scratched, creating beautiful shiny lines.

In the photo below I give you an example of a completed engraving. The outline is drawn gray.
When you draw a pencil along the contour, the top layer of paint is removed, revealing a shiny base.
This engraving is from the Silver series, so the drawing has a silver color.

Instructions written in clear language and is accompanied by visual diagrams of the process.


For children older in age(the manufacturer recommends ages 6 and older), and also for those who have already mastered the engraving technique, you can take engravings from the Postcard series.
This engraving is slightly larger, its size is 110*170 mm.

It is also “with a metallic effect”, only from the “gold” series.
As you can see, the complexity of the drawing is already higher - there are more strokes, when performing them it is important to maintain the correct direction.

The highlight of this engraving is that back side there are rulers on which you can write words of congratulations, and you will get a real, made with my own hands postcard!

The most difficult of the engravings that my daughter completed on her own was the following.

As you can see, the drawing is not very simple, made of thousands of small multi-directional strokes.
And the size of this engraving for children seems more respectable - 190*235 mm.

The most important thing for my daughter was to depict a tigress with a cub, but she was already bored with finishing the background, and she put the work aside.
Pay attention to the places I have circled on the engraving in the photo below. For children, working with a stichel is not an easy task - you need to constantly control the length and direction of the strokes and, most importantly, the force of your pressure.
If the pressure is too strong, the metal base may be scratched along with the layer of the applied outline of the design to the cardboard base.

During her passion for engraving, my daughter completed approximately 5-6 works. What I am showing you today are those who moved to another city with us.
The range of prints in stores today is very wide - there are drawings for almost every taste, taste, varying complexity and sizes, intended for children of different sizes. age categories.
I am glad that the price of engravings is not exorbitant, which means that this type of creativity is accessible to children.
I still have price tags for engravings from the Postcard and Small Engraving series:

I like that the manufacturer, on the back of the packaging, shows customers which engravings are still being produced in this series.
For example, for the youngest children you can purchase engravings of three series - Gold, Silver and Holography.

In addition to the above series (Silver, Gold and Holography), Postcard engravings are also available in pink, blue and red metallic.

The most complex engravings go to three options versions - Gold, Silver and Classic.

All these sets are produced by LLC "7-Ya" in the city of Yaroslavl, you can easily recognize them in stores by the trademark "LORI Engraving".

The manufacturer emphasizes that engraving is useful for children - it develops creative thinking, accuracy and perseverance. But for me, as a mother, it was the second!...
The most important thing that engraving classes helped us with, I think, is preparing the child’s hand for school, for writing!
Holding a pen correctly (a pen in this case), drawing straight, neat lines of the required length and direction, adjusting the intensity of pressure, shading - a lot of useful, necessary skills that my daughter mastered with pleasure and interest.
I am sure that it is partly thanks to timely engraving classes that today my daughter has one of the neatest handwritings in the class, and she writes the fastest!
Today in specialized stores you can find a lot of different sets for children's creativity: developing, educational, simply entertaining. Such toy products attract the attention of children, but it is much more interesting to create something similar with their parents, thereby learning all the secrets of the creative process.
And in fact, many children's creative sets are not anything complicated that cannot be reproduced independently at home. For example, engravings familiar to many can be made with your own hands in just half an hour. How? Let's find out.
For creating color engraving you will need:
- white cardboard (not glossy);
- wax crayons different colors(you can also use oil pastels);
- black gouache (you can take another dark color);
- liquid soap;
- brush;
- orange stick (or other thin and sharp object for engraving).
Step 1. Create a colored background
Most of the prints that are sold in stores are made with a single-color background (golden or silver), but children will find it more interesting to see the picture in different colors. To do this, paint one side of white matte cardboard in random order with multi-colored wax crayons— the richer and more contrasting the colors, the more impressive they will look when engraved. Note: instead of wax pencils you can use regular or felt-tip pens, but they will need to be additionally sketched on top paraffin candle, and only then proceed to the next stage. 
Step 2. Making an intermediate layer of engraving
To make a kind of “protective” invisible layer that will not allow the colored background to be erased during engraving, you will need liquid soap. It must be applied evenly to the background mosaic. Note: you should “rub” the soap into the pastel more carefully, because the color can “smear,” that is, be transferred to an area of paper of a different color. 
Step 3. Apply a finishing layer for scratching
After the soap has absorbed into the colored background of the cardboard, you need to paint it tightly with thick black gouache. Even if in some places the paint bleeds away from the wax, it is necessary to repeat painting until the background stops showing through. You can paint over the entire sheet or part of it. 
We are waiting for the gouache to dry and our engraving is ready. (although it would be more correct to say grattage, which is just one type of engraving). Now you can pick up a thin, pointed object (for example, an orange stick, a knitting needle, an empty pen refill, etc.) and start scratching a new masterpiece. 
To get acquainted with the “engraving” style and gain first experience, you can use a set for creativity, which is called “Engraving”. Such sets can be purchased both in stores with art departments and in online stores. Models for work are offered of varying complexity, there are simple small pictures, but there are also quite complex and delicate paintings. The recommended age of the engraving artist is indicated on the packaging. Moreover, such an activity can captivate both a schoolchild and an adult. The picture shown as an example shows ages from 3 years. But children in younger age You must work under adult supervision.
Step 2
The engraving blank looks like a thick sheet of metallized paper covered with a tinted layer, onto which the contours of the future design are applied. Metallized paper comes in a variety of colors: silver, gold, or rainbow (irridescent colors).
Step 3
The set also includes a tool for performing the work - a stencil. With this tool, notches are made on the top dark layer, through which the metallized layer is revealed. The shtikhel is similar to a pen, only it has a metal core. For safety, a cap is put on the tip when the stylus is not used. If the work is carried out by children, then it is imperative to supervise the handling of the quill to avoid injury.
Step 4
To complete the engraving, you must apply all the drawn strokes, removing the tinted layer in these places. The serger can make fine cuts or wider cuts, depending on which side you turn it on. This type of work requires perseverance and accuracy.
Svetlana Bolshakova
Recently, while going through my old notes from courses, I found two pieces of paper with a stamp, two old engravings.
This the engraving is made of cardboard

And here, in addition to cardboard, lace is used

We were shown techniques for working with printmaking and preparing clichés for prints engravings. Then I really liked this technique. It was getting close to March 8th and I decided to do something with the guys for moms engraving on a postcard. I made the cliches myself from cardboard, and the children just painted them with gouache and made an imprint on paper. The cardboard quickly became wet, peeled off and became unusable. Preparatory work seemed difficult to me and I'm more interested engraving I didn’t return to working with children. But, having found old leaves with engravings, I wanted to remember how it’s done.
Engraving on cardboard(from French. gravure) - cut out, create a relief - a type of printmaking. A relief print is made using appliqué, made up of individual cardboard elements. The thickness of the cardboard must be at least 2 mm. Engraving came from jewelry making. She is very multifaceted: linocut, metal engraving, engraving on cardboard, woodcut, lithograph. There are many ways to take impressions from natural objects: leaves, feathers, flowers. Scratching is an imitation engravings.
I want to show you how to do it engraving on cardboard. I took 2 identical cardboards 11x15 cm.

I cut out a frame from one and glued it to the second, although this is not necessary

I decided to make a vase with flowers, cut out the vase and individual elements for it

I cut out flowers, their centers, leaves and parts of leaves


I glued everything onto the base.

I decided to take burgundy gouache

But I didn't like it.

Painted it black

I pressed it hard when stroking it with my fingers on the left, again it didn’t work

I painted it again and made a print. Well, now you can stick it on paper and put it in a frame.

But after three times my cliche got wet and the elements began to separate

While searching for material on this topic on the Internet, I found recommendations for working with children using polystyrene and ceiling tiles. This is what we did yesterday with my corn lover guests (I talked about this in a previous publication) - engraving using polystyrene as a substrate for vegetables. I had one such “bowl” of mushrooms, I cut it up and first tried it on my granddaughters


My gouache is good, professional and there is no need to dilute it with water. And children's gouache needs to be diluted to the thickness of sour cream. The first print may not work, but the second will be better. This print will never get wet and children will be able to draw a picture on their own. ballpoint pen, paint over with gouache and make an impression


We spread the gouache in vain; the drawing is not very clearly visible.
Publications on the topic:
The most magical time of the year has come - spring! When all nature is transformed, they arrived migratory birds, flowers bloomed, appeared.
Master class "Drummers" senior preschool age. Dear colleagues, I have already introduced you to the project “ Musical instruments their own.
To make such a carnation you will need: corrugated paper of two colors (green and red), scissors, PVA glue, a tube. To get started.
This is an exciting opportunity to try yourself as a true watchmaker and decorator. And to breathe life into your new ones.
Today, I wanted to dedicate a master class for children to an interesting and one of the most ancient drawing techniques. It's about about an engraving that can become a discovery of a great world visual arts both for you and for your child.
The creative streak has always been present in people and aroused the desire to leave their mark on various surfaces, which was the beginning of the creation of interesting and unusual techniques drawing. After all, what could be simpler than scratching a design on a stone, clay tablet or wood? If you fill the grooves with paint, you will get bright drawing, which will last for quite a long time. This is how one of the ancient techniques drawing - engraving. She came from the jewelry business; all the tools and techniques are used by jewelers to this day. It is very multifaceted and includes many various techniques execution. These include linocuts, metal engravings, cardboard engravings, woodcuts and lithographs. The advent of engraving technology served as the impetus for the creation of printing presses.
Many great artists paid great attention to engraving and created amazing and beautiful masterpieces. One of the brightest masters was Albrecht Durer.
How to make an engraving
Creating an engraving with your own hands, no matter how strange it may seem, is quite simple. Children's drawings can easily be diversified by offering the child the engraving technique or its imitation - scratching, scratching a design plate covered with colored paint or wax.
These engraving classes at home will perfectly entertain kids and contribute to the development of a love for beauty. And they will be the first steps in art. Working with this technique helps the child develop fine motor skills, perseverance and accuracy.
Even small children can create paintings using this technique. For kids, the process can be simplified and they will need adult help. For this technique we will need:
- thin plates of polystyrene foam or expanded polystyrene;
- a stick for scratching the design, a stencil or a regular ballpoint pen.
- scissors;
— colored paper;
- paints;
- rubber roller for rolling the work.

A child can draw a picture on a plate of polystyrene foam with a ballpoint pen by pressing harder on it.

The result is a drawing, the contours of which are pressed into the material.

Let's cut out the city and put it on a tray so as not to stain everything around with paint.
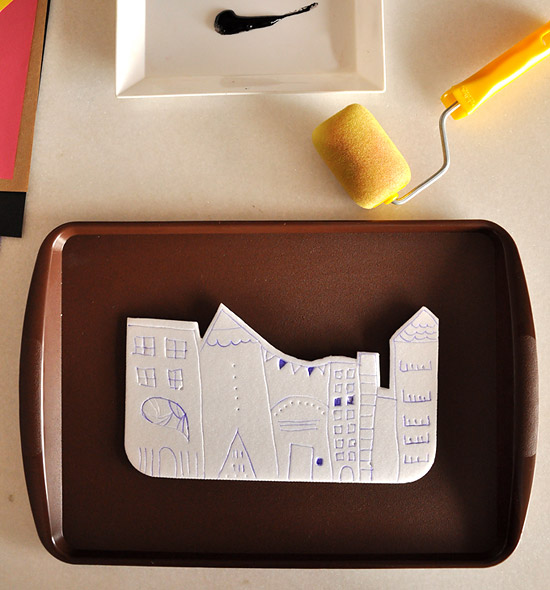
Using a roller, apply paint to the plate.

Place it on a sheet of colored paper and press firmly.

Carefully removing the plate from the paper, we will see the resulting engraving.