Drawing an autumn leaf. Drawing autumn leaves in watercolor step by step with photos
The leaves of wild grapes were the first to turn yellow and red this year. Very beautiful, they form hedges in bright red tones. I really like how you can find many shades on one leaf, from bright green to dark red. I decided to paint such a leaf of wild grapes in watercolor and at the same time record the stages.
You can copy from a photograph, or you can find it on the street beautiful leaf and draw from life. I drew an autumn leaf of a wild grape from life, you can see it in the photo below.

For the drawing you will need:
- watercolor sheet of paper;
- watercolor paints;
- brushes and pencil;
- masking fluid for watercolors (but you can do without it).
We make a light sketch with a pencil, you can even attach a leaf and mark the location of each sheet on paper, or start drawing with ovals.

The next step: mark the teeth along the edges of each leaf and outline its veins.


Now you can move on to coloring the autumn leaf watercolor paints. You will need for the base: light green and add a little muted pink paint between the greens. But before starting work, you need to go over each leaf with a wet brush (without paint). Sketch the leaves green you need to not reach the edges of the leaves, there will be a reddish-brown color.


Without waiting for it to dry, you can start working on the edges of the leaves. The very edge is pinkish-red and the transition between red and green should be yellow. If you look closely at the leaf itself, you can see what is there and yellow. And use the same combination: pink, red and yellow with green to color the petiole of the leaf.


If you paint with brighter colors, and not heavily diluted with water, you can finish the work, but if you want to work harder, we paint further. Now we work according to the principle - from light to dark. And little by little make the foliage brighter. But in order for the veins to remain visible, it is necessary to apply watercolor liquid along their contour (in the next article I will write a little about it). After finishing the work, it is easily removed and the light areas remain light.
We paint the sheet with the same combination of colors, only in a brighter, more saturated color.


On green part The leaf can be sprayed with brownish-red color or a combination of black and pink, because the leaf itself has already begun to turn red and specks of red can be seen through the green.


By the way, there is interesting way coloring using colored corrugated paper. You must first draw leaves on paper in exactly the same way with white wax crayon. After this, tear corrugated paper of autumn colors (red, yellow, orange, brown) into small pieces and, thoroughly wetting each piece in water, stick them onto the drawing. Make sure that there are no two pieces of paper of the same color next to each other. Let the paper dry a little (but not completely!), and then remove it from the drawing. You will get a wonderful multi-colored background. Leave the work to dry completely, then put it under the press.

Method 2.
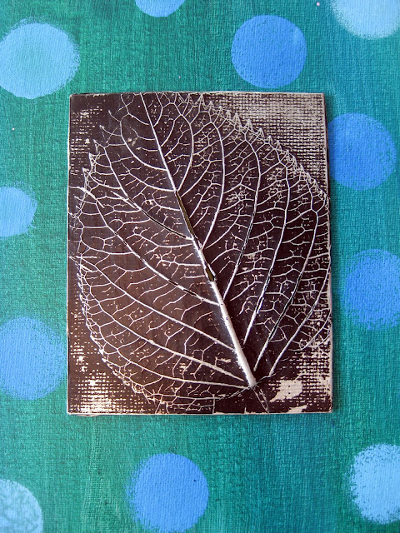
You can make an interesting autumn craft if you place the leaf under thin foil. The foil should be placed with the shiny side up. After this, you need to carefully smooth the foil with your fingertips so that the design appears. Next you need to cover it with a layer of black paint (this can be gouache, ink, tempera). Once the paint is dry, very gently scrub the painting with a steel wool pad. The protruding veins of the leaf will shine, and dark paint will remain in the recesses. Now you can paste the resulting relief onto a sheet of colored cardboard.
Autumn leaves. How to draw autumn
Method 3.
Very simple and at the same time spectacular technique- print leaves on paper, onto which paint is previously applied. You can use any paint, just apply it to the side of the leaves where the veins appear.

Link
Here are prints of rowan leaves. And any kid can draw rowan berries - they are made using a cotton swab with red paint.

Link
Beautiful autumn drawing It will work if you print leaves with white paint on a sheet of dark-colored cardboard. When the paint dries, you need to color the leaves with colored pencils. It will turn out beautiful if some leaves are left white.


The background can be left as is, or made colorful by painting with paints using a sponge. In this case, you need to leave a small unpainted space around the leaves.


If you decide to make the background colored, then the leaves themselves can be left white.

How to draw autumn leaves. Autumn crafts
Method 4.
To add volume to your drawings, you can use the following interesting technology. You will need thin wrapping paper or white crepe paper.


Method 6.
Another original autumn pattern, made in warm and cold colors. The leaves themselves are drawn in warm colors (yellow, red, orange), the background is drawn in cold colors (green, blue, purple). To do this job you will need a compass.

1. Draw some leaves different shapes on paper.
2. Now, using a compass, draw a circle of small radius in the lower left corner of the piece of paper. Next, adding about 1 cm at a time, draw circles of larger and larger radius, as far as the compass allows.
3. Now do the same in the upper right corner.
4. Finally, color autumn leaves felt-tip pens or pencils in warm colors (the colors should alternate sequentially), and the background in cold colors.
Maple Leaf. Maple leaf drawing
Method 7.
Help your child draw on a piece of paper Maple Leaf. Divide it into sectors with veins. Let the child paint each sector of the leaf with some special pattern.


You can combine two methods.


Autumn crafts for children
Method 8.
Another unusual autumn pattern.

1. Draw leaves of different shapes on paper. They should occupy the entire sheet of paper, but not touch each other. Some of the leaves should start from the borders of the sheet of paper. Draw only the outlines of the leaves, without veins.
2. Now using a simple pencil and rulers, draw two lines from left to right and two from top to bottom. The lines should cross the leaves, dividing them into sectors.
3. Choose two colors for the background and two colors for the leaves. Color them in the chosen colors as in the picture.
4. When the paint has dried, trace the outlines of the leaves and the drawn lines with a gold marker.
Drawings on the theme of autumn
Method 9.
To make this autumn crafts you will need regular newspaper and paints (including white paint).
1. Draw a maple leaf on a piece of newspaper.

2. Paint it and, after the paint has dried, cut it out.


3. Take another sheet of newspaper and use white paint to draw and color a large square on it.

4. Place your sheet over the paint and wait for it to dry completely.

5. This is what you should get in the end!
Autumn is truly a magical time. What colors does she give to the trees! It is impossible to take your eyes off this riot of flowers. And I really want to capture a piece of fading beauty for a long time! You can take pictures of landscapes. Or you can transfer this golden magic onto paper.
The best option is to resort to such a simple method as drawing autumn leaves with a pencil, paint, and hanging the picture on the wall. This way you will be able to maintain a warm mood in the house, even when bad weather is raging outside. Finding a master class on how to draw autumn leaves step by step and learning how to do it is not a difficult task. To do this you will need a little time, patience, inspiration and, of course, desire.
Leaf drawing diagram
In order to understand how to draw autumn leaves, you just need to disassemble the structure of the leaf down to the skeleton. That is, learn to draw lines - the basis of the future image.
To begin with, draw a straight vertical line - from this you need to draw two more, at approximately an angle of 45 degrees, directed upward. These lines will be shorter. There should be a pair of them. How much on each side depends on the size of the sheet.
They are then connected in a straight line or in arcs. All that remains is to finish drawing the leg and decorating it.
This is a simplified version of the leaf. To make it more like the real one, you need to add a couple more of the same to the segments that go obliquely. After this, we carry out the procedure as with the previous primitive drawing - we connect the edges of the lines to each other in pairs.
This short excursion on the topic of how to draw autumn leaves step by step. If you plan to continue coloring, then you do not need to press hard on the pencil so that it does not bleed through the paint later.
Drawing autumn leaves in color
For many, the answer to the question of how to draw autumn leaves with a pencil remains a mystery and a labor-intensive process. Few people can convey colors the way they appear in nature. The reason for this is ignorance, inability or a banal lack of courage to pick up a pencil and try to transfer the surrounding beauty onto a sheet of paper.
To draw a colored leaf, you need to select the following colors:
- red;
- yellow;
- orange;
- brown;
- pink;
- green;
- and universal color - black.
Painting the leaf yellow pencil, without pressing too hard; near our skeleton, a couple of centimeters wider, apply orange. A little more orange - red. We do the same manipulations with the edges of the leaf.
Then we partially fill in the unpainted middle (yellow remaining background) with green.

To figure out how to beautifully draw autumn leaves, you need to take into account several nuances. A simple pencil must be wiped as you paint so that it does not spoil general form. The edges of the colors should blend smoothly and be almost invisible. To do this, you need to start painting with the lightest shade, and then apply darker and darker on top.
The strokes should be directed in one direction so that the drawing does not look unnatural.
Unusual leaves
Who said that leaves are a classic of the genre? Drawing an autumn leaf can turn into a process of creating an object contemporary art. Simply put, we go beyond the classics and create the avant-garde.
We draw the backbone and rim of the leaf, but do not decorate it, as we are used to doing, but divide the leaf into sections and draw our own ornament in each. It is important that the pattern is not repeated in each section or that the zones are evenly repeated so that our composition looks organic.

The question of how to draw autumn leaves can be solved in an elementary way: with imagination and the ability to hold a pencil. Brilliant phrase: “I am an artist. That’s what I see!” - saved more than one abstractionist from the danger of being pelted with rotten tomatoes. So feel free to create!
Drawing autumn leaves
Autumn leaves are easy to draw. It is enough to apply to the resulting skeleton color scheme, which is inherent How to do this is described above. But there are several subtleties.
In order to learn how to draw autumn leaves, you need to remember Magic word- variety. There is no need to be afraid of “splashing paint from the glass.”
A warm palette should not limit the canvas. Cool tones will help make the image contrasting and bright. We apply them as a background. Then the picture will be colorful and varied.
Drawing leaves. A guide for the lazy
It also happens that your hands are not sharpened for the magical device - a pencil. Don't despair! Like leaves, your imagination will tell you.
Let's not be upset, but we are going for a walk in the fall to collect a herbarium. At home we lay out the leaves, choose the most beautiful and favorite ones and trace them along the outline. We decorate the resulting drawing with warm tones, as we please.

An equally interesting way is to create a composition of leaves, leaving empty outlines instead.
For this we need:
- several different leaves;
- set of paints;
- glass of water;
- Toothbrush.
Place two or three sheets of paper on white paper. Apply a little paint to a wet brush. Using a brush, spray paint onto the sheet. Then lay out the next layer and repeat this simple manipulation. When you get tired of it (the herbarium runs out or you just think it’s enough), simply remove the leaves and insert the resulting drawing into a frame.
A little trick: it’s better to lay out the leaves in the form of a bouquet to avoid chaos.
Leaf Seal
There is nothing easier and more fun than teaching a child how to draw autumn leaves. Or rather, we're talking about not really about the drawing. Leaf stamps are suitable for creative activities with the youngest artists.
We will need several different leaves and paints. Gouache ones are ideal for this. And White list, a board on which we will apply the drawing.
We decorate the background for the future painting light color or several. For the background it is better to use watercolor, as it flows well. When mixing several colors, this paint forms smooth transitions.

We wait until the background dries. And at this time we apply thick layer paint on one side of the sheet and apply it to the paper until the sheet dries. We repeat the same procedure several times, alternately painting the leaves in different colors.
To make the leaves stand out more, you can outline the outline with a black felt-tip pen. You can also apply the veins of the leaf or decorate it with an ornament.
Metal leaf
An original picture can be created by using dark paint, sheet and foil.
We apply foil to the sheet and carefully smooth it until the contour and veins are transferred to the foil. Then apply a thick layer of dark paint. Black and dark blue colors look especially beautiful in combination with silver foil.

After the paint has dried, use a metal scraper to carefully go over the drawing until the veins of paint are cleared. Carefully remove the sheet from under the foil and glue it to the cardboard to size.
Drawing leaves in watercolor
There is nothing easier than learning how to paint autumn leaves in watercolor.
We draw the same outline as for the drawing, it should be as light and transparent as possible. It’s good if, by the time you start working with watercolors, you have already become proficient and understand how to draw autumn leaves with a pencil.
Paint the leaf with yellow paint. Then we shade it with different colors - just like we did with the only difference is that you need to wait each time for the previous layer of paint to dry. Otherwise, there is a risk of getting an ugly blot without transitions.
Unusual ways to draw
There are many ways to draw an autumn leaf (a leaf with a pencil too). Therefore, for many it is not difficult to complete such a picture.
You can not be limited in drawing tools and use instead of the usual brush or pencil cotton buds. Fill the outline of the leaf with dots different colors. Apply a darker shade to the places where the pencil outline is located. The background can be left white or painted over with strokes and strokes. Not recommended bitmap in the background, since the leaves will merge with it (exception: if it is in cold shades, and the main pattern is warm, and vice versa).

An interesting composition is obtained when a wax candle is used instead of a simple pencil. Then, when the paint is applied, a white, unpainted space remains in place of the outline.
In order to learn how to draw, it is not necessary to have the talent of a great artist. Courage, imagination and the desire to create will allow you to create unique drawings quickly and always remain original.
How to draw autumn leaves for children step by step with photos
Sredina Olga Stanislavovna, teacher, Central Children's Educational Institution No. 1 "Bear Cub", Yuryuzan, Chelyabinsk region.
Target:
Creation of educational or creative (competitive, exhibition) work
Tasks:
Learn techniques for infusing color into color
Develop imagination and the ability to arrange objects of different sizes on a sheet of paper (in particular, leaves)
Improve practical brush skills
Cultivate artistic taste
The target audience:
preschoolers and junior schoolchildren
Materials:
Paper, dried leaves, glue stick, wax crayons, watercolor (24 or 36 colors)
brushes No. 1, 3 (pony, squirrel or kolinsky)
Preliminary work:
Introduction to watercolor techniques
There are several watercolor techniques. This is glazing (multi-layer painting, when each layer is applied to the previous one only after complete drying), a la prima (in Italian Allaprima) - painting in the raw. They reveal the possibilities of watercolor in different ways, just like Additional materials(salt, shaving foam, soap).

These are the beautiful stains that appear when color is poured into color.
Quote:
When the paint hits the wet surface of the paper, it spreads over it in a unique way, making picture of light, airy, transparent, breathable. By combining various color combinations with a variety of tonal solutions, you can achieve amazing play and transitions between the finest shades. The a la prima method, since it does not involve multiple recordings, allows you to maintain maximum freshness and richness of colorful sounds.
In addition, an additional advantage this technique There will be some time savings. As a rule, the work is written “in one go,” although, if necessary, you can additionally wet the paper during the creative process. This method is indispensable for quick sketches from life and sketches.
Introduction:
It is difficult for preschoolers to independently and realistically depict the casting of maple or oak. Therefore, we resort to the help of such technology as PHYTO PRINTING. Getting a real “photo” or even “ X-ray» leaves, we can reduce the time for drawing and focus on working in color.
Progress:
After creating a sufficiently large collection of dried leaves, you can leave some of it for creating applications, and use some for drawing.

To work, we will need to glue the dried leaves in advance in a certain order onto an A4 (landscape) sheet, or (optional) onto an A3 sheet. But the A3 format will be too big for preschoolers. Even if you use large leaves oak and maple. And you will need too many birch leaves to fill the space. Therefore, we will focus on the landscape format.
Children try to select and distribute leaves on their own various breeds trees in random order. The teacher gives the following instructions:
1 - Take leaves of different sizes, different tree species (you can take several small leaves)
2 - Use a small amount of material, do not clutter the space, leave “empty spaces”
3 - Some leaves overlap each other
4 – Do not place the leaves as in a herbarium, rotate them.
5 - Choose the format of the picture as desired (vertical or horizontal)
6 – Do not overload the middle of the sheet, but do not push against the edges.

Not all children succeed right away. interesting composition. The teacher can give hints, but not interfere with the exciting creative process.
This stage can be done with children in advance, or during the process of creating applications.
After the teacher sees and approves the placement of the leaves, they can be glued. To do this you need to use a glue stick. It is better to coat the paper rather than the sheet, lifting the sheet and roughly, “by eye,” marking the place where the glue will be applied. Dried leaves are fragile. Laying them on the intended places, we place them on top Blank sheet paper and lightly smooth it, pressing the sheets against each other.
Let's take it wax crayon Brown and begin to go through the entire sheet, lightly touching the paper. When the outlines of the leaves appear, you need to press the chalk a little harder so that the veins and edges of the leaves become more clearly visible.

We remove the bottom sheet with the dried leaves glued to it (we may need it more than once) and take out the watercolor.
It is best to work on two drawings at once. This is necessary so that the watercolor from the leaves does not flow onto the background and does not merge with it (despite the fact that the wax chalk holds back the paint, such drips are quite possible for preschoolers). We will draw leaves falling on the grass and leaves falling on the water. You can use the same composition, create two different ones, or simply change with your neighbors.
1
We draw a brush with some color along the outline of the leaf.
You can first moisten the leaves with water, and only then put paint on the brush, but it is difficult for preschoolers to follow the colorless line, so we start with color. Then you can fill the outline of the sheet with water and pour paint into the outline. You don’t have to do this, but just take it on the brush more water and less paint.

We begin to fill the leaves with autumn flowers in random order, warm colors: (cadmium lemon, cadmium yellow medium, yellow ocher, natural sienna, golden ocher).

We work quickly before the paint dries.


Using a thin brush, we draw several veins along the damp surface of the leaf. Brem for this is dark green.

We begin to color the second maple leaf without first drawing the entire contour line.

We continue to use the entire autumn palette, but in different proportions and combinations

Draw the veins in dark brown.

Each small leaf has its own palette: one is yellow-green, another is dark red, with a drop of yellow, the third is almost entirely written in ocher.


We finish the veins and leave the sheet to dry.

2 Take the second sheet and start working with small birch leaves

We draw veins with ocher
We write two maple leaves mainly in scarlet and red (kraplak, carmine),


Here are both drawings prepared. All that remains is to add the background.

Let's start with the grass. We use all ready-made green colors (yellow-green, emerald green), mixing them with other paints and different amounts of water, brightening, intensifying, chaotically pouring into each other, carefully avoiding the contours of the leaves.


Rotate the sheet the way you want.

Once again we clarify and draw the veins

Select the final format (vertical) and draw blades of grass with a thin brush.
We depict water on the second sheet by pouring various shades(blue, violet, blue, turquoise)


Adding small waves (ripples on the water)
Hi all!
Today we will talk about how to draw autumn leaves (and not only autumn ones). I will show you diagrams for drawing leaves.
So, how to draw a maple leaf?
I offer several options and several schemes.
To begin with, I would like to draw your attention to the fact that all large veins should go into the stalk.
Moreover, the midrib divides the leaf exactly in half.
Drawing a maple leaf (diagram No. 1)
To draw a maple leaf, start with an oval. Divide it in half with a vertical line, outlining two halves. Draw each half more clearly. Add cloves along the edges of the leaf and get a maple leaf.
Drawing a maple leaf (diagram No. 2)
Start by displaying the leaf shape. Please note that the maple leaf has five main veins that converge into one “knot”. Mark each vein. Connect them with lines to make the sheet even. Then draw the jagged edges.
Drawing a maple leaf (diagram No. 3)
Let's start with a square. Let's divide it in half, depicting the spine. From the middle of the sheet we draw three veins, as shown in the figure. And then around each vein there are teeth.

Drawing a maple leaf (diagram No. 4)
We start with the veins. We draw them as shown in the figure. We mark the deepest cuts in the sheet with dots. Then we draw the spine. And then – the most protruding parts. Smoothly connect them to the designated points and get a maple leaf.

How to draw an oak leaf?
Very simple. We start with a narrowed oval. In the middle of the oval we draw a vein that goes into the root. Then the edges of the sheet, which look like waves.
Drawing an oak leaf (diagram no. 2)
We start with the shape of the leaf and divide it in half, drawing the vein that goes into the root. We form the borders using a wavy arc. Give it a clear shape and edges.