How to draw Egyptian pyramids step by step. Sequence of drawing a pyramid
Let's learn how to draw a pyramid in different positions.
Draw in angular perspective. Build vertical and horizontal pyramids on each square of the cube's base.
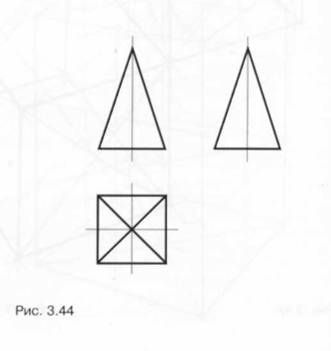
Consider the pyramid in Fig. 3.43 and it in Fig. 3.44. The base of a tetrahedral pyramid is , its side faces are identical triangles. The height of the pyramid in relation to the side of the square of the base determines its proportions (tall or squat).
You need to start building a standing pyramid with an image of a square base. Through the intersection point of its diagonals, draw a vertical line, on which set aside a segment equal to the height of the pyramid (Fig. 3.45). By connecting the top of the pyramid obtained in this way with the vertices of the base square, we obtain a promising tetrahedral pyramid (Fig. 3.46). The construction of a pyramid with a vertical square base is carried out in the same sequence.
Sections of the pyramid with planes parallel to the base are squares, the dimensions of which depend on the position of the cutting plane - closer to the top of the pyramid, the size of the sections is smaller than at the base (Fig. 3.47). A section perpendicular to the base of the pyramid, passing through its apex and midline square base, is a triangle. All other sections of the pyramid parallel to this one are trapezoids, the larger base of which is equal to the side of the square of the base, the smaller one varies depending on the position of the section plane (Fig. 3.48). When constructing such sections, remember that the sides of the trapezoids are parallel to the heights in the triangles of the side faces.


Now that you have thoroughly studied the sequence of constructing a pyramid and cutting it with planes different directions, proceed to the main task. Draw a cube (Fig. 3.49). Cross the diagonals of all six faces of the cube and draw straight lines connecting the centers of the opposite squares. Plot the heights of the pyramids on these straight lines (Fig. 3.50). All six pyramids are the same in height (1.5a, where a is the edge of the cube), but in the figure their heights have different sizes. To determine the heights of the pyramids different positions Various segments are used as a unit of measurement. So, for example, when determining the heights of vertical pyramids, such a unit of measurement is a segment of a vertical straight line, limited by the points of the centers of the horizontal faces of the cube. For the heights of horizontal pyramids, such units are straight segments passing through the center of the cube and having the same direction as the height being determined. Thus, in any drawing, the basis of which is geometric bodies, the cube acts as a three-dimensional ruler, with which you can determine or measure the lengths of segments lying in three mutually perpendicular directions. When determining the vertex points of the pyramids, also take into account the perspective contractions of the segments. Connect the vertices of all six pyramids with the vertices of the base squares (Fig. 3.57).
Hopscotch option No. 2 and 3 Options for playing “Hopscotch” on the street:
1. Draw a long line with chalk. Even the little ones can play.
Walk the line. Don't stumble.
Jump on one leg.
Measure the number of feet.
Jump either to the right or to the left of the line. You can do it on one or two legs.
2. Draw a long line and triangles adjacent to it. Jump as in option No. 1.
3. Classics option No. 3. Jump on two or one leg. Count jumps out loud. Don't step on the line.
| 0 | 0 | 0 |
The emergence of perspective as a science dates back to the Renaissance, which was associated with the flourishing realistic direction in fine arts.
Created transmission system visual perception spatial forms and space itself on a plane practically resolved the problem facing artists and architects. We still use the fruits of this science to this day.
The architect Philippa Brunelleschi was the first to find a method for optical-geometric constructions, cutting through Euclid's visual pyramid with a picture plane and thereby obtaining a perspective image of objects. Renaissance artists made enormous contributions to the field of perspective.
For example, Albrecht Durer applied the geometry of solid bodies and the theory linear perspective to construct a human figure in space, taking into account complex angles and movements. Leonardo da Vinci was a brilliant theorist in the field of perspective and participated in the development of the doctrine of proportions and perspective space.
Great educator, educator and teacher academic drawing P. Chistyakov wrote that the ability to draw and write, a subtle knowledge of perspective is necessary for any talent: “Everything that exists in nature and has any form is subject to the laws of perspective. Knowing how to apply the laws of perspective, you can draw everything motionless in nature correctly.” A.G. Venetsianov and many other Russian artists, architects and art historians paid serious attention to targeted searches in the field of patterns of vision of nature based on perspective.
Cartoon Bonjour bag. It looks like it was drawn on paper, but is actually a real canvas bag.
The cartoon Hola bag looks like it was drawn on paper, but is actually a real canvas bag.
Cartoon bags were invented by two female designers from Taiwan. In 2012, they exhibited at fashion weeks in London, Paris and Milan.
The bag has a zipper at the bottom, so its volume can be increased. It won't fit much, but the essentials will fit. An ideal solution for a tablet computer.
(http://multyashniesumki.ru/)
Let's draw - we'll live
An idiot's dream come true! Now do = draw. And all because of a magical fountain pen with a polymer that hardens in air. It is claimed that you can simply draw in the air.
| 0 | 0 | 0 |
Pastel drawing - Egyptian Mau cat
1) In this lesson I will tell you how to draw a cat of the Egyptian Mau breed. This is very beautiful cats with large eyes the color of currant green or yellow-amber. The Egyptian Mau has a wonderful and unique color. This is their distinctive feature. For this painting we will need a pastel sheet of dark blue A4 size. White, well sharpened pastel pencil Let's make a sketch.
2) Let's move on to drawing the eyes and nose. For the eyes, use green, yellow, dark orange, and black pastel pencils. Carefully shade the eye, make the pupil black, and finally add highlights with a white pastel pencil. For the nose, use white, pink, black, red pastel pencils. Around the eyes and nose, shade lightly with a white pencil and rub with your finger. When drawing such small parts your pencils must be well sharpened!
3) Shade the ear first with a pink pastel pencil, and over it with a white pastel pencil. Rub everything with your finger. Add black shades and rub. Now sharpen a white pastel pencil well and draw white hairs with quick and light movements.
4) Shade the cat's head with a white and gray pastel pencil. You can add a few touches somewhere blue color. After this, rub everything with your finger.
5) We begin to clarify the details. Using a white pencil, using small strokes, we imitate the growth of fur. Draw the stripes with small strokes of black.
| 0 | 0 | 0 |
how to overcome cellulite-3 simple ways get rid of cellulite without much effort
Move more. A sedentary, sedentary lifestyle is one of the main causes of cellulite. If you don’t have time for fitness, try to walk more - park your car away from the office, go to the toilet on the next floor at work, and use the elevator only in extreme cases.
Drink more. Drinking water is the easiest way to cleanse the body; drink at least two liters of it per day (not counting soups, coffee, juices). Green tea also helps remove toxins from the body, drink at least two cups per day.
Self-massage. Every evening, while taking a shower, give yourself a light massage. Professionals recommend doing it from the bottom up. Start with the shin of one leg, squeeze the skin with your palms to form a triangle, thumbs With both hands, massage the area between your palms, moving up to the problem areas. After a shower, be sure to apply anti-cellulite cream - the components of the product penetrate faster and deeper into the skin heated by massage. Rub the cream with your knuckles (folding your hand into a fist), carefully work through the problem areas. You can solve the problem of cellulite by normalizing your diet and thereby establishing proper metabolism. Your daily intake of food should not exceed the calorie content of your energy expenditure - otherwise excess deposits cannot be avoided. Counting calories is easy. Look at the calorie tables and remember the number of calories in the foods you eat most often. For clarity, draw yourself a pyramid proper nutrition, on top of which there will be a cake, and at the foot - greens, vegetables and grains. Remove all fatty foods, smoked meats and sausage from your diet. Try to replace harmful carbohydrates with healthy ones, for example, include porridge from a variety of cereals in your diet, give up regular bread, replacing it with wholemeal bread. All kinds of gels, creams, lotions and serums will help in the fight against cellulite. But remember - such remedies without proper nutrition and exercise have a weak and short-lived effect. But if you combine them with diet and physical activity, they can bring tangible benefits. The most common component of anti-cellulite products is caffeine, which promotes the breakdown of fat. This component may be listed in the product as coffee extract. As a home option, you can use scrubs based on ground coffee.
The second most popular ingredient is algae extract. Seaweed helps improve fat breakdown and restore skin elasticity
| 0 | 0 | 0 |
Please draw me the sea,
So that quiet waves flash,
To the smells of happiness and will
My chest was filled to the brim.
Draw the sand under my feet
Yellow-yellow, like a ray of sunshine.
And decorate the sky with clouds,
Just don't draw clouds, please.
Draw me a kite
So that the wind plays with him rebelliously.
So that I, having nothing,
She continued to be kind and gentle.
Will you draw me the sea and the sky?
And will you strew it with clouds?
Can you draw me an eternal summer?
And sand under your bare feet?
Draw, but don’t put a dot yet,
I didn't tell you the main thing,
Please draw me a daughter
And draw yourself at the pier.
| 0 | 0 | 0 |
How to draw a picture with paints
Choose watercolor paints. They are the easiest to start painting a picture with. They can convey all shades and add brightness when shined through. Choose what surface you will paint on - wet or dry. When drawing on a wet surface, the outlines of objects are blurred, which is useful in landscape compositions or when filling vegetables and fruits in the background.
Take drawing paper - it does not swell from excess water, and the places that need to be corrected can be easily washed off with foam rubber. Place the paper at an angle of 30-40 degrees to ensure the paint spreads evenly.
Make pencil sketches of the main objects. If this is a still life, then determine the location of the table or other surface and the fruit and vegetable composition. If this is a portrait, then take into account the proportions of the person, and if it is a landscape, then light sketches will be enough - main role colors will play. When painting with paints, especially watercolors, take into account the fact that you need to think through the shade of each stroke in advance. The error can be corrected only with the help of damp foam rubber. Then apply the necessary strokes on the already well-dried surface.
Paint the general background with foam rubber or a wide squirrel brush. When painting large areas, make sure there is enough paint on the brush. Apply the background from light to dark. Please note that the effect of white when drawing watercolor paints is achieved only through unpainted or well-washed areas with water. Be careful not to tear or roll the paper.
Determine the sunny side and shaded areas in the picture. Based on this, sketch all the objects. Mix paints on the palette - in a drawing, overlapping color layers can lead to a simple distortion of the color of dark shades. Apply each subsequent stroke next to the previous one with a slightly moistened brush for a smooth transition.
Paintings have the gift of attracting attention over and over again. The unique play of shades allows you to convey everything down to the smallest detail. But how exactly to draw a picture with paints? - drawing paper,
- pencil,
- eraser,
- paints.
| 0 | 0 | 0 |
How to draw a daffodil
Make pencil sketches in the middle of the sheet and arrange the individual details. In the upper part, draw a hexagon - the basis of the flower itself. To do this, draw two equal trapezoids having common ground, but with convex parts facing opposite sides. Draw the middle in the form of an oval and depict the stem and leaf with simple strokes.
Draw the details of the daffodil more accurately. From each vertex of the hexagon, draw straight lines converging towards the middle. These lines will be the vertical axes for the flower petals. Mark the midpoints of the lines. Now draw strokes from each vertex, expanding to the designated points. Next, add strokes to the middle of the flower in the form of straight parallel lines.
To draw a daffodil, draw the flower petals smooth lines– smooth out the main contours. Draw a slight curl of the petals wavy lines, located at their walls. Draw the middle of the daffodil. First, make the borders of the oval jagged with small steps. On the right side of the oval, draw a small dome, making the middle more voluminous.
Draw part of the narcissus stem in the form of a tubular arc connecting the flower itself and the straight thin stem with the wide side directed towards the petals. Draw the leaf of the plant as elongated and narrow with a pointed apex.
Sketch a flower with a simple pencil. Densely shade the middle of the daffodil with straight, thin lines diverging from the middle to the borders of the oval. On the petals, draw rays running along the vertical midline. Shade both the left side of the stem and top part narcissus leaf.

How to draw an anchor
How to draw an anchor
Draw a modern anchor design with two sharp edges at the bottom. Draw a vertical line in the middle of the sheet, slightly narrowed at the top and widened at the bottom. This will be the anchor spindle. Draw a circle around the upper border of the spindle, the so-called. eye - a place where a cable or rope is attached to raise or lower an anchor. At the top of the vertical, draw a horizontal line - the rod. Secure the lower part of the spindle with a large tick.
Draw the individual parts of the anchor in more detail. Draw the spindle in the form of two straight lines, each of which is drawn at the bottom different sides, forming the anchor, its main part. This way you will get two anchor horns. The junctions of the lines should be smooth. Make each horn three-dimensional by adding another line that follows the outline of the anchor. At the tips of the horns, draw lobes - wide plates with sharp outer peaks. Please note that the heel of the anchor must be quite sharp.
Draw the stem in detail. From the inclined straight line, at a short distance, draw another one with the same slope, but slightly convex, thus delimiting the side and lower parts of the rod. Connect both lines with several vertical strokes. Now draw another repeating outline inclined line and continue the vertical strokes at an angle slightly greater than 90 degrees. Draw a neck above the upper border of the stem - draw a small rectangle and divide it in half with a vertical line. Make the eye ring double.
Darken certain areas of the anchor: the lower part of the blade and the right horn. Shade the stem with short lines and the neck, its right side. Also darken the section of the spindle that runs along the right border of the vertical - the drawn anchor is ready.
An anchor is a special metal structure that is designed to secure a ship in one place. It has many various types, but the base is always the same - a heavy bottom, which is fixed to a straight metal vertical. A drawn anchor is most often used as a maritime symbol. - landscape sheet;
- pencil;
- eraser.
| 0 | 0 | 0 |
In ancient times, people were not particularly far-sighted and optimistic, and generally believed that people would at most live until 2012, and then they would burn in fiery hell. Therefore, they did not have the ability to explain things, or at least hint at their essence, in general, as well as the ability to do simple things. The Mayans made a post-apocalyptic calendar, which caused a lot of molehills and thoughts about life in the average person, and the ancient Egyptians built pyramids, the purpose of which worries even artists. And if so, we will learn how to draw pyramids with a pencil. The Pyramids of Cheops are one of the wonders of the world, a bunch of cobblestones that bring in a lot of income from the influx of tourists, as well as architectural masterpiece, built before our era. IN old times, during the reign of the sun god Ra, they were used for the burial of pharaohs, sacrifices, platonic contacts with the other world and other mass entertainment. The pyramid-shaped structure turned out to be a very reliable structure, so similar buildings were built in Mesopotamia, China, Mars and Las Vegas. If you believe accurate sources from Wikipedia, then the pyramids in Egypt are called Egyptian, in China Chinese, and so on. Well, you understand.
How did mere mortals manage to build a building 146 meters high from blocks weighing 15 tons? Nobody knows this. Perhaps this could not have happened without the help of alien friends.
One thing I know for sure is that drawing mystical structures is much easier than building them, especially if you do it according to these steps:
How to draw a pyramid with a pencil step by step
Step one. Draw several triangles, preferably even ones, and below there will be a sand background with camels. For now, let's denote them by circles.  Step two. Carefully select the shapes of the pyramids and outline the contours.
  Step three. Now let's add some Bedouins with camels.
  Step four. Let's add a few touches for believability. You can even color it with colored pencils. But I’ll leave this to you:
  Try to draw other mysterious places on our planet.
5 829
It is known that the ancient civilizations of Egypt and Greece left visual and versatile evidence of themselves and various aspects of their lives in stone, drawings, texts, architecture, and sculptures. The Egyptians tried to convey information about the knowledge they had achieved in various ways, placing it in temples, pyramids, tombs, and various underground storage facilities. In our time, much has not yet been deciphered and understood. Inside the Cheops pyramid, many rooms and various void channels remain unclear. One of these rooms is a room where there is a open book about the history and achievements of the country during the period of completion of the pyramid.
IN famous drawings and bas-relief images on stone slabs there are numerous technical devices of unknown purpose. Among them there are designs that resemble batteries and other sources of static electricity. About them in the media mass media try not to mention it. But in vain. Knowledge about them could be useful for our civilization.
The study of drawings and images of a technical nature on stone slabs naturally led to the study of the external stepped walls of the Cheops pyramid. This was also prompted by the fact that several years ago, inside the pyramid, interesting find. In the passage leading to the Queen's Chamber, high above on the right there is an image male portrait about 10 cm in size. This image is similar to a photograph on a stone. So far no one knows how it was made at this place.
On the outer walls of the pyramid, numerous curvilinear grooves of large and small sizes were first noticed. Studying them at a certain lighting angle made it possible to clearly see an image (portrait) of a middle-aged man on the southern side. The height of the portrait on the inclined wall is about 150 meters. In his portrait one can see stones of different colors (lighter and darker). Surrounded by the portrait one can also see other images (the trident of the Atlanteans and Scythians, an airplane bird, plans of stone buildings, pyramid rooms), texts, individual letters, large signs resembling a flower bud, etc. It is believed that the portrait depicts God Thoth (a real god-man), who lived at that time and assisted Khafre, the main builder Great Pyramid(see Fig. 1).

Subsequent studies on the northern side of the pyramid revealed a portrait of a man and a woman with their heads bowed towards each other (Fig. 2). Presumably the portrait depicts the son of Pharaoh Khafre and his wife, who made a significant contribution to the construction of the pyramid (he may have been the main builder of the pyramid). On the same side, other smaller portraits of people, signs-symbols, texts, and drawings are visible. The portrait images probably represent deities and outstanding people that time. This is a portrait gallery of the people of Egypt.

A century later, a portrait of one of the Egyptian generals was applied to the image of the son of Khafre in such a way that all images are viewed without distortion, both early and late periods application (Fig. 3). There are also multiple images on the eastern and western sides of the pyramid, which remain to be explored and clarified. These unique portraits and other  The paintings on the vast area of the pyramid's walls were painted within just a few years of the main pyramid's completion and installation in 2630 BC. top stone, now kept in the Cairo Museum (Fig. 4). This stone has highly artistic exterior painting. Its translucence shows that a special object carrying information has been inserted inside it through a walled-up hole at the bottom. Over the ensuing decades and centuries, new images and information continued to be added. The huge number of applied images, as well as their jewelry execution, is surprising. In terms of application technique, they are significantly superior to the drawings of the Nazca desert, the USA, England...
On the eastern side of the pyramid, from its top to its base, a strip about 7 meters wide is clearly visible from some kind of physical impact on the stone blocks. This is evidence that it was here that there was a transport device that could be extended in length for conveying stone blocks upward. This device worked (using electricity) using the solenoid principle. For transportation, stone blocks were attached to iron pallets and moved upward. And from above they went down in the middle part of the western wall. Traces from this descent of pallets are also present on west side pyramids.
The electric transport device received static (amber) electricity from the internal three triple rooms located in the pyramid itself, as well as from several generating plants located at the foot of the pyramid.
There is reason to believe the legend that after construction was completed, this transporter was hidden in an underground storage facility near the pyramid at a depth of several tens of meters.
The technology for applying portraits and other images on an inclined stepped surface so that they can be viewed from the foot of the pyramid without distortion remains a mystery.
It is possible that when decorating portraits, individual stones could have been subjected to physical and chemical effects to give them a lighter or dark shades, with the absorption or emission of light.
Are not the discovered images on the walls of the Cheops pyramid the secret concentration of knowledge and information about the ancient Egyptian civilization that Herodotus and others wrote about?
The saying “face to face, you can’t make out the face” is truly true when millions of people visit the Great Pyramid and do not notice the real information on its outer walls. Will they notice now?

One of the greatest wonders of the world, the pyramids of Egypt, have survived to this day. Moreover, every year many tourists go to Giza just to see the pyramids and the Sphinx, which seems to be guarding the buildings, frozen motionless among the ruins of the ancient temple.
To interest your child, you can tell him the following:
- Until now, no one knows how and why the pyramids were built. Scientists have found that this wonder of the world was built much earlier than the kingdom of Egypt appeared.
- Despite the fact that in ancient times there was no modern technology, the pyramids were built with mathematical precision.
- For three thousand years, the pyramid of Pharaoh Cheops was the tallest building in the world.
Drawing pyramids is very simple. Follow our instructions and you will succeed.
You will need: a sheet of paper;
pencil; eraser; ruler;
Step 1
Place for pyramids 
First, draw a rectangle in which we will place the pyramids. To make the process easier, you can use a ruler.
Next, divide the rectangle into three parts. You should end up with two rectangles on the left and right, and a square in the center, slightly larger than the rectangles.
Step 2 
First pyramid
At this stage we begin to draw the pyramids. First, we draw a pyramid in the first rectangle. It is also called the Pyramid of Khafre. It is the second largest and is in front of the rest. Notice that part of the triangle extends beyond the rectangle.
It was the turn of the Great Pyramid or the Cheops Pyramid. It starts in the first rectangle and extends beyond the edges of the second. The top of the triangle touches the top side of the square. 
Step 4
Third pyramid
The last pyramid of Pharaoh Mikerin is the smallest. We draw it only in a rectangle, without going beyond the edges. Part of this structure is hidden behind the Great Pyramid. 
Step 5
Removing extra lines
Now you need to erase all unnecessary lines. Only the pyramids remain. Only the first one is fully drawn, since the rest are hidden behind each other. 
Step 6
Drawing bricks
From the tops of the pyramids we draw straight lines down, indicating the corners.  We draw horizontal lines throughout the first pyramid.
  These lines are separated at small intervals by vertical lines, indicating bricks.
  Draw horizontal lines on the remaining pyramids.
  Similarly, we divide the lines to make bricks.